Thursday, May 14, 2026

Retrieving Groups from NSX-T

This might seem like a bit of a theme developing, but in my work life I'm assisting in the migration from a "standalone" vSphere environment to a VCF 9 environment, and having some of this information from the old environment is helpful for building and auditing the new environment.

So this script will dump groups from NSX-T into a CSV-formatted text. It was a fun one to code because of the way groups are handled: some sort of boolean logic—up to and including selection of objects by individual ID—is possible, and when you're mixing & matching [AND] and [OR] clauses, you are starting to nest evaluation scope, similar to the way parenthesis work in math (remember PEMDAS?).

At any rate, this code uses 'recursion,' where a function calls itself with new arguments rather than creating deeper and deeper loops. When the language permits it—and PowerShell does—it becomes a powerful tool for writing efficient and highly readable (in my experience) code. It can also create pitfalls for a coder who doesn't build in the "escape hatch" that keeps the recursion from happening infinitely, but that's an entirely different discussion.

So with the help of recursion, this script will dive into the criteria used to define group membership and assemble it all together in a single field. This is output along with the group name and any description that is available from the source environment

Get-NsxGroups.ps1

FUNCTION Decode-Expression() { # decode an individual Expression # these can come in several types, so handle each using the switch control param ( [System.Object]$expr ) switch ($expr.resource_type){ 'Condition' { $str += '(' + $expr.member_type + ' [' + $expr.key + '] ' + $expr.operator + ' "' + $expr.value.replace('|','') + '")' } 'ConjunctionOperator' { $str += ' ' + $expr.conjunction_operator + ' ' } 'NestedExpression' { # nested expressions are not individual expressions, so recurse through the nested criteria $str += Decode-Expressions($expr.expressions) } 'MACAddressExpression' { $addr_string = '' foreach ($addr in $expr.mac_addresses){ $addr_string += "$addr," } $addr_string = $addr_string.SubString(0,$addr_string.Length-1) $str += '[MAC in (' + $addr_string + ')]' } 'IPAddressExpression' { $addr_string = '' foreach ($addr in $expr.ip_addresses){ $addr_string += "$addr," } $addr_string = $addr_string.SubString(0,$addr_string.Length-1) $str += '[IP in (' + $addr_string + ')]' } 'ExternalIDExpression' { $str += ($expr.external_ids.Length.ToString() + ' explicit VMs') } default { $str += '<<unhandled>>' } } return $str } FUNCTION Decode-Expressions(){ # One or more expressions--including multi-level nesting--can be used to define # what makes a group member. # This function handles iterating and recursing through all criteria that could be in # any given expression param ( [System.Object]$expr ) $str = '' if (($expr -is [Array]) -and ($expr.Length -gt 1)){ #passed object is an array of objects for ($i = 0; $i -lt $expr.Length; $i++) { $str += Decode-Expressions($expr[$i]) } } else { if ($expr.Length) { $str += Decode-Expression($expr) } else { $str += 'No criteria set' } } return $str } $dfltNSXMGR = "default NSX manager" $nsxtManager = Read-Host ("Enter NSX-T IP or FQDN [$dfltNSXMGR]" -f $dfltNSXMGR) if (-not $nsxtManager) { $nsxtManager = "https://$dfltNSXMGR" } else { $nsxtManager = "https://$nsxtManager" } $output = Read-Host "Enter output filepath" $username = Read-Host "Enter username" $secPwd = Read-Host "Enter password" -AsSecureString $password = [System.Runtime.InteropServices.Marshal]::PtrToStringAuto([System.Runtime.InteropServices.Marshal]::SecureStringToBSTR($secPwd)) $response = Invoke-RestMethod -Uri "$nsxtManager/api/v1/infra/domains/default/groups" -Method Get -Headers @{ "Authorization" = "Basic $( [Convert]::ToBase64String([Text.Encoding]::ASCII.GetBytes(("${username}:${password}"))) )" "Content-Type" = "application/json" } -Body '{}' -SkipCertificateCheck $grp_list = @() foreach ($grp in $response.results) { if ($grp._system_owned -ne 'false') { #ignore system-owned groups; these should be auto-created anyway $grp_name = $grp.display_name $grp_descr = $grp.description $rules = Decode-Expressions($grp.expression) $row = New-Object PSObject -Property @{ Grp = $grp.display_name Descr = $grp.description Crit = $rules } $grp_list += $row } } $grp_list | Select-Object 'Grp','Descr','Crit' | Export-CSV -Path $output -NoTypeInformation

Note: I made the decision to ignore any explicit VMs that were in these groups. It was a business decision driven by several factors:

  • There weren't many groups using this feature
  • Most groups using the feature had references to VMs that no longer existed

Wednesday, May 13, 2026

Retrieving tags from NSX-T

In the process of preparing a new NSX-T environment, a request came for a dump of the tags in the production environment so that we could match those in the new one. PowerShell & RESTful API to the rescue!

Note: after working with VMware solutions since 2005 and for the company itself for just over 6 years, I have it ingrained to call it "VMware". Aside from this paragraph, you'll probably never see me write "VMware by Broadcom" or even something as gross as "Broadcom vSphere." Just understand that "by Broadcom" is implied until such time as the tech stack finds new ownership.

At any rate: PowerCLI, the module set for PowerShell that VMware publishes for automating parts/pieces of their software stack, is extremely light in cmdlets for interacting with NSX-T. But NSX-T has a very rich RESTful API, so that's what I'm taking advantage of.

I found several solutions that other folks had written, and for one reason or another, it just wasn't working to create output the way we needed it. So here are a couple of iterations that I wrote. The first dumps a CSV-formatted file that lists the tags and the entities that are associated with them; the second dumps a CSV-formatted file that list the VMs and the tags (if any) that are applied to them.

Get-NsxTags.ps1

function Read-Param { <# generic function to grab input from the user, providing for defaults if there's no entry provided #> param( $prompt, $default ) $value = Read-Host ("$prompt [$default]" -f $default) if (-not $value) { return $default } else { return $value } } function Get-Data { <# Perform a RESTful API call against the NSX-T manager #> param( $nsx, $usr, $secPwd, $apiPath ) $password = [System.Runtime.InteropServices.Marshal]::PtrToStringAuto([System.Runtime.InteropServices.Marshal]::SecureStringToBSTR($secPwd)) $credPair = "$($usr):$($password)" $encCreds = [Convert]::ToBase64String([Text.Encoding]::ASCII.GetBytes($credPair)) $params = @{ Uri = "$nsx$apiPath" Method = 'GET' Headers = @{ "Authorization" = "Basic $encCreds" "Content-Type" = "application/json" } Body = '{}' SkipCertificateCheck = $true } $results = Invoke-RestMethod @params return $results.results } # All NSX-T API paths "hang" off the base path $ApiBase = "/policy/api/v1" # DFW-related stuff is off the Policies path, below. Note: the "default" domain seems to be the only one we have; technically it's a variable... $ApiTags = "$ApiBase/infra/tags" <# INPUT SECTION #> # The actual URI must have the "https://" prefix $nsxtManager = "https://" + (Read-Param "Enter NSX-T IP or FQDN" "Default VIP") $output = Read-Param "Enter output filepath" "c:\temp\get-nsxtags.csv" $username = Read-Param "Enter username" "defaultusername" $secPwd = Read-Host "Enter password" -AsSecureString <# ALGORITHM NSX provides an API to list the tags, and then individual entries provide the tag name and the scope required to retrieve the effective resources associated with them #> $itemlist=@() #storage for the output list #get all the tags $tags = Get-Data -nsx $nsxtManager -usr $username -secPwd $secPwd -apiPath $ApiTags write-host '.' -NoNewline #loop through the tags and grab the associated resources, appending the resource names to a single string field for later output for($t =0; $t -lt $tags.Length; $t++) { $items = '' if($tags[$t].tagged_objects_count -gt 0) { #if there are no objects associated with the tag, don't try and retrieve them $ApiItems = $ApiTags + '/effective-resources?scope=' + $tags[$t].scope + '&tag=' + $tags[$t].tag write-host '.' -NoNewline #this will take a while; show progress happening... $itemSet = Get-Data -nsx $nsxtManager -usr $username -secPwd $secPwd -apiPath $ApiItems foreach ($item in $itemSet) { switch ($item.target_type) { 'VirtualMachine' { $items += $item.target_display_name + ' [vm],' } 'HostTransportNode' { $items += $item.target_display_name + ' [Host],' } default { $items += $item.target_display_name + '<<undefined>>,' } } } } #add a row to the output, removing a trailing comma if needed $row = New-Object PSObject -Property @{ Tag = $tags[$t].tag Count = $tags[$t].tagged_objects_count Items = '' } if ($items.Length -gt 0) { $row.Items = $items.substring(0, $items.length-1) } $itemlist += $row } write-host '.' write-host 'Done' $itemlist | Select-Object 'Tag','Count','Items' | Export-CSV -Path $output -NoTypeInformation


Get-NSXvmTags.ps1

$dfltNSXMGR = "default" $nsxtManager = Read-Host ("Enter NSX-T IP or FQDN [$dfltNSXMGR]" -f $dfltNSXMGR) if (-not $nsxtManager) { $nsxtManager = "https://$dfltNSXMGR" } else { $nsxtManager = "https://$nsxtManager" } $output = Read-Host "Enter output filepath" $username = Read-Host "Enter username" $secPwd = Read-Host "Enter password" -AsSecureString $password = [System.Runtime.InteropServices.Marshal]::PtrToStringAuto([System.Runtime.InteropServices.Marshal]::SecureStringToBSTR($secPwd)) $response = Invoke-RestMethod -Uri "$nsxtManager/api/v1/fabric/virtual-machines?included_fields=display_name,tags" -Method Get -Headers @{ "Authorization" = "Basic $( [Convert]::ToBase64String([Text.Encoding]::ASCII.GetBytes(("${username}:${password}"))) )" "Content-Type" = "application/json" } -Body '{}' -SkipCertificateCheck $vmlist = @(); foreach ($vm in $response.results) { $tags = '' foreach ($tag in $vm.tags) { $tags += $tag.tag + ',' } if ($tags.Length -gt 0) { $row = New-Object PSObject -Property @{ VM = $vm.display_name Tags = $tags.substring(0, $tags.length-1) } } else { $row = New-Object PSObject -Property @{ VM = $vm.display_name Tags = '' } } $vmlist += $row } $vmlist | Select-Object 'VM','Tags' | Export-CSV -Path $output -NoTypeInformation

These two are interesting in that in the first case, you use one API URI to get the tags—which provide the information (scope, tag) to use as parameters—and a child URI to get the items that are associated with that tag. But in the second case, a single URI provides a list of VMs as well as the tags that are applied to them as properties.

Resuming this site

 Well, when I look at this blog and see that the last post was from 2022, I'm a bit shocked. But it's not exactly a surprise:

When I started working for VMware in October 2017, the demand for working on my system and keeping my tech skills were greatly reduced. Yes, I was still maintaining everything and even implementing things on the VMware stack that I hadn't previously, but there just wasn't time or impetus to do much publishing.

Then "the Broadcom thing" happened.

I got laid off along with 4K other VMware associates.

I spent nine months trying to get back into a technical pre-sales position in the industry, and "came in second" several times. But second isn't good enough, and $2300/mo in COBRA payments wasn't going to be very good either.

On a whim, I applied to the United States Postal Service to be a letter carrier. Seemed like straightforward work, and I knew I could not just do the work from a skills perspective, but with all the bicycling I was doing I'd have no issue from the physical aspect.

I had a contingent job offer in less that 24 hours. Which was both exciting and depressing. Exciting, because working as a civil servant would give me access to great healthcare—a key reason for having a good job in the US of A—and a path forward to retirement. If I could stick it out for just over 5 years, I could "retire" at 62, keep my healthcare as a federal retiree, and get a part-time job in a bike shop to feed my passion.

Being a letter carrier is the hardest "easy job" I've ever had.

When you start, the idea is to gradually ease you into the demands of the position: you're limited in the number of hours they can work you each day, and the number of days without a break you can go. For someone who not only had worked "9 to 5" salaried jobs his whole career, but had the previous 9 months of free time, it was a shock.

Shortly after finishing the official training, I was regularly working 6 days a week--including Sundays--with no way to know if/when I was getting a day off. And each day, although I was guaranteed at least 4 hours of work if I was scheduled, I rarely worked fewer than 10h each day.

The work seems easy. You put letters, magazines, and packages into someone's mailbox or front porch. Rinse and repeat about 1000 times every day. "Anyone can do it."


I'm here to tell you now: it's exhausting, both mentally and physically—and that's without having walking routes to do! From the end of Aug 2024 until June 2025, I was stationed at an office without any walking routes; until January 2025—with few exceptions—I never knew what route I'd do when I reported. Some days, I'd get a text telling me to report to a different office; some days I'd show up and get sent elsewhere. And some days, I'd work 10+ hours, return to the station and still get sent to yet another location to help.

Such is the life of a "Part-Time Flexible" city carrier, aka "PTF."

January 2025, I was able to get a "hold down" on a route that was temporarily vacant due to the regular carrier being out on extended sick leave. That meant I couldn't be sent anywhere else at the start of the day, and I knew when my days off should fall, but otherwise I was still working 6 days a week and (usually) over 8h/day. I was promoted from PTF to "Full-time Regular" (aka "Regular") in February, and working on Sundays ended along with most of the enforced overtime; I could still be mandated to work over 8, but only under certain circumstances. Life got much better. I would still have to worry about a route when the hold-down ended, but for that winter and spring, I had felt like I'd gotten some of my life back.

The carrier on sick leave—it was his route I'd been holding for several months—decided to go ahead and retire rather than finish out his leave and come back in any limited fashion, so now the clock was ticking: the route would be declared vacant and I'd lose my hold when it was assigned to a new carrier through the bidding process. Yes, I'd request it, but my lack of seniority would be a severe limitation. So I started watching the vacancy postings, keeping an eye out for a route that I'd be able to make my own, but wasn't up for bid because it was super hard & no other carriers would want.

I made several bids that lost, but finally won one. I didn't think it seemed too bad, but several carriers told me that it "was a real hoofer," meaning a lot of hard walking.

I transferred stations and became the regular for "Route 12C035" in mid-June, 2025. It is a walking route with ~460 homes and ~52 businesses. On my first day, it took me over 10h to get everything ready that morning and deliver, walking over 12mi in the process. My legs were shattered. My feet were numb. It was all I could do to come in the next day and do it all again.

Four weeks later I had my first podiatrist appointment. I have high arches; I needed an orthotic to help with the mechanics of my walking. I needed better shoes.

I needed a different job!

The reality is that I never stopped applying for positions in technical sales. It was hard to schedule interviews amid the demands of the carrier schedule, but I made it happen. But still no job offers.

I kept getting better, faster, and stronger on the route. If I could get prepped and "on the street" within an hour of reporting, I could typically finish the route by the end of 8 hours on the clock. I learned it was a bit unprecedented: only one other carrier who had the route could do the same with regularity. And I got frustrated with co-workers who wouldn't come to work for whatever reason, so I'd also have some mandatory overtime to help cover those routes as well.

In late January of 2026, one of my IT colleagues called and let me know that a position would be opening on the enterprise infrastructure team for a private company, and would I be interested? It would be focused on "keeping the lights on" for the core systems, something I'd done before both privately and as a consulting engineer, so I reached out to the hiring manager to learn more.

Life went on with the Post Office—including a few weeks as an acting supervisor—when I got the call I'd been hoping to receive since the end of 2023: a job offer in high tech that was fair in compensation, for a good company, with a manager & team that I'd met and would be able to work with.

I resigned from the USPS the same day, working my final shift on 20-Mar-2026.

19 months. Exactly 82 weeks. For 574 days, I was a City Letter Carrier for the United States Postal Service, and I both hated and loved it.

But now I'm back in IT, and I have stuff to share again!

Tuesday, June 7, 2022

Synology DSM and Veeam 11

For a long time, Veeam has been telling its users to not use "low-end NAS boxes" (eg, Synology, QNAP, Thecus) as backup repositories for Backup & Replication (VBR), even though these Linux-based devices should be compatible if they have "x86" architecture (as opposed to ARM).

The reality is that none of these devices use "bog standard" Linux distributions, and due to their appliance-based nature, have some significant limitations on what can be done to their custom distributions.

However, there are many folks—both as home users or within small/budget-limited businesses—who are willing to "take their lumps" and give these things a shot as repositories.

I am one of them, particularly for my home "lab" environment. I've written about this use case (in particular, the headaches) a couple of times in this blog [1, 2], and this post joins them, addressing yet another fix/workaround that I've had to implement.

Background

I use a couple of different Synology boxes for backup purposes, but the one I'm dealing with today is the DS1817+. It has a 10GbE interface for connectivity to my network, a quad-core processor (the Intel Atom C2538) and 8GB RAM (upgradable to 16GB, but I haven't seen the demand that would require it). It is populated with 8x1TB SATA SSDs for ~6TB of backup capacity.

I upgraded DSM to 7.0 a while back, and had to make some adjustments to the NFS target service to continue to support ESXi datastores via NFS 4.1

Yesterday, I updated it to 7.1-42661 Update 2, and was greeted to a number of failed backup jobs this morning.

Symptoms

All the failed jobs have uniform symptoms: Timeout to start agent

With further investigation, I saw that my DS1817+ managed server was "not available", and when attempting to get VBR to re-establish control, kept getting the same error with the installation of transport services:

Installing Veeam Data Mover service Error: Failed to invoke command /opt/veeam/transport/veeamtransport --install 6162:  /opt/veeam/transport/veeamtransport: error while loading shared libraries: libacl.so.1: cannot open shared object file: No such file or directory

Failed to invoke command /opt/veeam/transport/veeamtransport --install 6162:  opt/veeam/transport/veeamtransport: error while loading shared libraries: libacl.so.1: cannot open shared object file: No such file or directory

Workaround

After failing to find a fix after some Linux-related searches, I discovered a thread on the Veeam Community Forum that addressed this exact issue [3]. 

This is apparently a known issue with VBR11 and Synology boxes, and as Veeam is moving further and further away from the "on the fly" deployment of the transport agent to a permanently-installed "Data Mover" daemon (which is necessary to provide the Immutable Backup feature), it becomes a bigger issue. Veeam has no control over the distribution—and would just as soon have clients use other architectures—and Synology would probably be happy with customers considering their own backup tool over competing options...

At any rate, some smart people posted workarounds to the issue after doing their own research, and I'm re-posting for my own reference because it worked for me.

  1. Download the latest ACL library from Debian source mirrors. The one I used—and the one in the Forum thread—is http://ftp.debian.org/debian/pool/main/a/acl/libacl1_2.2.53-10_amd64.deb
  2. Unpack the .deb file using 7zip
  3. Upload the data.tar file to your Synology box. Feel free to rename the file to retain your sanity; I did.
  4. Extract the tarball to the root directory using the "-C /" argument:
    tar xvf data.tar -C /
  5. If you are using a non-root account to do this work, you'll need to use "sudo" to write to the root. You will also need to adjust owner/permissions on the extracted directories & files:
    sudo tar xvf data.tar -C /
    sudo chown -R root:root /usr/lib/x86_64-linux-gnu
    sudo chmod -R 755 /usr/lib/x86_64-linux-gnu
  6. Create soft links for these files in the boxes filesystem:
    sudo ln -sf /usr/lib/x86_64-linux-gnu/libacl.so.1 /usr/lib/libacl.so.1
    sudo ln -sf /usr/lib/x86_64-linux-gnu/libacl.so.1.1.2253 /usr/lib/libacl.so.1.1.2253
  7. Last, get rid of any previous "debris" from failed transport installations
    sudo rm -R /opt/veeam
Once the Synology is prepped, you must go back into VBR and re-synchronize with the Linux repository:
  1. Select the "Backup Infrastructure" node in the VBR console
  2. Select the Linux node under Managed Servers
  3. Right-click on the Synology box being updated and select "Properties..." from the popup menu.
  4. Click [Next >] until the only option is [Finish]. On the way, you should see that the Synology is correctly identified as a compatible Linux box, and the new Data Mover transport service is successfully installed.

Summary

I can't guarantee that this will work after a future update of DSM, and there may come a day when other libraries are "broken" by updates to VBR or DSM. But this workaround was successful for me.

Update

The workaround has persisted through a set of updates to DSM7. I have seen this come up with DSM6, but this workaround does not work on that; too many platform incompatibilities, I suspect. Need to do some more research & experimentation for DSM6...

Friday, February 28, 2020

Update: maintaining the pi-hole HA pair

In an earlier post, I shared how I got pi-hole working in my environment, thanks to a number of posts on a reddit thread. Since then, I've been living with the setup and tweaking my configuration a bit.

This post documents one of the tweaks that might be useful for others...

If you're using the method documented by Panja0, you know that there's a script in the pi-hole distribution (gravity.sh) that must be edited in order to synchronize files between the nodes of the HA pair. Well, he reminds you in the tutorial that it'll need to be re-edited every time you update pi-hole, or the synchronization won't occur.

As you might guess, I didn't remember when I updated a week ago, and couldn't understand why my settings weren't getting synchronized. So I went back to the post, reviewed my settings, and face-palmed myself when I discovered my oversight. I had failed to re-edit gravity.sh

After I did the necessary edits, I realized that, even if I'd remembered about it, I'd still need to refer to the original post to get the right command line, etc., for the edits.

I didn't want to spend the time to figure out how to trigger a script to make the update for me upon a pi-hole update, but I sure could figure out the script to do the correct updates!

I mean... come on: what better use of automation than to use a script to a) check to see if the update has already been performed, and b) if not, perform the update?

#!/bin/bash
# make sure the pihole-gemini script is being run by gravity.sh

GEMINI='su -c /usr/local/bin/pihole-gemini - <gemini user>'
GRAVITY=/opt/pihole/gravity.sh

TRIGGER=$(sed -e '$!{h;d;}' -e x $GRAVITY)
if [ "$TRIGGER" != "$GEMINI" ]
then
        # insert the gemini commandline before the last line of the script
        sed -i "$ i$GEMINI" $GRAVITY
fi

If you decide to use the script, just make sure that you make any necessary modifications for the first two script variables to match your installation. You also need it on both nodes of your HA pair!

In my setup, I'm saving this script in the /etc/scripts directory, which I'm using for other "keepalived" scripts. I'll remember to run it next time I update pi-hole, and that's all I'll need to recall!

Saturday, February 1, 2020

Putting Pi-hole to work

I've been reading about my friends' use of Pi-hole on their home networks, and I've been curious about trying it to see how well it does. I've resisted doing so, primarily because of the single point of failure a pi-hole system represents: if it's unavailable, you get no DNS.

And we all know, it's never DNS...except when it is.

An alternative, naturally, it to run a pair of systems. Why not? Raspberry Pi devices are relatively cheap, and the software is all no-charge.

For most home users, that might be fine, but I run a lab in my home that also provides services to the household, so I had more permutations to worry about: what happens if my Pi dies? what happens if my domain controllers are unavailable? Etc.

The solution I've settled on is to run a primary Pi-hole server as a VM in my lab environment—which gives me more than enough performance and responsiveness, even under the most demanding of situations—and a secondary with a Raspberry Pi, so that even if the VM environment goes "pear shaped," I still get DNS resolution.

In order to accommodate several types of outages, yet avoiding the need to both double-up the configuration work (with the potential of missing an update and having weird results to troubleshoot) while providing pre-configured support for a couple of likely failure and maintenance scenarios, I've mated the two systems together in a failover cluster by configuring the "keepalive" daemon along with some scripting to keep the two systems in sync for the blocking function, while leaving some configuration elements (upstream DNS servers for one) independent of each other.

I didn't do the "heavy lifting" on the sync and keepalive aspects; those were provided by reddit user Panja0 in this post: https://www.reddit.com/r/pihole/comments/d5056q/tutorial_v2_how_to_run_2_pihole_servers_in_ha/

I'm running ubuntu server 19.10 (Eoan Ermine... whatever) instead of Raspbian Stretch/Buster, so there have been a number of changes I've had to make to the systems to adapt:

  • To get keepalived installed, I needed libipset11, not libipset3 (mentioned in the comments of the HA tutorial)
  • I had to modify the rsync command arguments in the synchronization script due to changes between Debian versions that I'm running versus the original post (mentioned in the comments of the HA tutorial)
  • I had to permit my rsync user to skip password re-auth by editing the sudoers file; I think this may also be a version-specific issue.
  • I added an NTP client to utilize my GPS-based hardware time server; this is super important when using a Raspberry Pi without a real-time clock HAT add-on.
  • The primary system uses the lab's DNS (domain controllers) for its upstream DNS servers. In addition to avoiding the need to configure additional conditional forwarding rules for dnsmasq, this gives the Pi-hole server the identity of the clients via DNS
  • The secondary uses OpenDNS servers—I have a household account with several filtering options enabled already—with a dnsmasq configuration for conditional forwarding on the domain.
Given my homelab, it was pretty trivial to set this up as a VM, but what really sold it to me was getting the Raspberry Pi running in concert. I originally started with a Pi 3 Model B that I had lying around after an old project that I'd quit, but the performance difference between the two platforms was so noticeable that going with a true primary/secondary setup made the most sense. I considered upgrading to the Pi 4, but decided that my desire to avoid purchasing micro-HDMI adapters outweighed the value in the more-robust, newer model. I did decide to go ahead and upgrade from the 3 to the 3+, however, when I discovered that my local MicroCenter had them for $34US; I also paired the new unit with a passive heatsink case, which has allowed the Pi to run significantly cooler (30°F) than the original setup, which utilized aluminium heatsinks and a non-vented plastic case.

Aside from this "vanilla" setup, I also took note of the additional block lists that my friend Tim Smith wrote about in a blog post. I need to let this "bake" for a while before considering it finished, but I'm liking what I'm seeing so far.

Thursday, September 19, 2019

New VM cleanup

When creating a new VM in vSphere, you get a number of virtual devices & settings by default that you probably don't have any interest in keeping:

  • Floppy drive (depending on version & type of client in use)
  • Floppy adapter
  • IDE ports
  • Serial ports
  • Parallel ports
Given that some of these are redundant (why keep the IDE adapter when you're using SATA for the optical device?) while others are polled I/O in Windows (OS must keep checking to see if there's activity on the port, even if there will never be any), it just makes things more streamlined if you cleanup these settings when creating a new VM...then using the cleaned-up VM as a template for creating new VMs later on.

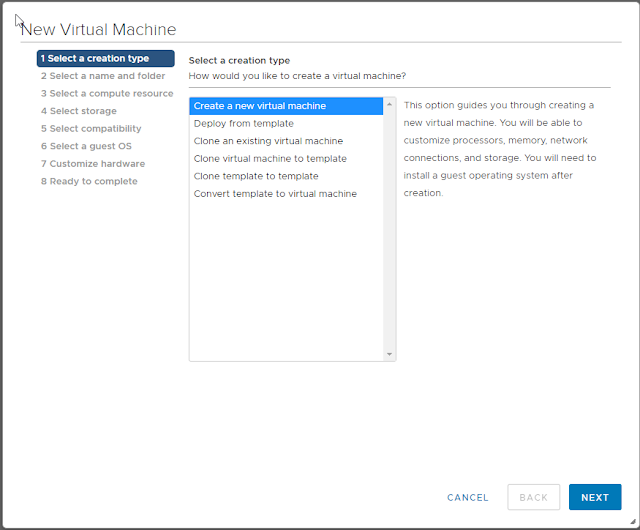
Step 1: create a new VM
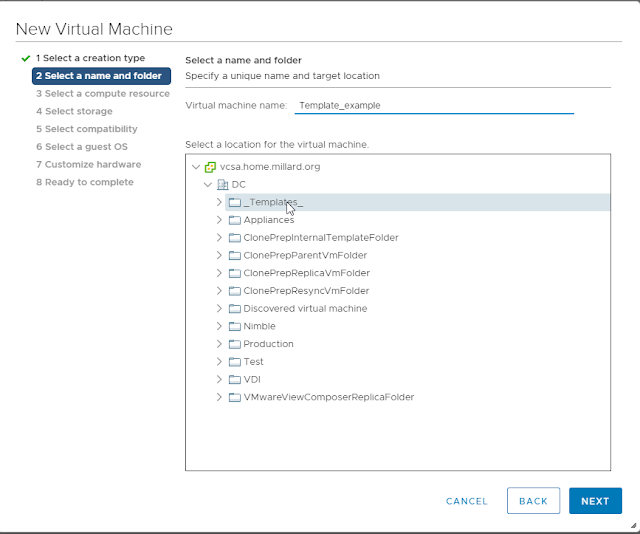
Step 2: Set VM name and select a location
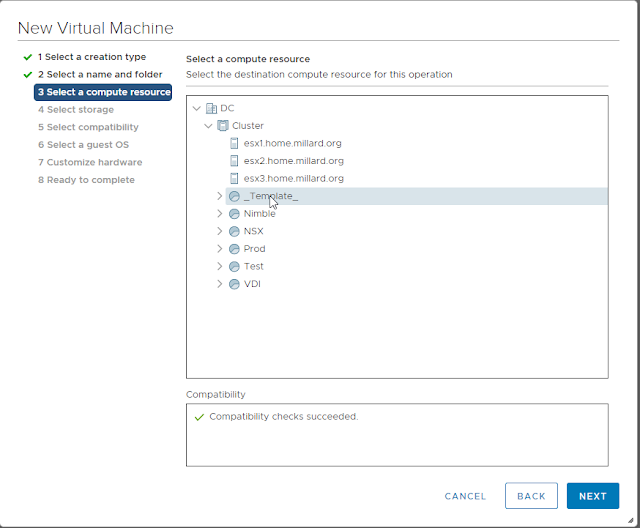
Step 3: Select a compute resource
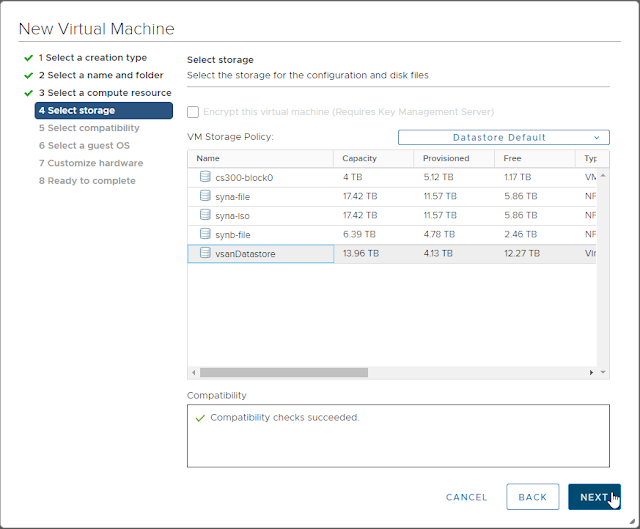
Step 4: Select storage
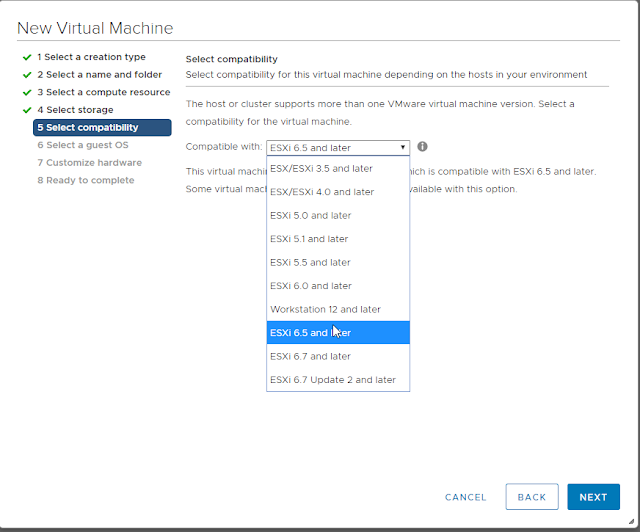
Step 5: Set compatibility no higher than your oldest version of ESXi that the template could be deployed on.
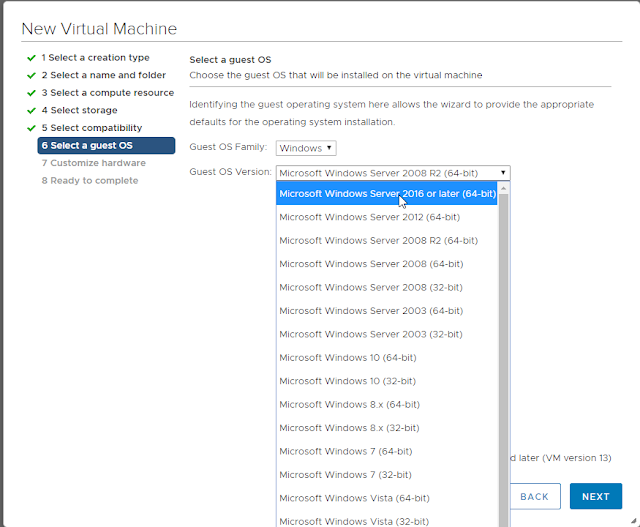
Step 6: Select the guest OS you'll install
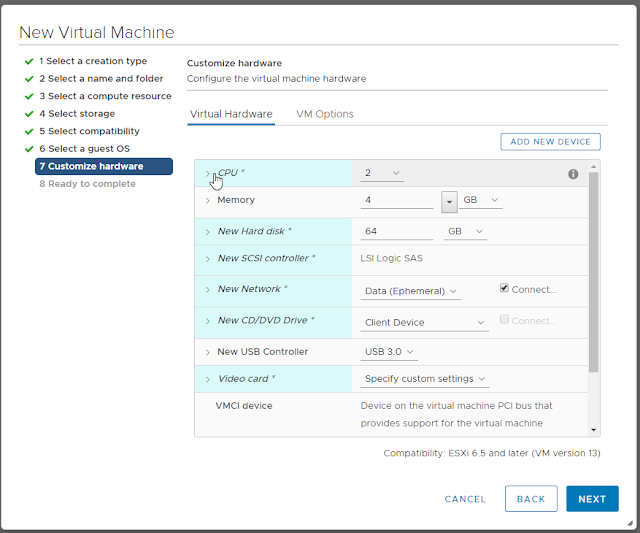
Step 7a: Customize hardware: CPU, Memory, Hard Drive
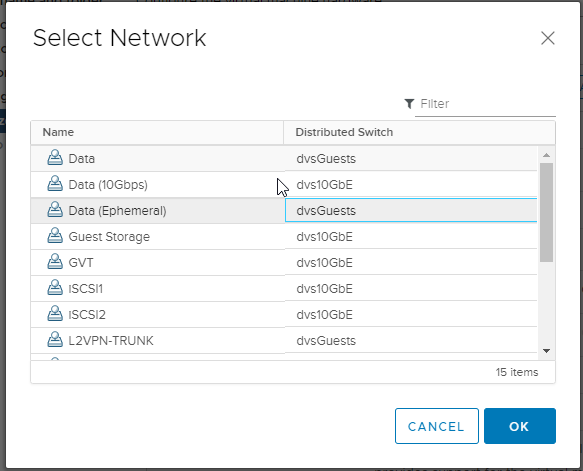
Step 7b: Attach NIC to a general-purpose or remediation network port
Step 7c: Don't forget to change the NIC type! If you don't the only way to change it later is to remove & re-add the correct type, which will also change the MAC address and, depending on the order you do the modifications, could put the new virtual NIC into a different virtual PCIe slot on the VM hardware, upsetting other configurations in the guest (like static IP addresses).
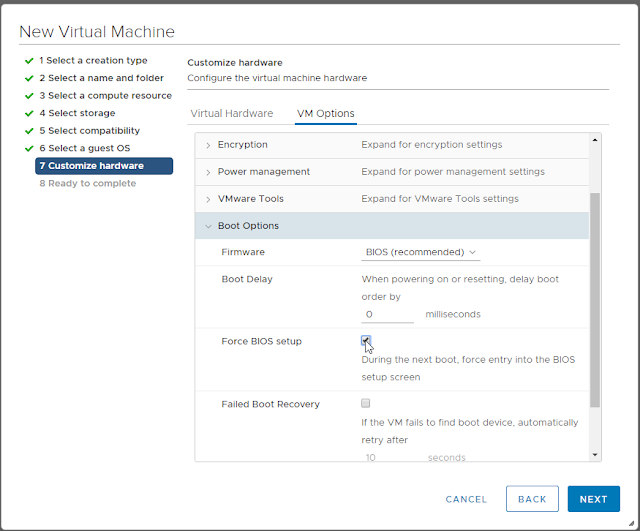
Step 7d: Jump to the Options tab and set "Force BIOS setup"
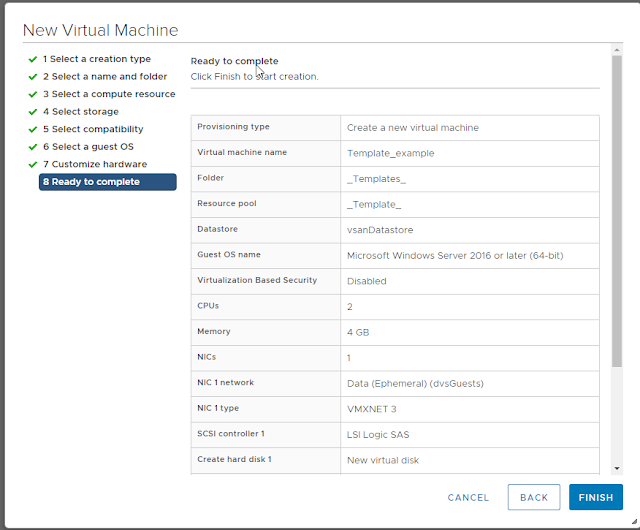
Step 8: Finish creating the VM
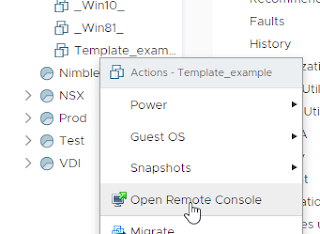
Step 9: Open remote console for VM
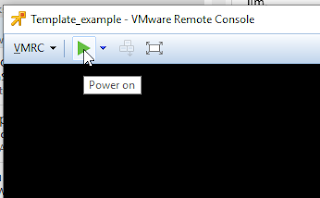
Step 10: Power On the VM. IT should pause at the BIOS editor screen.
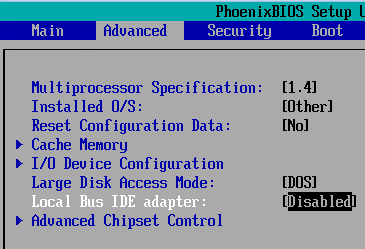
Step 11: On the Advanced page, set Local Bus IDE to "Disabled" if using SATA; set it to "Secondary" if using IDE CD-ROM (Even better: Change the CD-ROM device to IDE 0:0 and set it to "Primary").
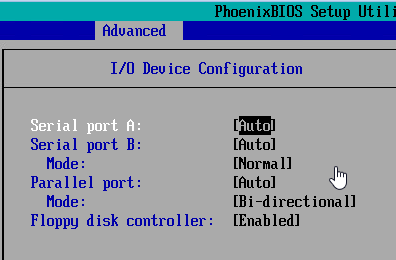
Step 12: Descend into the "I/O Device Configuration" sub-page; by default, it'll look like the screenshot below:
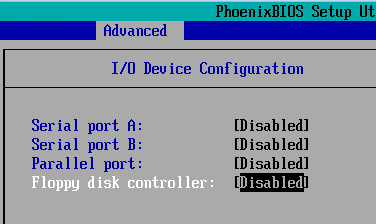
Step 13: Using the arrow keys & space bar, set each device to "Disabled", then [Esc] to return to the Advanced menu.
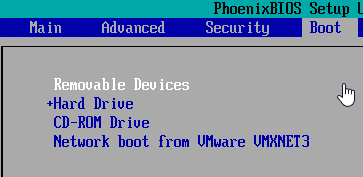
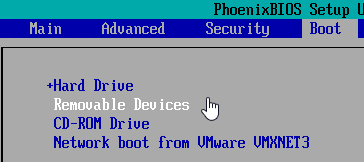
Step 14: Switch to the Boot page. By default, removable devices are first in the boot order.
Step 15: Use the minus [-] key to lower the priority of removable devices. This won't hurt the initial OS setup, even on setup ISOs that normally require a key-press to boot off optical/ISO media: the new VM's hard drive has no partition table or MBR, so it'll be skipped as a boot device even when it's first. Once the OS is installed, you'll never have to worry about a removable media causing a reboot to stall.
Step 16: Press [F10] to save the BIOS config, then use the console to attach to an ISO (local or on a datastore) before exiting the BIOS setup page.


Step 17: Install the guest OS, then add VMware Tools. Perform any additional customization—e.g., patching, updates, and generalization—then convert the new VM to a template.

You're set! No more useless devices in your guest that take cycles from the OS or hypervisor.

Additional Note on modifying existing VMs:
Aside from the need to power down existing VMs that you might want to clean up with this same procedure, the only issue I've run into after doing the device + BIOS cleanup is making sure I get the right combination of IDE channels & IDE CD-ROM attachment. The number of times I've set "Primary" in BIOS but forgot to change the CD-ROM to IDE 0:0 is ... significant.

Additional Note on Floppy Drives:
Floppy drive handling is a special case, and will very much depend on which version of vSphere—and therefore, the management client—you're using. If you have the "Flex" client (or are still using v6.0 and have the C# client), the new VM will have a floppy disk device added by default. Naturally, you want to remove it as part of your Hardware Customization step during new VM deployment.
If you're happily using the HTML5 Web Client, you may find that the floppy is neither present, nor manageable (for adding/removing or attaching media)... This is the 0.1% of feature parity that I still find lacking in the H5 client. Hopefully, it'll get added, if for no better reason than to allow an admin to remove floppy devices that are still part of VMs that were created in older versions.

Tuesday, January 8, 2019

Merry Christmas: Apple Macintosh SE

Christmas, 2018.
My brother has given to me a circa-1989/1990 Apple Macintosh SE HDFD. It's in a "carrying" case, includes an external 800K floppy drive, Apple Desktop Bus keyboard and mouse, power cord, manuals, and System 6 install disks.

The system has 2.5MB RAM, a 20MB SCSI hard drive, and a 1.44MB internal floppy.

2.5MB RAM
20MB Hard drive (with "stuff" on it)
System 6, at your service...
My wife wanted to know what I'd do with it... well, the answer is: play with it.

The first thing I did was look into "useful" upgrades: Network, Memory, Capacity.

I found an Asante MacCon adapter for the SE
I found 4 x 1MB RAM SIMMs for the SE
I found this gizmo: SCSI2SD

DING-DING-DING!

I can work with this.

And then I ran across this: macrepository.org

Wednesday, May 17, 2017

VBR v10 new hotness

Sitting in the general session is not typically the way I'd compose a new post, but I'm pretty stoked by some new, long-desired features announced for the next version of Veeam Backup and Replication (VBR), version 10.

First is the (long awaited) inclusion of physical endpoint backup management via VBR console. We've had Endpoint Backup for a while, which is awesome, and we've been able to use VBR repositories to store backups, but all management was at the endpoint itself. In addition to centralized management, the newest version of the managed endpoint backup (alright, alright... Agent) will support Microsoft Failover Clusters at GA!

Second is the new feature that significantly expands VBR's capability: the ability to backup NAS devices. Technically, it's via SMB or NFS shares, so you could target any share--including one on a supported virtual or physical platform--but the intention is to give great backup & recovery options for organizations that utilize previously-unsupported platforms for NAS, like NetApp, Celera, etc.

Third--and most exciting to me, personally--is the addition of a replication mode utilizing VMware's new "VMware APIs for I/O Filtering" (VAIO). This replication mode uses a snapshot-free capture of VMDK changes on the source, with and the destination being updated on a (configurable, default of 15s) by-the-second interval. This new replication method is branded "Veeam CDP" (Continuous Data Protection). There are competing products on the market that offer similar capability, but Veeam is advertising that they are the first to leverage VAIO while other products are using either undocumented/unsupported APIs, or old APIs intended for physical replication devices.

There are a number of other nice, new features coming--Object storage support, Universal APIs for storage integration, etc.--but these three will be the big, compelling reasons to not only upgrade to Version 10 when it arrives (for current customers) but to upgrade your vSphere environments if you haven't already embraced Version 6.x.

Saturday, April 15, 2017

Upgrading to vSphere 6.5 with NSX already installed

This has been a slow journey: I have so many different moving parts in my lab environment (all the better for testing myriad VMware products) that migrating to vSphere 6.5 was taking forever. First I had to wait for Veeam Backup & Replication to support it (can't live without backups!), then NSX, then I had to decide whether to discard vCloud Director (yes, I'm still using it; it's still a great multitenancy solution) or get my company to give me access to their Service Provider version...

I finally (finally! after over a year of waiting and waiting) got access to the SP version of vCD, so it was time to plan my upgrade...

My environment supports v6.5 from the hardware side; no ancient NICs or other hardware anymore. I was already running Horizon 7, so I had two major systems to upgrade prior to moving vSphere from 6.0U2 to 6.5a:

  • vCloud Director: 5.5.5-->8.0.2-->8.20.0 (two-step upgrade required)
  • NSX: 6.2.2-->6.3.1
There was one hiccup with those upgrades, and I'm sure they may be familiar to people with small labs: the NSX VIBs didn't install without "manual assistance." In short, I had to manually place each host into maintenance mode, kick off the "reinstall" to push the VIBs into the boot block, then restart the host. This wouldn't happen in a larger production cluster, but because mine is a 3-node VSAN cluster, it doesn't automatically/cleanly go into Maintenance Mode.

Moving on...

Some time ago, I switched from an embedded PSC to an external, so I upgraded that first. No problems.

Upgrading the stand-alone vCenter required a couple of tweaks: I uninstalled Update Manager from its server (instead of running the migration assistant: I didn't have anything worth saving), and I reset the console password for the appliance (yes, I'd missed turning off the expiration, and I guess it had expired). Other than those items? Smooth sailing.

With a new vCenter in place, I could use the embedded Update Manager to upgrade the host. I had to tweak some of the 3rd-party drivers to make it compatible, but then I was "off to the races."

After the first host was upgraded, I'd planned on migrating some low-priority VMs to it in order to "burn in" the new host and see if some additional steps would be needed (ie removing VIBs for unneeded drivers that have caused PSODs in other environments I've upgraded). But I couldn't.

Trying to vMotion running machines to the new host, I encountered network errors. "VM requires Network X which is not available". Uh oh.

I also discovered that one of the two DVS (Distributed Virtual Switch) for the host was "out of sync" with vCenter. And no "resync" option that would normally have been there...

Honestly, I flailed around a bit, trying my google fu and experimenting with moving VMs around, both powered-on and off, as well as migrating to different vswitch portgroups. All failing.

Finally, something inspired me to look at my VXLAN status; it came to me after realizing I couldn't ping the vmknic for the VTEPs because they sit on a completely independent IP stack, making it impossible to use vmkping with a VTEP as a source interface.

Bingo!

The command esxcli network vswitch dvs vmware vxlan list resulted in no data for that host, but valid config information for the other hosts.

A quick look at NSX Host Preparation confirmed it, and a quick look at the VIBs on the host nailed it down: esx-vsip and esx-vxlan were still running 6.0.0 versions.

I went back through the process I'd used for upgrading NSX in the first place, and when the host came back up, DVS showed "in sync", NSX showed "green" install status and—most important of all—VMs could vMotion to the host and they'd stay connected!

UPDATE: The trick, it seems, is to allow the NSX Manager an opportunity to install the new VIBs for ESXi v6.5 before taking the host out of maintenance mode. By manually entering Maintenance Mode prior to upgrading, VUM will not take the host out of Maintenance, giving the Manager an opportunity to replace the VIBs. Once the Manager shows all hosts upgraded and green-checked, you can safely remove the host from Maintenance and all networking will work.