Showing posts with label VMware. Show all posts

Thursday, September 19, 2019

New VM cleanup

When creating a new VM in vSphere, you get a number of virtual devices & settings by default that you probably don't have any interest in keeping:

  • Floppy drive (depending on version & type of client in use)
  • Floppy adapter
  • IDE ports
  • Serial ports
  • Parallel ports
Given that some of these are redundant (why keep the IDE adapter when you're using SATA for the optical device?) while others are polled I/O in Windows (OS must keep checking to see if there's activity on the port, even if there will never be any), it just makes things more streamlined if you cleanup these settings when creating a new VM...then using the cleaned-up VM as a template for creating new VMs later on.

Step 1: create a new VM
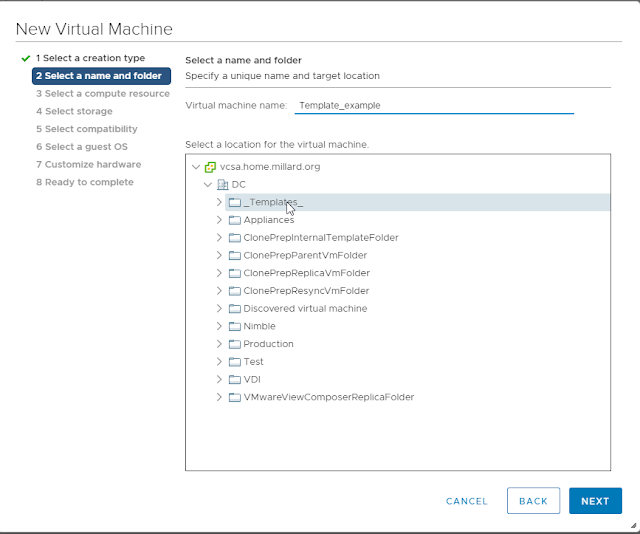
Step 2: Set VM name and select a location
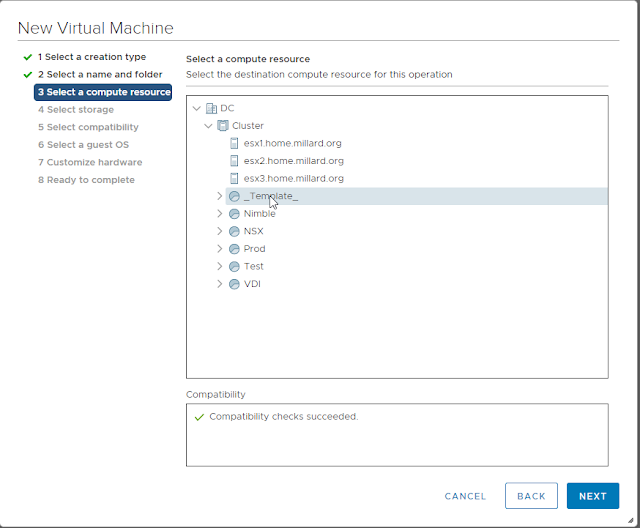
Step 3: Select a compute resource
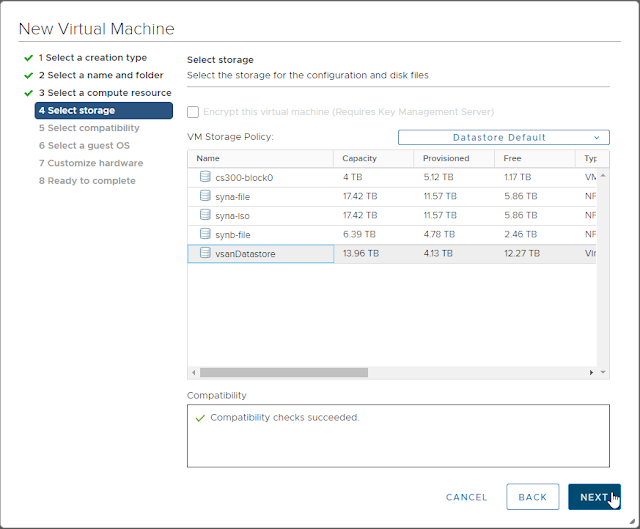
Step 4: Select storage
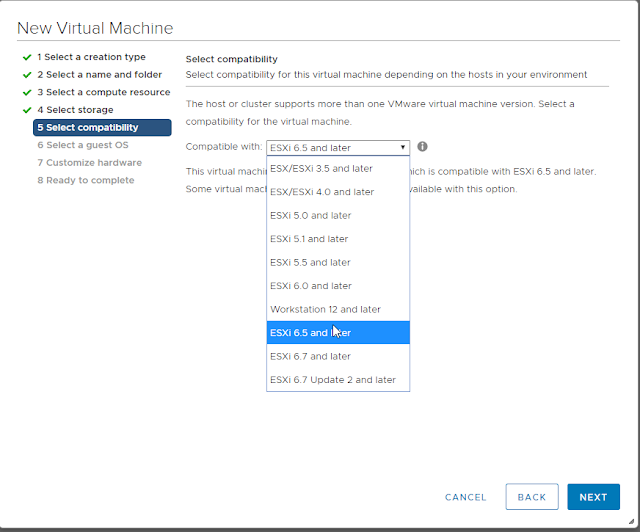
Step 5: Set compatibility no higher than your oldest version of ESXi that the template could be deployed on.
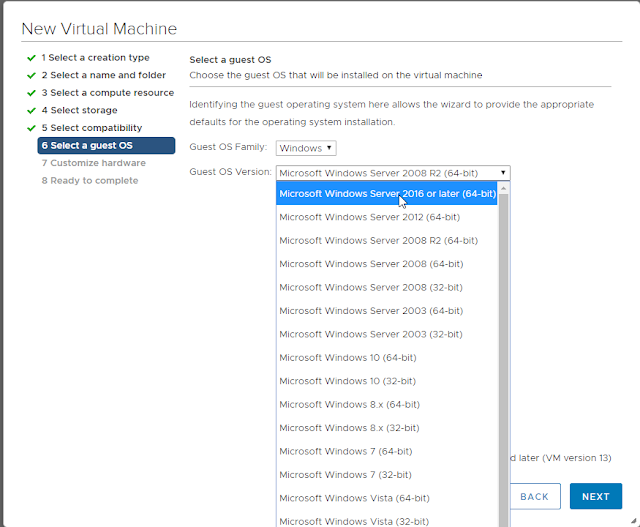
Step 6: Select the guest OS you'll install
Step 7a: Customize hardware: CPU, Memory, Hard Drive
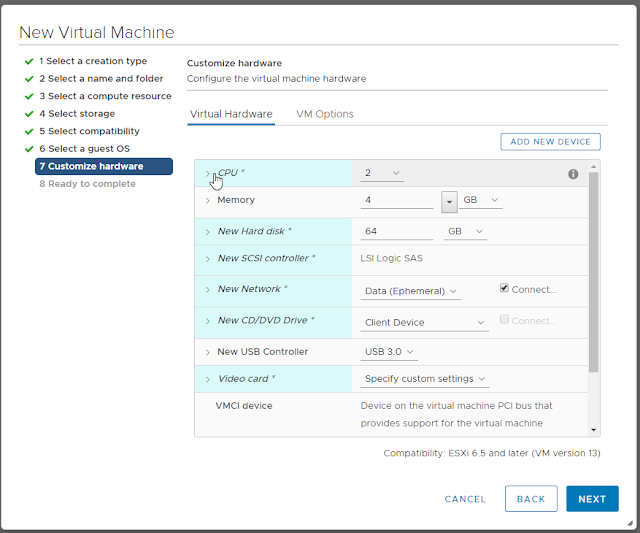
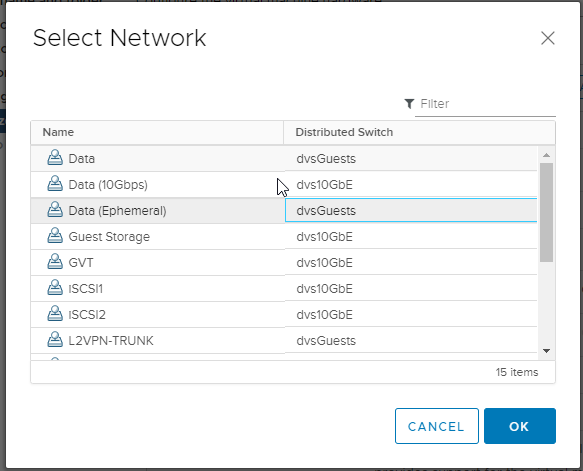
Step 7b: Attach NIC to a general-purpose or remediation network port
Step 7c: Don't forget to change the NIC type! If you don't the only way to change it later is to remove & re-add the correct type, which will also change the MAC address and, depending on the order you do the modifications, could put the new virtual NIC into a different virtual PCIe slot on the VM hardware, upsetting other configurations in the guest (like static IP addresses).
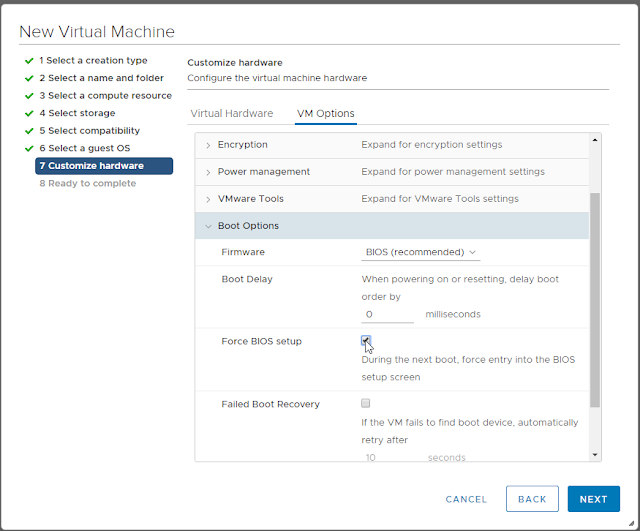
Step 7d: Jump to the Options tab and set "Force BIOS setup"
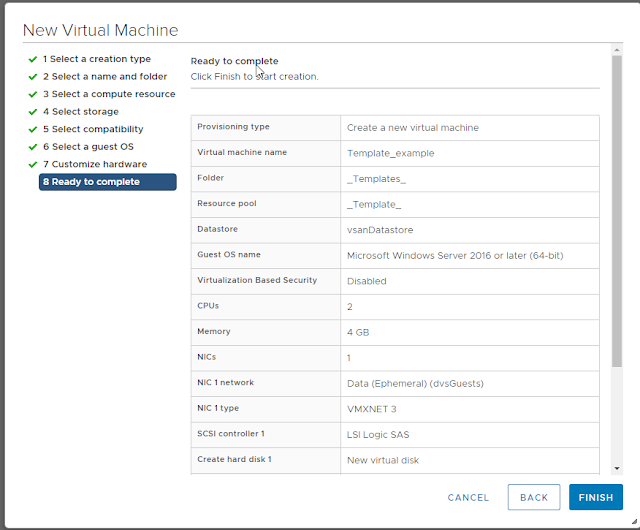
Step 8: Finish creating the VM
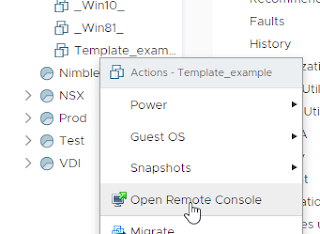
Step 9: Open remote console for VM
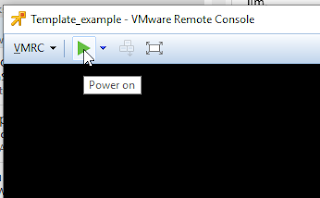
Step 10: Power On the VM. IT should pause at the BIOS editor screen.
Step 11: On the Advanced page, set Local Bus IDE to "Disabled" if using SATA; set it to "Secondary" if using IDE CD-ROM (Even better: Change the CD-ROM device to IDE 0:0 and set it to "Primary").
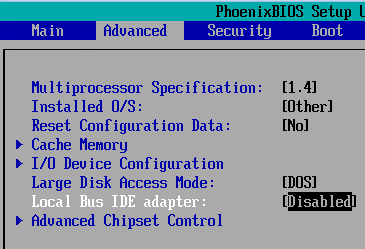
Step 12: Descend into the "I/O Device Configuration" sub-page; by default, it'll look like the screenshot below:
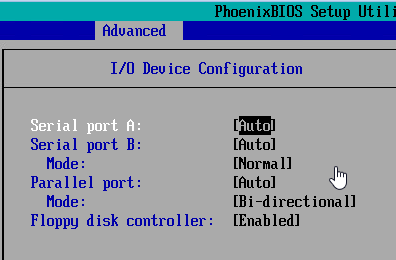
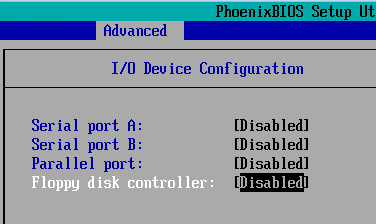
Step 13: Using the arrow keys & space bar, set each device to "Disabled", then [Esc] to return to the Advanced menu.
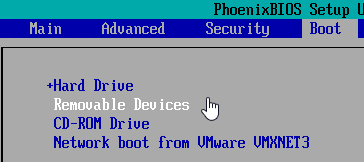
Step 14: Switch to the Boot page. By default, removable devices are first in the boot order.
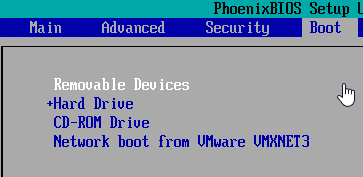
Step 15: Use the minus [-] key to lower the priority of removable devices. This won't hurt the initial OS setup, even on setup ISOs that normally require a key-press to boot off optical/ISO media: the new VM's hard drive has no partition table or MBR, so it'll be skipped as a boot device even when it's first. Once the OS is installed, you'll never have to worry about a removable media causing a reboot to stall.
Step 16: Press [F10] to save the BIOS config, then use the console to attach to an ISO (local or on a datastore) before exiting the BIOS setup page.


Step 17: Install the guest OS, then add VMware Tools. Perform any additional customization—e.g., patching, updates, and generalization—then convert the new VM to a template.

You're set! No more useless devices in your guest that take cycles from the OS or hypervisor.

Additional Note on modifying existing VMs:
Aside from the need to power down existing VMs that you might want to clean up with this same procedure, the only issue I've run into after doing the device + BIOS cleanup is making sure I get the right combination of IDE channels & IDE CD-ROM attachment. The number of times I've set "Primary" in BIOS but forgot to change the CD-ROM to IDE 0:0 is ... significant.

Additional Note on Floppy Drives:
Floppy drive handling is a special case, and will very much depend on which version of vSphere—and therefore, the management client—you're using. If you have the "Flex" client (or are still using v6.0 and have the C# client), the new VM will have a floppy disk device added by default. Naturally, you want to remove it as part of your Hardware Customization step during new VM deployment.
If you're happily using the HTML5 Web Client, you may find that the floppy is neither present, nor manageable (for adding/removing or attaching media)... This is the 0.1% of feature parity that I still find lacking in the H5 client. Hopefully, it'll get added, if for no better reason than to allow an admin to remove floppy devices that are still part of VMs that were created in older versions.

Saturday, April 15, 2017

Upgrading to vSphere 6.5 with NSX already installed

This has been a slow journey: I have so many different moving parts in my lab environment (all the better for testing myriad VMware products) that migrating to vSphere 6.5 was taking forever. First I had to wait for Veeam Backup & Replication to support it (can't live without backups!), then NSX, then I had to decide whether to discard vCloud Director (yes, I'm still using it; it's still a great multitenancy solution) or get my company to give me access to their Service Provider version...

I finally (finally! after over a year of waiting and waiting) got access to the SP version of vCD, so it was time to plan my upgrade...

My environment supports v6.5 from the hardware side; no ancient NICs or other hardware anymore. I was already running Horizon 7, so I had two major systems to upgrade prior to moving vSphere from 6.0U2 to 6.5a:

  • vCloud Director: 5.5.5-->8.0.2-->8.20.0 (two-step upgrade required)
  • NSX: 6.2.2-->6.3.1
There was one hiccup with those upgrades, and I'm sure they may be familiar to people with small labs: the NSX VIBs didn't install without "manual assistance." In short, I had to manually place each host into maintenance mode, kick off the "reinstall" to push the VIBs into the boot block, then restart the host. This wouldn't happen in a larger production cluster, but because mine is a 3-node VSAN cluster, it doesn't automatically/cleanly go into Maintenance Mode.

Moving on...

Some time ago, I switched from an embedded PSC to an external, so I upgraded that first. No problems.

Upgrading the stand-alone vCenter required a couple of tweaks: I uninstalled Update Manager from its server (instead of running the migration assistant: I didn't have anything worth saving), and I reset the console password for the appliance (yes, I'd missed turning off the expiration, and I guess it had expired). Other than those items? Smooth sailing.

With a new vCenter in place, I could use the embedded Update Manager to upgrade the host. I had to tweak some of the 3rd-party drivers to make it compatible, but then I was "off to the races."

After the first host was upgraded, I'd planned on migrating some low-priority VMs to it in order to "burn in" the new host and see if some additional steps would be needed (ie removing VIBs for unneeded drivers that have caused PSODs in other environments I've upgraded). But I couldn't.

Trying to vMotion running machines to the new host, I encountered network errors. "VM requires Network X which is not available". Uh oh.

I also discovered that one of the two DVS (Distributed Virtual Switch) for the host was "out of sync" with vCenter. And no "resync" option that would normally have been there...

Honestly, I flailed around a bit, trying my google fu and experimenting with moving VMs around, both powered-on and off, as well as migrating to different vswitch portgroups. All failing.

Finally, something inspired me to look at my VXLAN status; it came to me after realizing I couldn't ping the vmknic for the VTEPs because they sit on a completely independent IP stack, making it impossible to use vmkping with a VTEP as a source interface.

Bingo!

The command esxcli network vswitch dvs vmware vxlan list resulted in no data for that host, but valid config information for the other hosts.

A quick look at NSX Host Preparation confirmed it, and a quick look at the VIBs on the host nailed it down: esx-vsip and esx-vxlan were still running 6.0.0 versions.

I went back through the process I'd used for upgrading NSX in the first place, and when the host came back up, DVS showed "in sync", NSX showed "green" install status and—most important of all—VMs could vMotion to the host and they'd stay connected!

UPDATE: The trick, it seems, is to allow the NSX Manager an opportunity to install the new VIBs for ESXi v6.5 before taking the host out of maintenance mode. By manually entering Maintenance Mode prior to upgrading, VUM will not take the host out of Maintenance, giving the Manager an opportunity to replace the VIBs. Once the Manager shows all hosts upgraded and green-checked, you can safely remove the host from Maintenance and all networking will work.

Thursday, December 25, 2014

Synology DS2413+

Based on the recommendations of many members of the vExpert community, I purchased a Synology DS2413+. This is a 12-bay, Linux-based array that can be expanded to 24 spindles with the addition of the DX1211 expansion chassis. My plan was to eliminate a pair of arrays in my home setup (an aging Drobo Pro and my older iomega px6-300d), keeping a second array for redundancy.

The array is a roughly cube-shaped box which sits nicely on a desk, with easy access to the 12 drive trays and "blinky lights" on the front panel. It also sports two gigabit (2x1000Mb/s) network ports that can be bonded (LACP is an option if the upstream switch supports it) for additional throughput.

Synology has a page full of marketing information if you want more details about the product. The intent of this post is to provide the benchmark information for comparison to other arrays, as well as information about the device's comparative performance in different configurations.

The Synology array line is based on their "DSM" (DiskStation Manager) operating system, and as of this iteration (4.1-2661), there are several different ways to configure a given system. The result is a variety of different potential performance characteristics for a VMware environment, depending on the number of spindles working together along with the configuration of those spindles in the chassis.

The two major classes of connectivity for VMware are represented in DSM: You can choose a mix of NFS and/or iSCSI. In order to present either type of storage to a host, disks in the unit must be assembled into volumes and/or LUNs, which are in turn published via shares (NFS) or targets (iSCSI).

DSM supports a panoply of array types—Single-disk, JBOD, RAID0, RAID1, RAID5, RAID6, RAID1+0—as the basis for creating storage pools. They also have a special "SHR" (Synology Hybrid RAID) which automatically provides for dynamic expansion of the storage capacity when an even number of drive sizes are present; both single-drive- and dual-drive-failure protection modes are available with SHR on the DS2413+.

When provisioning storage, you have essentially two starting options: do you completely dedicate a set of  disks to a volume/LUN ("Single volume on RAID"), or do you want to provision different portions of a set of disks to different volumes and/or LUNs ("Multiple volumes on RAID")?

iSCSI presents a different sort of twist to the scenario. DSM permits the admin to create both "Regular files" and "Block-level" LUNs for iSCSI. The former reside as sparse file on an existing volume, while the latter is done with a new partition on either dedicated disks (Single LUNs on RAID) or a pre-existing disk group (Multiple LUNs on RAID). The "Regular files" LUN is the only option that allows for "thin provisioning" and VMware VAAI support; the Single LUN option is documented as highest-performing.

For purposes of comparison, the only mode of operation for the iomega px6-300d (which I've written about several times on this blog) is like using "Multiple Volumes/LUNs on RAID" in the Synology, while the older iomega ix2-200d and ix4-200d models operate in the "Regular files" mode. So the DSM software is far more versatile than iomega's StorCenter implementations.

So that leaves a lot of dimensions for creating a test matrix:
  • RAID level (which is also spindle-count sensitive)
  • Volume/LUN type
  • Protocol
DS2413+ 1 block seq read

(IOPS)
4K random read

(IOPS)
4K random write

(IOPS)
512K seq write

MB/s
512K seq read

MB/s
Protocol RAID Disks
iSCSI none 1 16364 508 225 117.15 101.11
RAID1 2 17440 717 300 116.19 116.91
RAID1/0 4 17205 2210 629 115.27 107.75
6 17899 936 925 43.75 151.94
RAID5 3 17458 793 342 112.29 116.34
4 18133 776 498 45.49 149.27
5 17256 1501 400 115.15 116.12
6 15768 951 15960.41114.08
RAID0 2 17498 1373 740 116.44 116.22
3 18191 1463 1382 50.01 151.83
4 18132 771 767 52.41 151.05
5 17692 897 837 56.01 114.35
6 18010 1078 1014 50.87 151.47
RAID66 17173 2563 870 114.06 116.37
Protocol RAID Disks 1 block seq read

(IOPS)
4K random read

(IOPS)
4K random write

(IOPS)
512K seq write

MB/s
512K seq read

MB/s
NFS none 1 16146 403 151 62.39 115.03
RAID1 2 15998 625 138 63.82 96.83
RAID1/0 4 15924 874 157 65.52 115.45
6 16161 4371 754 65.87 229.52
RAID5 3 16062 646 137 63.2 115.15
4 16173 3103 612 65.19 114.76
5 15718 1013 162 59.26 116.1
6
RAID0 2 15920 614 183 66.19 114.85
3 15823 757 244 64.98 114.6
4 16258 3769 1043 66.17 114.64
5 16083 4228 1054 66.06 114.91
6 16226 4793 1105 65.54 115.27
RAID66 15915 1069 157 64.33 114.94

While this matrix isn't a complete set of the available permutations for this device, when I stick with the 6-disk variations that match the iomega I already have in the lab, I've been stunned by the high latency and otherwise shoddy performance of the iSCSI implementation. Further testing with additional spindles did not—counter to expectations—improve the situation.

I've discovered the Achilles' Heel of the Synology device line: regardless of their protestations to the contrary about iSCSI improvements, their implementation is still a non-starter for VMware environments.

I contacted support on the subject, and their recommendation was to create the dedicated iSCSI target volumes. Unfortunately, this also eliminates the ability to use VAAI-compatible iSCSI volumes, as well as sharing disk capacity for NFS/SMB volumes. For most use cases of these devices in VMware environments, that's not just putting lipstick on a pig: the px6 still beat the performance of a 12-disk RAID1/0 set using all of Synology's tuning recommendations.

NFS performance is comparable to the PX6, but as I've discovered in testing the iomega series, NFS is not as performant as iSCSI, so that's not saying much... What to do, what to do: this isn't a review unit that was free to acquire and free to return...

Update:
I've decided to build out the DS2413+ with 12x2TB drives, all 7200RPM Seagate ST2000DM001 drives in a RAID1/0, and use it as an NFS/SMB repository. With over 10TB of formatted capacity, I will use it for non-VMware storage (backups, ISOs/media, etc) and low-performance-requirement VMware workloads (logging, coredumps) and keep the px6-300d I was planning to retire.

I'll wait and see what improvements Synology can make with their iSCSI implementation, but in general, don't see using these boxes for anything but NFS-only implementations.

Update 2:
Although I was unsatisfied with the DS2413+, I had a use case for a new array to experiment with Synology's SSD caching, so I tried a DS1813+. Performance with SSD was improved over the non-hybrid variation, but iSCSI latency for most VMware workloads was still totally unacceptable. I also ran into data loss issues when using the NFS/VAAI in this configuration (although peers on Twitter responded with contrary results).

On a whim, I went to the extreme of removing all the spinning disk in the DS1813+ and replacing them with SSD.

Wow.

The iSCSI performance is still "underwhelming" when compared to what a "real" array could do with a set of 8 SATA SSDs, but for once, not only did it exceed the iSCSI performance of the px6-300d, but it was better than anything else in the lab. I could only afford to populate it with 256GB SSDs, so the capacity is considerably lower than an array full of 2TB drives, but the performance of a "Consumer AFA" makes me think positively about Synology once again.

Now I just need to wait for SSD prices to plummet...

Wednesday, April 9, 2014

Importing a CA-signed certificate in VMware vSphere Log Insight

I came across a retweet tonight; someone looking for help getting VMware vSphere Log Insight (vCLog) to accept his CA-signed certificate for trusted SSL connections:

As luck would have it, I was able to get it going in my home environment a while back. In the course of studying for Microsoft certifications, I had the opportunity to get some real practice with their certificate authority role, and I have a "proper" offline root and online enterprise intermediate as an issuer running in my home lab environment.

With that available to me, I'd already gone through and replaced just about every self-signed certificate I could get my hands on with my own enterprise certs, and vCLog was just another target.

I will admit that in my early work with certificates and non-Windows systems, I had a number of false starts; I've probably broken SSL in my environment as many times as I've fixed it.

One thing I've learned about the VMware certs: they tend to work similarly. I learned early on that the private key cannot be PKCS#1 encoded; it must be PKCS#8 key. How can you tell which encoding you have?

If the Base64 header for your private key looks like this:
-----BEGIN PRIVATE KEY-----
you have a PKCS#1 key. If, instead, it looks like this:
-----BEGIN RSA PRIVATE KEY-----
then you have the PKCS#8 key. Unfortunately, many CAs that provide the tools needed to create the private key and a signed cert only provide you with the PKCS#1 key. What to do? Use your handy-dandy OpenSSL tool to convert it (note: there are live/online utilities that can do this for you, but think twice and once more just for good measure: do you really want to give a copy of your private key to some 3rd party?):
openssl rsa -in private.pkcs1 -out private.pkcs8
Once you have the properly formatted private key, you must assemble a single file with all the certs in the chain—in the correct order—starting with the private key. This can be done with a text editor, but make sure you use one that honors *NIX-style end-of-line characters (newline as opposed to carriage-return+linefeed like DOS/Windows likes to use).

Most public Certificate Authorities (I personally recommend DigiCert) are going to be using a root+intermediate format, so you'll end up with four "blobs" of Base64 in your text file:
-----BEGIN RSA PRIVATE KEY-----
[Base64-encoded private key blob]
-----END RSA PRIVATE KEY-----
-----BEGIN CERTIFICATE-----
[Base64-encoded intermediate-signed server certificate]
-----END CERTIFICATE-----
-----BEGIN CERTIFICATE-----
[Base64-encoded root-signed intermediate CA cert]
-----END CERTIFICATE-----
-----BEGIN CERTIFICATE-----
[Base64-encoded root CA cert]
-----END CERTIFICATE-----
Note that there's nothing in between the END and BEGIN statements, nor preceding or following the sections. Even OpenSSL's tools for converting from PKCS#12 to PEM-encoded certificates may put "bag attributes" and other "human readable" information about the certificates in the files; you have to strip that garbage out of there for the file to be acceptable.

If you follow these rules for assembly, your file will be accepted by vCLog's certificate import function, and your connection will be verified as a trusted connection.

Wednesday, April 2, 2014

An odd thing happened on the way to the VSAN...

Object placement

Cormac Hogan has a nice post on the nature of VSAN from an "Objects & Components" perspective, Rawlinson Rivera describes witness creation & placement, and Duncan Epping teaches the user how to see the placement of objects in VSAN.

Based on these (and many other articles written by them and other authors—check out Duncan's compendium of VSAN links) I thought I had a pretty good idea of how a VM would be laid out on a VSAN datastore.

Turns out, I was wrong...

Default use case

Take a VM with a single VMDK and put it on a VSAN datastore with no storage policy, and you get the default configuration of Number of Failures to Tolerate (nFT) = 1 and Number of Disk Stripes per Object (nSO) = 1. You'd expect to see the disk mirrored between two hosts, with a third host acting as witness:
Image shamelessly copied from Duncan
If you drill down into the object information on the Web Client, it bears out what you'd expect:

Multi-stripe use case

The purpose of the "Number of Disk Stripes per Object" policy is to leverage additional disks in a host to provide more performance. The help text from the nSO policy is as follows:
The number of HDDs across which each replica of a storage object is striped. A value higher than 1 may result in better performance (for e.g. when flash read cache misses need to get services from HDD), but also results in higher use of system resources. Default value 1, Maximum value: 12.
In practice, adding additional stripes results in VSAN adding a new "RAID 0" layer in the leaf objects hierarchy under the "RAID 1" layer. That first level is the per-host distribution of objects needed to meet the nFT policy rule; this second layer represents the per-host distribution of objects necessary to meet the nSO policy rule.


As you can see from the diagram, the stripes for a single replica aren't necessarily written to the same host. Somehow, I'd gotten the impression that a replica had a 1:1 relationship with a host, which isn't the way it's run in practice.

I'd also been misreading the details in the web client for the distribution of the components; when all your disks have a display name that only varies in the least-significant places of the "naa" identifier, it's easy to get confused. To get around that, I renamed all my devices to reflect the host.slot and type so I could see where everything landed at a glance:

As this screencap shows, the VM's disk is a 4-part stripe, split among all three of my hosts. One host (esx2) has all four components, so the other hosts need enough "secondary" witnesses to balance it out (three for esx3 because it hold one data component, one for host esx1 because it holds three data components). There's also a "tiebreaker" witness (on esx1) because the sum of the data components and secondary witnesses is an even number.

The other disks show similar distribution, but the details of disk utilization is not the same. The only thing I've found to be fairly consistent in my testing is that one host will always get an entire replica, while the other two hosts share components for the other replica; this occurs for all policies with nSO>1. If you have more than 3 hosts, your results will likely be different.

Wednesday, February 5, 2014

Homelab, part troix

With VSAN in beta and having a requirement for a three-host minimum, I was getting antsy: how could I test it in real-life scenarios? Sure, I could've spun up a virtual ESXi instance on one of my two hosts, but that would defeat the purpose of duplicating customer scenarios.

So, I once again reached out to my friends at Stallard Technologies, Inc. for a third host to match the two I'd already purchased. Thankfully, they still had my preferred configuration available, and they even had it on sale for the same price I'd paid before. With my original setup designed around those older 2U hosts, I was still using the 2U brackets to hold each of the 1U servers. With the addition of the third server, I simply move it from side-to-side if I need access to the host that's closer to the wall.

At this point, I'd also reached the limit of the ports available on my Cisco SG300-28, so I needed some changes there, too: I wouldn't just buy 1 switch, but I'd instead pick up a pair so I'd have redundancy for the hosts, and I'd uplink the switches to the Cisco as my "core" switch, as well as cross-connect the new switches to prevent either uplink set as a single-point-of-failure. Given the costs and the number of ports I was planning, SG300 was out of the running due to cost considerations. Based on recommendations, I chose a pair of HP V1910-24G; together, they essentially cost the same as the SG300-28 did.

I again turned to the StarTech equipment brackets, this time for the 3U model to accommodate the three switches.
Network Central
The addition of all those switches were nice, but I was starting to get worried by all those devices with single power supplies: sure, I could plug them all into a UPS, but what happens when the UPS quits? I searched for and found a working automatic transfer switch (ATS) on Ebay for cheap, and added that to the mix, again using a StarTech 1U bracket to tuck it behind the desk.

With common VSAN configurations being designed around 10Gb/s, I knew that kicking the tires with 1Gb/s connections was going to require some careful design decisions: two connections per host, shared with the other IP storage in my environment was going to be a bit thin. A side-effect of adding more network ports, however, was the ability to also increase the number of pNIC ports in the hosts, so I added another dual-port Intel adapter to bring the per-host count up to 8 Gigabit ports.

In my current setup, I have three VDS switches:
  1. Management & vMotion (2 x pNIC)
  2. Guest networking (2 x pNIC)
  3. IP Storage (4 x pNIC)
The first and last switches have vmkernel port groups; the IP Storage switch also has a VM portgroup for in-guest access to iSCSI. It looks a little like this:
In this configuration, I get 4x1Gb/s "pinned" connections for VSAN, two "pinned" connections for iSCSI and two vmkernel NICs for independently-addressed NFS shares. Between NIOC and physical load balancing that's available in the VDS switch, I don't think I'll overwhelm the iSCSI with VSAN (or vice-versa).

This configuration also makes it so no single-chip failure can take out an entire block of services: adjacent pNICs are on different assignments, and paired adapters are either on-board or expansion card.

With 9 connections from each host (8 data NICs for the host; 1 management NIC for the hardware), it was time to get a little more serious about cable management. I ended up buying custom colored patch cables from Monoprice, along with a length of "wire loom"; the loom allowed my to bundle the data cables together into a single, tidier bulk cable. As the diagram above shows, the colors were assigned to NICs and each pair was additionally marked with some black electrical tape. All motherboard-based ports were patched into one switch, while the remaining ports were patched into the second. It's now all very tidy and consistent.

When I purchased those original hosts, I didn't get drives with them; I pretty much presumed that I'd boot from SD card and use shared storage for 100% of the workloads.

Enter PernixData FVP: I'd already had a couple of Intel i520-series SSDs from testing the performance of cache in my iomega arrays (conclusion: it doesn't help), so the first disk installed in my hosts were 240GB SSD.

Enter HP StoreVirtual VSA: I've been a long-time fan of the former Lefthand VSA, and after receiving the latest version as a long-term NFR copy as a vExpert, I decided I needed some capacity to do some testing. I searched around and decided that the Seagate Constellation.2 enterprise SATA were the right choice: sure, they were limited by their interface and rotational speed, but they were also backed by a 5y manufacturer's warranty and had a decent price point for 500GB, all things considered. Two more spindles added to each host.

Enter the third host and VSAN: although the hosts already had what I'd need to do testing (SSD & HDD), I didn't want to tear down the other storage, so it was back to the well for more SSD and HDD.
As they stand today, all three hosts have full inventory of disk: 2x 240GB SSD, 4x 500GB HDD.

Sunday, September 15, 2013

Revisiting the Home Lab

Although my home lab has performed flawlessly (aside from the occasional lost hard drive in the NAS boxes), the cornerstone equipment—two Dell PowerEdge 2950 hosts—were a little dated when acquired and have certainly shown their age as post vSphere 5.0 releases (and their accessory services & features) come out.

In short, they weren't cutting it anymore: not enough RAM, physical NICs that don't support NIOC, limited cores, limited CPU/RAM features for the hypervisor, etc.

But, having "saved my pennies" while working with the 2950s, I have treated myself to new kit.

I could have gone down the path of "Baby Dragon"—and had I more free time to do system builds and support my frankenservers—but instead chose recertified Dell PowerEdge R610s from Stallard in my home town of Kansas City, getting another set of enterprise-class servers with a 1-year warranty from STI to boot.

Of several criteria, I knew I wanted a recent generation of hardware with 96 to 128GB of RAM per host. Rackmount would be a good replacement for the existing hosts, as long as the "ears" on the new hosts would work with my crazy vertical setup. PCIe was a given, but with the enormous capacity available among 3 NAS boxes, local storage wasn't a consideration. Finally, I wanted a system that had an inboard SD card reader so I could boot via Flash.

There are many, many options to fit the bill: I watched eBay and Craig's List, checked with my company's NFR purchase options, and several recommended resellers of reconditioned gear. With STI in the area and the option to take direct delivery (no shipping!!), there just wasn't anything else that fit the bill.

I took delivery of the new servers on Friday, 13-Sept, and set about swapping new for old. After putting the first host into maintenance mode and removing it from storage & DVS, I dismounted it and swapped the 2-port Intel server NIC into the new server.

I then mounted the new server after dropping an 8GB "Class 10" SD card into the internal reader, and booted to the vSphere install CD.

For those of you who have done this, you know how quickly ESXi installs; a little additional configuration for storage and vmkernel nics and I was ready to perform my first vMotion to the new host (what I would normally consider a definitive test of a cluster setup). A final step to run Update Manager against the host to get it fully patched, and I was "In Production" on the first host.

I repeated the steps with my second old/new pair, and even with interruptions around the house, was done with the swap in a handful of hours. (Try THAT with a non-virtualized system!)

New lab specs:

  • Dell PowerEdge R610
  • 96GB RAM (12x8GB)
  • 2x Intel E5540 (Quad-core, 2.53Ghz, Hyperthreading enabled)
  • Dell SAS 6/iR; No internal storage
  • Boot from 8GB SD Card
  • 6x 1Gbps (4x Broadcom 5709, 2x Intel 82571EB)
  • Redundant power
  • iDRAC Enterprise for "headless" operation
Closing Notes:
By choosing to go with Enterprise class equipment, both now an previously, I also have a charitable organization that is quite interested in taking my old 2950s; while I may have out-grown them, these servers would be the first "true" servers they'd ever had. Additionally, the servers remain on the HCL for VMware, so it's quite likely I'll be able to get them to put in VMware rather than trying to do physical server installs on them.

Wednesday, May 1, 2013

The "home lab"

Back in 1998, I took an old tower system and put a copy of NetWare 5 on it, then connected a modem and shoved it under a desk. I connected it to two other machines using discarded 10Base-2 network adapters,  RG-59 cable and a couple of terminating resistors. That version was able to do on-demand dialup to an ISP, could share that connection with connected clients, and when you stuck with IPX for inter-machine communication, was immune from most worms or viruses that spread by NetBIOS shares.

No, that wasn't a work or customer environment, it was my home network.

It wasn't too much longer that I joined the beta team for Time Warner Cable, testing out the very first DOCSIS modems in the Kansas City area. Back then, it was faster for me to drive home, download patches (to an Iomega ZIP disk—remember those?) and drive back to work than to use the office network to do it.

My, how things have changed.

I'm still the geek with a home system that rivals those found in some small businesses, but that system serves a very important purpose. This home environment affords me the luxury to experiment, learn and play with systems that are similar enough to business environments to be useful, but not so critical that the occasional upset doesn't result in lost revenue.

Having seen others post information on how they built their labs, I thought I'd post mine, too. Not so much for bragging rights—although there's always a bit of that in IT—but to show yet another variant in the theme.

Compute: 2 x Dell PE2950 III with
  • 2 x Intel Xeon E5345 @ 2.33 GHz
  • 32 GB DDR2 (8 x 4GB DIMMs)
  • Dell PERC 6/i
  • Intel PRO/1000 PT Dual Port Server Adapter
  • DRAC5
  • 2 x 1TB 7200RPM (RAID1), 1 x 240GB SSD; 4 x 500GB 7200RPM (RAID1/0), 1 x 240GB SSD
  • Dual power supplies
  • 2 x APC BackUPS 1500
Network:
  • Cisco SG300-28
  • Netgear JGS524
  • Apple Airport Extreme
  • 2 x Apple Airport Express (1st Generation)
  • Apple Airport Express (2nd Generation)
  • Astaro ASG110
Storage:
  • iomega StorCenter ix2 "Cloud Edition", 2 x 1TB "stock" drives
  • 2 x iomega StorCenter px6-300d, 6 x 2TB HDS723020BLA642 (RAID5)
  • Synology DS2413+, 12 x ST2000DM001 (RAID5)

The current status is the result of years of slow change. I picked up the first 2950 at Surplus Exchange for $200, with no drives, 4GB RAM and stock network (dual-port Broadcom). I replaced the RAM and added the Intel NIC and PERC 6/i through my friends at Aventis Systems. The second 2950 was from eBay, originally priced as part of a bulk lot with a "buy it now" exceeding $1000; it was only one of several identical systems with 8GB RAM (8 x 1GB), PERC 5/i and no DRAC. I was able to negotiate with the seller to send it without the RAM or PERC for $100, then added the same (plus DRAC) to match the first. In the latter case, it was more important to match MB & CPU than anything else, and I made out like a bandit because of it.

At the time, I put the big drives in the hosts because I didn't have shared storage with sufficient performance to host the VMs I needed to run regularly; running them locally was the only option. Later, I was able to add shared storage (first, an iomega ix4-200d, which actually had enough "steam" to be reasonable with these systems), which I've been slowly updating to the current status.

The PE2x50 is a line of 2U rackmount servers. Rather than leaving them on a table (a pain if you ever need to get into them) or putting them in a rack (lots of floor space consumed), I hung them on the wall. Seriously. Startech.com sells a 2U vertical-mount rack that's intended for network gear or other light gear; I bolted them into the poured-concrete walls of my basement, and hung the servers from them. The front "tabs" of the server are sufficiently sturdy to support the weight, and it gives me full access to the "innards" of the machines without pulling them from the wall.
PE2950 on startech.com vertical rack brackets.
The Cisco switch doesn't run IOS (it doesn't run iOS, either, but that's a different joke) but it is a layer 2* managed switch that does VLAN, QoS, LAG/LACP and other fine functions you expect to find in the enterprise. And yes, I would prefer to have 2, but seem to do fine without as long as I don't need to upgrade the firmware.

This environment is a bit more than just a lab, however; labs have the idea of impermanence to them, while I have a number of systems that I never dump or destroy. This setup is permanent residence of a pair of domain controllers, a pair of file servers, an Exchange 2010 MBX/HT host, a remote desktop server, a multi-purpose web server (it does regular web, Exchange CAS & RDS Gateway), SQL Server and of course, vCenter. The remaining capacity gets used by "play" with other projects in the way one would normally use a lab: VMware View, Citrix XenApp/XenDesktop/XenMobile, vCOps, vCIN (infrastructure navigator).

And as of Monday (29-April-2013) it was upgraded to the latest/greatest version of vSphere: 5.1 U1

Tuesday, April 23, 2013

Moving the vSphere 5.1 SSO database

Plenty of resources for moving MS SQL Server-hosted vCenter and Update Manager databases. But what about the database for the new Single Sign-On service?

Easy, as long as you get the SQL users moved and change the hostname string in two places.

The easy part is getting the users moved. There's a handy Microsoft KB article for transferring logins from one server to another. I've never had a problem with that.

The harder part is getting the SSO "bits" to accept a new hostname. Thankfully, Gabrie van Zanten was able to document this, along with some other pieces related to SSO database management.

So here's your steps:
  1. Execute the sp_help_revlogin stored procedure on the existing SQL server to get the RSA_USER and RSA_DBA logons.
  2. Merge the create user lines with the script from the vCenter SSO Install source. This makes certain you have all the necessary attributes for these users.
  3. Shut down the SSO service.
  4. Backup the current RSA database.
  5. Restore the backup on the new server.
  6. Execute the user creation lines from Step 2.
  7. In a command shell, go to the SSO Server's utils folder (in a default install, the path is C:\Program Files\VMware\Infrastructure\SSOServer\utils) and use the rsautil script to modify the database location:
    rsautil configure-riat -a configure-db --database-host hostname
  8. Verify your changes by inspecting .\SSOServer\webapps\ims\WEB-INF\classes\jndi.properties
  9. Update the db.host field in the .\SSOServer\webapps\lookupservice\WEB-INF\classes\config.properties file.
  10. Restart the SSO service.

Thursday, March 14, 2013

Windows Sysprep and VM creation

I've seen a ton of blog posts, reference documents and white papers all instructing you—the virtualization admin—to build "template" VMs in the following fashion:

  1. Create a VM and install the OS
  2. Install standard applications
  3. Set all your configuration settings
  4. Patch & Update the OS and applications
  5. Sysprep
  6. Convert to Template
I'm here to tell you now: stop doing Step 5. Don't sysprep those golden images. At least, don't do it in your template process.

At the very least, using this model means you won't be able to update that template more than 3 times: doing a standard sysprep—without a custom unattended settings file—will "rearm" the software activation only so many times. If you run out of "rearms" you get the joy of rebuilding your golden image.

There is a way around the sysprep limit—see the SkipRearm post for my method—but that still leaves you with a VM template that's going to roll through the remainder of the Sysprep process the first time you turn it on—which you'll be doing every time you want to patch or update the image.

Instead, make Sysprep part of your new VM creation process. With VMware, you can easily convert a VM  back-and-forth from a template to a VM; in fact, for the longest time, I never even converted VMs to templates because there didn't seem to be much value in them: everything you could do to a template, you could do to a VM, while there are things you can do with a VM that you can't do to a template.

Instead, leave your golden image at Step 4; you will be revisiting it every month anyway, right?

Every time you need to spin up a VM from that point forward, you will have a (relatively) recently-patched starting point. In fact, if you're really efficient, you'll run the template VM before creating a new machine from it and patch that machine. Either way, you'll be patching a VM; but if you need to spin up more than one VM, the patching is already complete!

So here's my process:
A) Create your golden image
B) Update your golden image
C) Clone a new VM from the golden image
D) Run Sysprep (with or without SkipRearm and other unattended settings)
E) Repeat steps C-D as needed
F) Repeat step B as needed

Note: I realize there are certain setups that require you to leave a template/golden image at the post-Sysprep shutdown state. In those cases, just make sure you've got a snapshot prior to Sysprep so you can revert to a state before it was ever run.

Wednesday, February 6, 2013

Re-engineering vCenter: a proposal

After fighting my own instances of SSO and vCenter in the vSphere 5.1 management suite, seeing posts from others that have run into the same issues or other new and interesting ones, and generally counseling people to hold off on upgrading to 5.1 because of vCenter issues rather than hypervisor issues, it struck me that I've not seen very many suggestions on how or what to fix.

I'm just as guilty: It's far easier to complain and expect someone else to fix the problem than to wade in provide solutions.

So I did a bit of thinking, and have a set of ideas for re-engineering vCenter to overcome perceived faults.

At any rate, here we go...

Solution 1: SSO as a "blackbox" appliance.

Single sign-on has probably received the worst press of all the new vCenter bits in vSphere 5.1. By divesting this particular piece of all its Windows- and SQL-compatible nature and being distributed as an appliance, the vCenter team could also focus on adding features that allow the single appliance to be scaled (or at least made highly-available as an intrinsic feature).
Problems solved:

  • Native code. By standardizing on a single appliance OS, the development team could shelve the low-performing Java code—who's only redeeming value is the ready portability to run on both Windows and Linux platforms—and write using native code and eschew the interpreted languages. This should have the added bonus of being far more "tunable" for memory utilization, resulting in a svelte little appliance instead of a multi-gigabyte monster.
  • Integral clustering & load balancing. By adding integrated clustering and shared virtual server technology, the addition of a second appliance immediately eliminates SSO as a single point of failure in the vCenter suite. While the current implementation has a degree of support for adding high availability to this most-crucial of services, the lack of official support for many clustering or high-availability technologies for dependencies (eg, database access, client load balancing) is embarrassing.
  • Distributed database. By discarding the use of ODBC-connected databases and falling back on an open-source distributed database (with high levels of data integrity), the appliance can rely on internal database replication & redundancy rather than depending on some other system(s). Single appliances for small implementations are no longer dependent on external systems; multi-node clusters become interwoven, allowing scale-out without any other dependencies, yet behave transparently to systems that rely upon it.

Solution 2: If you're going "blackbox" with SSO, why not vCenter Server, too?

Yes, the vCenter Server Appliance (or VCSA) exists, but in its current iteration, it's limited compared to the Windows Application. Worse, because of a presumed desire to share as much code between the application and the appliance, a large portion—would it be fair to say essentially all of it?—of the server is written in Java. I don't know about you, but while that might serve the goal of making portable code, it certainly isn't what I'd want to use for a performance piece. So the same thing goes here as with SSO:
  • Native code.
  • Integral clustering (say goodbye to vCenter Heartbeat as an independent product)
  • Distributed database (Say goodbye to those MS or Oracle licenses!)

Solution 3: Integrated appliance

If you're going to have SSO and vCenter with the same sort of "black box" packaging, why not combine everything (SSO, Inventory, vCenter, Client, etc.) into a single appliance? We have a degree of that with the VCSA, but without the additional "packaging" as suggested above as well as needing feature-parity with the Windows app. Update Manager should be included, and View Composer could be just another 'click to enable' service that's activated with a license key: when configuring the VCSA, the admin should have the ability to enable arbitrary services, and if the same service is configured on multiple instances of the VCSA, the admin should have the option of enabling that service to run as a member of a cluster instead of having an independent configuration.
Stop with the individual appliances for every little management function: include all of them as a service in every build of VCSA!

No Silver Bullet

These suggestions are neither the "silver bullet" for the current perceived failings in vCenter, and I'm sure my peers can come up with dozens of reasons why these ideas won't work—not to mention the difficulty in actually producing them in code.
If nothing else, however, I hope is sparks thought in others. Maybe some discussion into how things can be improved, rather than simple complaints of "would'a, could'a, should'a" can come from it.

Wednesday, November 28, 2012

vSphere 5.1 Beacon Probes

As in previous versions of vSphere, an administrator for 5.1 can choose to use Link status only or Beacon probing to help determine the uplink status of multi-NIC physical port aggregation.
Failover Detection Options
The default is "Link status only," which merely watches the Layer 2 status for the network adapter. While very simple, it does not have the ability to determine whether "upstream" network problems are present on that link.

That's where Beacon probing comes in handy: By sending a specially crafted frame (it's not a packet; it's an Ethernet frame without any IP-related elements) from one pNIC to another, ESX(i) is able to determine whether a complete path exists between the two. When three or more pNICs are together in an uplink set (in either standard or distributed switches), it's possible to determine with high reliability when a link is "bad," even if the local connectivity is good.

VMware has several blog posts on the topic (What is beacon probing?Beaconing Demystified: Using Beaconing to Detect Link Failures), and the interwebs are full of information on what it is and how it works for even the most casual searcher.

While working on a completely different system, I was doing some port monitoring and discovered that my ESXi 5.1 hosts were using beaconing. I don't have it turned on in my lab because I have just the one switch: If a link is down, you can immediately detect it without any need to "look downstream." It was kind of annoying to see those showing up in my packet capture, and while it would've been easy enough to filter them, I was more interested in trying to figure out why they were there in the first place: I was pretty sure I hadn't turned Beaconing on for any of my port groups.
Beacon probing frames captured in Wireshark
I went through the settings of all my port groups and verified: all were set to Link status only. What? So I turned to Twitter Tech Support with an inquiry and got a quick reply:
http://kb.vmware.com/selfservice/microsites/search.do?language=en_US&cmd=displayKC&externalId=1024435
Unfortunately, setting the Net.MaxBeaconsAtOnce to 0 as suggested in the KB article didn't help: still seeing the beacons. But that suggestion helped me fine-tune some of my search criteria, and a memory was triggered: there's some new network health check capabilities in vSphere 5.1...
Virtual switch health check options in vSphere 5.1
By default, both of these health checks are disabled, but I remember seeing them and enabling them when I first set up 5.1. I wasn't sure which item was the source of the beacon frames, but it's simple and fast to check both options when the frames show up in the packet capture every 30 seconds!
Enabling VLAN and MTU will enable beaconing
Turns out that it's the VLAN and MTU that was putting those beacons out there. I was only watching the traffic for a specific VLAN (which is tagged for my pNICs), so the Teaming and failover option may also put beacons on the untagged network. But the mystery of beacon frames was solved!

Friday, October 26, 2012

Upgrading vSphere 5.1.0 to 5.1.0a

VMware released the 'a' update to their vSphere 5.1 binaries (both vCenter & Hypervisor) on 25-Oct-2012. I downloaded the ISOs for both ESXi (VMware-VMvisor-Installer-201210001-838463.x86_64.iso), vCenter (VMware-VIMSetup-all-5.1.0-880471.iso)  as well as the offline update (ESXi510-201210001.zip) because VMware vSphere Update Manager (VUM) doesn't perceive these as patches.

Update: Since first posting this, I've been informed that VUM is able to patch the ESXi hosts, whether you're running 5.1.0 or 5.1.0a versions of vCenter. I infer one of two things from this: I went after the updates too soon (before VMware had published the update for VUM to use), or my VUM install isn't getting the update info correctly. This change only affects the way you (can) go about updating the host; the vCenter server upgrade doesn't change.

Note: The offline update package for 5.1.0a is not for use with VUM; you'll have to either install from the ISO or use command-line methods to perform an upgrade of ESXi. The latter will be covered in this post.

Reminder: If you run vCenter in a VM, not on a physical host, use out-of-band console access that bypasses the vCenter Server! As soon as that vCenter service stops—which it must—your connectivity to the VM goes away. You can use the VIC if you connect directly to the ESXi host that's running the vCenter VM; that's the way I do mine. Windows Remote Console should only be used with the "/admin" switch, and even then, your mileage may vary. Any other remote access technique that mimics the physical console access is fine. Just don't use the VIC or Web Client remote access via the vCenter services that you're trying to upgrade. "Duh" might be your first response to this, but the first time you forget and connect out of habit, you'll hopefully remember this post and smile.

As with all upgrades, vCenter is first on the list, and in the new model introduced with 5.1, that starts with the SSO Service. That was recognized as an upgrade, and proceeded and succeeded without any additional user entry beyond the obligatory EULA acceptance.

Just to be sure, after SSO finished updating, I tried logging in using the "old style" client (VIC) from the shortcut on the vCenter desktop: no problem. Then I tried it with the Web Client: failure. On a hunch, I restarted the Web Client Service, but with no luck: "Provided credentials are not valid."

Oopsie.

One more test: I'd used the "Use Windows session authentication" option in the Web Client. This time, I tried using the same domain credentials, but manually enter them instead of using pass-through: Pass.

That may be a bug; it may be a problem with unmatched versions of SSO and Web Client. Moving on with the rest of the upgrade...

The next step is to upgrade the Inventory Service service; like SSO, it can upgrade without specific user input. However, when the service is replaced with the newer version, vCenter Server (and other services dependent on vCenter Service) is stopped and not restarted. Manually restarting the services will allow you back at your system again, just in case you get interrupted while working and need to get back on before updating the vCenter Server service to the new version...

Like the previous services, vCenter Server recognizes that it's an upgrade and click, click, click to complete. Naturally, the services are stopped in order to replace them, but the installer does restart them when it's done. Upgrading the VIC is another click,click,click operation, as is the Web Client.

It did not, however, fix the pass-through authentication issue in the Web Client.
I spent a while in conversation with Chris Wahl and Doug Baer on Twitter, trying to get it straightened out. Both are VCDX and super sharp, and they gave me lots of solid advice for improving bits of my vCenter setup, but this one wasn't budging. At this point, I've given up on it: there's a solid workaround, so it's not a dealbreaker. Watch this space, however: if/when I figure it out, I'll pass along my findings.
VUM isn't updated in this release, so that bit doesn't need to be upgraded or reinstalled. However, the offline package isn't going to work with it (as mentioned above), so the upgrade is done using one of the alternate methods. My preferred choice is to use the busybox shell via SSH.

To use this method, I first used the VIC to upload the offline update to a datastore visible to all my hosts. Next, I put the first host into Maintenance Mode. Because I took advantage of the sweet "ssh AutoConnect" plugin, the console of the host is a right-click away. Once at the console, the following command is executed:

esxcli software vib update -d /vmfs/volumes/[DATASTORE]/[PATCH_FILE].zip

After a short wait, the prompt was back informing me that the update was complete, and a reboot was required to implement. You can use your favorite method of restarting the host, and once it returns to connectivity with vCenter, you have to manually exit Maintenance Mode. Repeat on each host until you're fully updated.

This update didn't replace Tools with a new version; the tools installed as part of the GA version are recognized as current, so I didn't get to see if the promise of no-reboot Tools updates would come to fruition.

Monday, October 22, 2012

vCenter 5.1 Install Notes

This post is a "live document" covering any "gotchas" that I discover as I install vCenter Server for vSphere 5.1 in various environments.

Install Defaults

SSO HTTPS Port: 7444
SSO Lookup Service URL: https://:/lookupservice/sdk
IS HTTPS Port: 10443
IS service mgmt port: 10109
IS linked mode comm port: 10111
IS Memory (small): 3072MB
IS Memory (med): 6144MB
IS Memory (large): 12288MB
VC HTTPS Port: 443
VC HTTP Port: 80
VC Heartbeat: 902
WebSvc HTTP Port: 8080
WebSvc HTTPS Port: 8443
WebSvc ChangeSvc Notification: 60099
LDAP Port: 389
SSL Port: 636
VC Memory (small): 1024MB
VC Memory (med): 2048MB
VC Memory (large): 3072MB
WebClient HTTP Port: 9090
WebClient HTTPS Port: 9443

Process Flow


Service Ports

Chances are very good that you'll be challenged by the Windows Firewall. Make sure that it's either disabled, or the appropriate ports are opened.

SSO Administrator Credentials

The default user (admin@System-Domain) is not changeable at installation, and you'd better keep the password you set well-documented. This is required when installing other dependent services.

JDBC requires fixed ports

The SSO service uses the JDBC library for connectivity to Microsoft SQL. JDBC is ignorant of named instances, dynamic ports and the use of the SQL Browser or SSRP. Before trying to install SSO, you must go into the SQL Server Configuration Manager and configure a static port. If there's only one SQL instance on the host, you can use the default (1433), otherwise, pick something out of the air.
"Dynamic Ports" is blank; "TCP Port" is set to the static port you desire.
If you want to avoid restarting the instance that's already running, you can set the currently-used port as the static port. The server will go on using that port (which it chose dynamically) until it restarts; after that, it'll use the same port as a static port.

SSO requires SQL Authentication

A good sign that SQL Auth is not enabled for the server.
Although the installer makes it look like you can install the services and use Windows Authentication, the service actually uses SQL Auth. This is also a side-effect of using JDBC libraries instead of native Windows ODBC or ADO libraries.
You can install with Windows Auth, but the service can't use it for DB logon.
If your database engine is not configured for SQL Auth, you'll need to talk to your DBAs—and possibly, your security officer(s)—to make it available. Changing the authentication from Windows to "Windows & SQL" may require restarting the instance; your DBAs will let you know when the job is completed.

Changes in 5.1.0a
Looks like VMware took some information to heart on broken installs and modified the SSO install dialog for database connectivity:
JDBC Connection for 5.1.0a SSO Installation
It is no longer possible to install using Windows Authentication. You will need to have created the user & DBA accounts as SQL Auth; the quick/easy way to get it right is to use the CreateUser script in the same folder as the CreateTablespace script.

SSO Service is Java

Like other services in the vCenter suite, SSO is a Java executable. You will want to review the heap size settings to be sure that it's reserving enough space to be useful, but not so much that it's wasteful. The default is 1024MB and can be adjusted by editing the "wrapper.java.additional.9" value in SSOServer\conf\wrapper.conf
Original memory: 1024MB; Running memory: 384MB

Inventory Service Service is Java

Like other services in the vCenter suite, Inventory Service (IS) is a Java executable. Although the installer gives you three choices for the heap size settings, you might want to tweak that value a little to be sure that it's reserving enough space to be useful, but not so much that it's wasteful. The value can be adjusted by editing the "wrapper.java.maxmemory" value in Inventory Service\conf\wrapper.conf
Small memory model: 3072MB; Running memory: 384MB

vCenter Database

Create the 64-bit Server DSN for the vCenter Server database connection before you start the installation. In order to do that, you'll have to create a blank database, too, or you can't set the DSN to connect to the right database by default.

Another gotcha: Using the built-in DOMAIN\Administrator account could backfire on you. Recommended practice, naturally, is to use a service account; however, you've got to run the installer from the account you want for the services to run under if you also want to use Windows Auth. That requires either logging in as that user, or running the installer with the "runas" utility.

vCenter Server Service is Java

Like other services in the vCenter suite, vCenter Server is a Java executable. Although the installer gives you three choices for the heap size settings, you might want to tweak that value a little to be sure that it's reserving enough space to be useful, but not so much that it's wasteful. The value can be adjusted by editing the "wrapper.java.maxmemory" value in tomcat\conf\wrapper.conf
Small memory model: 1024MB; Running memory: 384MB

Friday, October 19, 2012

vSphere Data Protection is still too immature


With the release of vSphere 5.1, I was excited to migrate from the sometimes-flaky "VMware Data Recovery" (VDR) product over to the Avamar-based "vSphere Data Protection" (VDP) appliance.

Unfortunately I found the product to be limited and hard to work with, even when compared to VDR.

While VDP replaces VDR in the vSphere lineup, it's no upgrade: VDR is not supported for v5.1 (but will work in many circumstances) and will not be supported for that environment; VDP will not be back-rev'd to older versions of vSphere. However, there is currently no way to "upgrade" or migrate from VDR to VDP; when you migrate to v5.1, you have to essentially "start fresh" with VDP if you desire to use the supported VMware solution. Any organization with backup retention requirements may find this a trouble spot—but then, you should probably be looking at a purpose-built product, anyway.

Installing VDP is both easy and difficult, and is performed in two stages. In the first stage—which is very easy—VDP is installed as an appliance from an OVF. The main decision you must make comes in the form of selecting the appropriate size of appliance to install: 512GB, 1TB or 2TB. This is where reading the manual comes in handy: you'd better pick the correct size, because you can neither expand the repository on an existing appliance, nor can you migrate the data from one appliance to another. This is one place where VDR had better capability: expanding a repository was pretty easy, and you could migrate a repository from one appliance to another. Additionally, the size is representative of the repository for the backups, not the space that is actually consumed by the entire appliance: the manual indicates that the actual space consumed by the appliance will be ~1.5x the stated size of the repository.

Why not just pick the biggest, you ask? Because the appliance will consume all that space, even if you install it on NFS or select thin disks for block storage. It'll start small, but the initialization process for the appliance (which happens as part of the second stage of the installation) will result in every block being touched and the disk being de-thinned. Worse, if you select "eager-zeroed thick" for the disk, the initialization will STILL go through and touch all blocks/clusters, so don't waste your time with it.

After the appliance is loaded and powered-on, you figure out where the admin portal is published, which is then opened in a web browser. The security-minded will cringe at the requirements for the appliance password (set during the second install phase):

  • Exactly 9 characters (no more, no less)
  • At least one uppercase letter
  • At least one lowercase letter
  • At least one number
  • No special characters
Personally, I have no problem with a minimum of 9 characters, but requiring exactly 9 chars, and not permitting "special characters" really makes me wonder what they're doing.

Other settings are configured (see Duncan Epping's "Back to Basics for VDP" for more details) and depending on your storage performance, it may be an either long or short wait while the system finalizes things and you're able to back up VMs. In my case, I had to redo the install a couple of times, with no rhyme or reason why the install mode wouldn't take the settings the first time.

Once the user interface is available in the Web Client, it's fairly straightforward for a previous VDR user to create VDP jobs that mirror the old system. VDR, however, had far more information about the "goings on" as it interacted with your vSphere environment; you could quickly see which VMs were being backed up at a given time (if at all), and if you had a failure for any reason, one could fairly quickly diagnose the reason for the failure (commonly a snapshot issue) and address the problem.

VDP, on the other hand, gives essentially zero information about machines being protected. Worse, the daily report that VDP can issue will also include information about machines that are not being protected, and there's no way to suppress the information. In my lab, I had 13 VMs to protect, and each day I learned that 2 of them would fail. I struggled to figure out how to determine the VMs with issues, and once I did that, it was nearly impossible to determine what caused the backup to fail. With some patience and Knowledge Base searches, I was able to get an idea of where logfiles might exist, but even once I found them, isolating the logs for the particular VMs of interest was difficult. Of the two failing VMs, one was the vCenter host, which frequently failed to backup in any environment when in-guest VSS snapshots were selected; I never solved that problem because I could never find a cause for the other VM (an Windows SSH host) failed as long as the system was powered on.

Ultimately, I gave up on it, and will be looking at other products like Veeam and Symantec V-Ray. While Avamar may be a phenomenal backup system, this VDP derivative of it is far too immature and unpredictable for me to rely on for my important data: I've uninstalled the appliance and removed the registration from vCenter.

Tuesday, September 11, 2012

Upgrading from vSphere 5.0 to 5.1

I upgraded my home lab from VMware vSphere 5.0 U1 to vSphere 5.1 today, using the GA bits that became available late yesterday, 10-September-2012.

vCenter Server

As with all vSphere upgrades, the first task was to upgrade the vCenter Server instance. This is also the first place that you'll see changes from the installs that were familiar from v4, forward.
Install Screen for VMware vCenter Server
The first thing you notice is that two other options are prerequisites to installing vCenter Server: vCenter Single Sign On (SSO) and Inventory Service.

VMware does you the favor of offering an option to "orchestrate" the install of the two items prior to installing vCenterServer, but in doing so, it also keeps you from accessing all of the installation options (like HA-enabled SSO) available in the prerequisite individual installs.

The next hiccup that I encountered was the requirement for the SSO database. Yes, it does support Microsoft SQL, and yes, it can install an instance of Express for you. But if you'd like to use the database instance that's supporting the current vCenter database, you'll have two additional steps to perform, outside of the VMware installer:
1) Run the database creation script (after editing it to use the correct data and logfile locations for the instance)
2) Reset the instance to use a static port.

It is documented as a prerequisite for installing the SSO service that the SQL server requires a static port. But why? Because it relies on JDBC to connect to the database, and JDBC doesn't understand Named Instances, dynamic ports or the Browser Service and SQL Server Resolution Protocol.
Note the lack of options for named instances.
If you did like many folks and used the default install of SQL Express as your database engine, you have the annoyance of needing to stop what you're doing and switch your instance (VIM_SQLEXP, if using the default) to an unused, static port. In order for that setting to take effect, you must restart the SQL Server instance. Which also means your vCenter services will need to be restarted.

Again: this is a documented requirement in the installation guide, yet another reason to read through it before jumping in...

Once you have SSO installed, the Inventory Service is recognized as a upgrade to the existing service, as is the vCenter Server itself. Nothing really new or unique in adding these services, with the exception of providing the master password you set during the SSO installation.

Then the ginormous change: you've probably been installing the Web Client out of habit, but now you really need to do so if you'd like to take advantage of any new vSphere 5.1 features that are exposed to the user/administrator (like shared-nothing vMotion).

But don't stop there! Make sure you install the vCenter Client as well. I don't know which plug-ins for the Client are supposed to be compatible with Web Client, but the ones I use the most—Update Manager and VMware Data Recovery—are still local client only.

That's right: Update Manager 5.1—which is also one of the best ways to install ESXi upgrades for small environments that aren't using AutoDeploy or other advanced provisioning features—can only be managed and operated from the "fat" client.

Finally, one positive note for this upgrade: I didn't have to change out any of my 5.0 license keys for either vCenter Server. As soon as vCenter was running, I jumped into the license admin page and saw that my existing license was consumed for the upgraded server, and no new "5.1" nodes in eval mode were present.

ESXi

Once vCenter is upgraded and running smoothly, the next step is to upgrade your hosts. Again, for small environments (which is essentially 100% of those I come across), Update Manager is the way to go. The 5.1 ISO from VMware is all you need to create an upgrade baseline, and serially remediating hosts is the safest way to roll out your upgrades.

Like the vCenter Server upgrade, those 5.0 license keys are immediately usable in the new host, but with an important distinction: as near as I can tell, those old keys are still "aware" of their "vTax" limitations. It doesn't show in the fat client, but the web client clearly indicates a "Second Usage" and "Second Capacity" with "GB vRAM" as the units.
vRAM limits still visible in old license key: 6 x 96 = 576. 
I can only assume that converting old vSphere 5 to vCloud Suite keys will replace that "Second Capacity" value with "Unlimited" or "N/A"; if you've got a big environment or host Monster VMs, you'll want to get those new keys as soon as possible to eliminate the capacity cap.
The upgrade itself was pretty painless for me. I run my home lab on a pair of Dell PE2950 III hosts, and there weren't any odd/weird/special VIBs or drivers with which to contend.
Update: vCloud Suite keys did NOT eliminate the "Second Capacity" columns; vRAM is still being counted, and the old v5.0 entitlement measures are being displayed.

Virtual Machines

The last thing you get to upgrade is your VMs. As with any upgrade to vSphere (even some updates), VMware Tools becomes outdated, so you'll work in some downtime to upgrade to the latest version. Rumors to contrary, upgrading Tools will require a reboot in Windows guests, at least to get the old version of Tools out of the way.

vSphere 5.1 also comes with a new VM Hardware spec (v9) which you can optionally upgrade to as well. Like previous vHardware upgrades, the subject VM will need to be powered off. Luckily, VMware has added a small bit of automation to this process, allowing you to schedule the upgrade the next time the guest is power-cycled or cleanly shut down.