Tuesday, April 23, 2013

Moving the vSphere 5.1 SSO database

Plenty of resources for moving MS SQL Server-hosted vCenter and Update Manager databases. But what about the database for the new Single Sign-On service?

Easy, as long as you get the SQL users moved and change the hostname string in two places.

The easy part is getting the users moved. There's a handy Microsoft KB article for transferring logins from one server to another. I've never had a problem with that.

The harder part is getting the SSO "bits" to accept a new hostname. Thankfully, Gabrie van Zanten was able to document this, along with some other pieces related to SSO database management.

So here's your steps:
  1. Execute the sp_help_revlogin stored procedure on the existing SQL server to get the RSA_USER and RSA_DBA logons.
  2. Merge the create user lines with the script from the vCenter SSO Install source. This makes certain you have all the necessary attributes for these users.
  3. Shut down the SSO service.
  4. Backup the current RSA database.
  5. Restore the backup on the new server.
  6. Execute the user creation lines from Step 2.
  7. In a command shell, go to the SSO Server's utils folder (in a default install, the path is C:\Program Files\VMware\Infrastructure\SSOServer\utils) and use the rsautil script to modify the database location:
    rsautil configure-riat -a configure-db --database-host hostname
  8. Verify your changes by inspecting .\SSOServer\webapps\ims\WEB-INF\classes\jndi.properties
  9. Update the db.host field in the .\SSOServer\webapps\lookupservice\WEB-INF\classes\config.properties file.
  10. Restart the SSO service.

Thursday, March 14, 2013

Windows Sysprep and VM creation

I've seen a ton of blog posts, reference documents and white papers all instructing you—the virtualization admin—to build "template" VMs in the following fashion:

  1. Create a VM and install the OS
  2. Install standard applications
  3. Set all your configuration settings
  4. Patch & Update the OS and applications
  5. Sysprep
  6. Convert to Template
I'm here to tell you now: stop doing Step 5. Don't sysprep those golden images. At least, don't do it in your template process.

At the very least, using this model means you won't be able to update that template more than 3 times: doing a standard sysprep—without a custom unattended settings file—will "rearm" the software activation only so many times. If you run out of "rearms" you get the joy of rebuilding your golden image.

There is a way around the sysprep limit—see the SkipRearm post for my method—but that still leaves you with a VM template that's going to roll through the remainder of the Sysprep process the first time you turn it on—which you'll be doing every time you want to patch or update the image.

Instead, make Sysprep part of your new VM creation process. With VMware, you can easily convert a VM  back-and-forth from a template to a VM; in fact, for the longest time, I never even converted VMs to templates because there didn't seem to be much value in them: everything you could do to a template, you could do to a VM, while there are things you can do with a VM that you can't do to a template.

Instead, leave your golden image at Step 4; you will be revisiting it every month anyway, right?

Every time you need to spin up a VM from that point forward, you will have a (relatively) recently-patched starting point. In fact, if you're really efficient, you'll run the template VM before creating a new machine from it and patch that machine. Either way, you'll be patching a VM; but if you need to spin up more than one VM, the patching is already complete!

So here's my process:
A) Create your golden image
B) Update your golden image
C) Clone a new VM from the golden image
D) Run Sysprep (with or without SkipRearm and other unattended settings)
E) Repeat steps C-D as needed
F) Repeat step B as needed

Note: I realize there are certain setups that require you to leave a template/golden image at the post-Sysprep shutdown state. In those cases, just make sure you've got a snapshot prior to Sysprep so you can revert to a state before it was ever run.

Sunday, February 10, 2013

It's not a watch, it's a Pebble

After being prompted by a tweet from Chris Grossmeier (@cgrossmeier) to check out a Kickstarter project he decided to back, I joined him in the ranks of backers for the single most successful project in Kickstarter history. Originally requesting $100,000 to build a modest little "smart watch," Pebble Technology founder Eric Migicovsky found his project with over $10 million in backing before "selling out."

With that sort of support, Migicovsky revised the scope and breadth of the project, including additional features for the device and plans to retail the watch to non-backers. After many delays—not surprising with Kickstarter projects, but wholly appropriate for the new scope and scale of this one—a Pebble was delivered to my eager hands.
The friendly box design
Inside the spartan box: Pebble watch & its USB power cord
Kickstarter Edition
When first "firing up" the watch, it simply prompts you to pair it with a supported smartphone; in my case, I'd already downloaded the Pebble app from the Apple App Store and was ready to get going.

iOS App
First impressions are everything. It took very little effort to accomplish the Bluetooth pairing, and a software update for the watch was already available for transfer: it shipped with v.1.5.3 and was updated to v1.7.1. With the hints from the iOS app, I was also able to get some of the interactive functions going between watch and phone; it's also the conduit for loading additional watch faces.

Status and tipsApp & Watchface Loading
At this time, the SDK isn't publicly available, but a watch face design tool and app creator SDK are in the works. The watch comes with three "hard coded" watch faces, and five more are available in the iOS app. The built-in watch faces can't be deleted, and there's no function for hiding or reordering the menu: new faces always appear below the lowest permanent menu item (Settings).

Built-in Watch Face OptionsAdditional Menu OptionsDefault Watch Face
Strangely enough, while the Pebble has a configuration option for setting whether it's a 12- or 24-hour clock by default, one of the original, optional watch faces ("Big Time") was purpose-built to ignore the setting. Since my original inquiries about the behavior, the Pebble team has replaced the original design with a pair of watch faces—Big Time 12 and Big Time 24—to accommodate user desires rather than updating the single face to honor the system setting. This makes me wonder a bit about how sophisticated the API for custom watchfaces is going to be...

WatchfacesTwo faces instead of one
The Pebble is a work in progress: there are some gyrations that one must complete to get notifications for Mail and non-cell applications going (SMS and Call notifications work as soon as pairing is complete) for iPhone, and there are plenty of bugs being discussed on the Pebble forums. Luckily, the guys behind the project "get it," and have been serious about keeping backers updated.

Text Alert on phone
With "project update #32," they went through a laundry list of known issues. Although I'm personally experiencing some problems with my Pebble, it was heartening to see all those issues identified as "known problems" for my Pebble/Phone combination.

From a cosmetic standpoint, I've found that wearing the Pebble on the inside of my wrist is most comfortable; I've found other watches to work better that way, too, but there's the real potential for badly-scratching the watch face.
Watch "rolls away" on back of wrist.Inside wrist, face stays in a good place.
The backlight is understated enough that it won't cause comments from others at the movie theater, but plenty bright to make the watch readable in a dark(ened) room. It comes on when pressing buttons as one would expect; it will also come on with the flick of the wrist, a cool feature now that the watch contains an accelerometer (not in the original scope).

Overall, I'm satisfied with the Pebble, and am looking forward to the improvements in the functionality as time goes on.

Wednesday, February 6, 2013

Re-engineering vCenter: a proposal

After fighting my own instances of SSO and vCenter in the vSphere 5.1 management suite, seeing posts from others that have run into the same issues or other new and interesting ones, and generally counseling people to hold off on upgrading to 5.1 because of vCenter issues rather than hypervisor issues, it struck me that I've not seen very many suggestions on how or what to fix.

I'm just as guilty: It's far easier to complain and expect someone else to fix the problem than to wade in provide solutions.

So I did a bit of thinking, and have a set of ideas for re-engineering vCenter to overcome perceived faults.

At any rate, here we go...

Solution 1: SSO as a "blackbox" appliance.

Single sign-on has probably received the worst press of all the new vCenter bits in vSphere 5.1. By divesting this particular piece of all its Windows- and SQL-compatible nature and being distributed as an appliance, the vCenter team could also focus on adding features that allow the single appliance to be scaled (or at least made highly-available as an intrinsic feature).
Problems solved:

  • Native code. By standardizing on a single appliance OS, the development team could shelve the low-performing Java code—who's only redeeming value is the ready portability to run on both Windows and Linux platforms—and write using native code and eschew the interpreted languages. This should have the added bonus of being far more "tunable" for memory utilization, resulting in a svelte little appliance instead of a multi-gigabyte monster.
  • Integral clustering & load balancing. By adding integrated clustering and shared virtual server technology, the addition of a second appliance immediately eliminates SSO as a single point of failure in the vCenter suite. While the current implementation has a degree of support for adding high availability to this most-crucial of services, the lack of official support for many clustering or high-availability technologies for dependencies (eg, database access, client load balancing) is embarrassing.
  • Distributed database. By discarding the use of ODBC-connected databases and falling back on an open-source distributed database (with high levels of data integrity), the appliance can rely on internal database replication & redundancy rather than depending on some other system(s). Single appliances for small implementations are no longer dependent on external systems; multi-node clusters become interwoven, allowing scale-out without any other dependencies, yet behave transparently to systems that rely upon it.

Solution 2: If you're going "blackbox" with SSO, why not vCenter Server, too?

Yes, the vCenter Server Appliance (or VCSA) exists, but in its current iteration, it's limited compared to the Windows Application. Worse, because of a presumed desire to share as much code between the application and the appliance, a large portion—would it be fair to say essentially all of it?—of the server is written in Java. I don't know about you, but while that might serve the goal of making portable code, it certainly isn't what I'd want to use for a performance piece. So the same thing goes here as with SSO:
  • Native code.
  • Integral clustering (say goodbye to vCenter Heartbeat as an independent product)
  • Distributed database (Say goodbye to those MS or Oracle licenses!)

Solution 3: Integrated appliance

If you're going to have SSO and vCenter with the same sort of "black box" packaging, why not combine everything (SSO, Inventory, vCenter, Client, etc.) into a single appliance? We have a degree of that with the VCSA, but without the additional "packaging" as suggested above as well as needing feature-parity with the Windows app. Update Manager should be included, and View Composer could be just another 'click to enable' service that's activated with a license key: when configuring the VCSA, the admin should have the ability to enable arbitrary services, and if the same service is configured on multiple instances of the VCSA, the admin should have the option of enabling that service to run as a member of a cluster instead of having an independent configuration.
Stop with the individual appliances for every little management function: include all of them as a service in every build of VCSA!

No Silver Bullet

These suggestions are neither the "silver bullet" for the current perceived failings in vCenter, and I'm sure my peers can come up with dozens of reasons why these ideas won't work—not to mention the difficulty in actually producing them in code.
If nothing else, however, I hope is sparks thought in others. Maybe some discussion into how things can be improved, rather than simple complaints of "would'a, could'a, should'a" can come from it.

Thursday, December 20, 2012

Overriding Citrix VDI-in-a-Box "write reserve" for pooled desktops

It is possible to adjust the "write reserve" that is built into Citrix VDI-in-a-Box (ViaB) managers, in both 5.0 and 5.1 implementations.

Add the instruction:
config.vm.diskspace.reserved.existing=0.0

to the file
/home/kvm/kvm/install/servlet_container/webapps/dt/WEB-INF/etc/store/config.properties (5.0)
or
/home/kvm/kvm/install/servlet_container/webapps/dt/WEB-INF/etc/store/store.properties (5.1)

to remove all "write reserve" for a given manager. This value is read only at startup, so you must restart the manager for the change to take effect.

The default algorithm for ViaB is 10-15% of the image. The manager will assume that each desktop will use at least that much space and refuse to provision additional desktops if sufficient free space on the desktop drive is no longer available.

There are certain use cases where the default reserve is overly conservative; this gives the ViaB administrator additional control over the environment in those situations.

Sunday, December 16, 2012

iOS device non-glare screens

I've never been happy with the high-gloss screens on iOS devices: in my opinion, they're fingerprint magnets, regardless of their "oleophobic" coatings.

Since getting my first iPad (the gateway device that suck[er]ed me into the clutches of iOS), I've put non-glare screen films on my devices. Not only does a good film improve the experience for me, I've saved an iPhone from serious damage thanks to it.

I haven't tried them all—they're awful pricey for much experimentation—but I have had both success and failure with various brand's implementation of the film. For the purpose of this post, I'll stick to making only positive recommendations, leaving out any negative reviews; you can find those all over the Internet...

The iLuv "Glare-free protective film" was the first I tried, based on an online recommendation. As it turns out, it was a great choice, and it gave me my first taste of the difficulties involved in getting screen protectors properly "installed" on a device—especially one with the square inches of coverage that an iPad represents. The only negative part of my experience was the lack of local purchase options for the various devices (iPad, iPod Touch, iPhone). Online was the only option for some of them, and after adding both tax & shipping, they were a bit of an investment.

That's when I was introduced to the Power Support HD Anti-Glare screen protectors, the only screen protector I've ever found sold in the Apple retail stores. While all screen protectors have some amount of impact on the original glossy screen—the stated reason why Apple didn't make matte screens a standard option—I've preferred the non-glare aspect of the Power Support film far more than any loss in color fidelity in the Retina display. Similarly, the Apple retail stores in my area only carried the iPhone version; getting them for iPod or iPad are also online experiences.

And with the introduction of a new form-factor—the iPad Mini—it becomes a waiting game to see who will support the new screen first (as of this writing, it was iLuv).

Links:
iLuv
Power Support

Wednesday, November 28, 2012

vSphere 5.1 Beacon Probes

As in previous versions of vSphere, an administrator for 5.1 can choose to use Link status only or Beacon probing to help determine the uplink status of multi-NIC physical port aggregation.
Failover Detection Options
The default is "Link status only," which merely watches the Layer 2 status for the network adapter. While very simple, it does not have the ability to determine whether "upstream" network problems are present on that link.

That's where Beacon probing comes in handy: By sending a specially crafted frame (it's not a packet; it's an Ethernet frame without any IP-related elements) from one pNIC to another, ESX(i) is able to determine whether a complete path exists between the two. When three or more pNICs are together in an uplink set (in either standard or distributed switches), it's possible to determine with high reliability when a link is "bad," even if the local connectivity is good.

VMware has several blog posts on the topic (What is beacon probing?Beaconing Demystified: Using Beaconing to Detect Link Failures), and the interwebs are full of information on what it is and how it works for even the most casual searcher.

While working on a completely different system, I was doing some port monitoring and discovered that my ESXi 5.1 hosts were using beaconing. I don't have it turned on in my lab because I have just the one switch: If a link is down, you can immediately detect it without any need to "look downstream." It was kind of annoying to see those showing up in my packet capture, and while it would've been easy enough to filter them, I was more interested in trying to figure out why they were there in the first place: I was pretty sure I hadn't turned Beaconing on for any of my port groups.
Beacon probing frames captured in Wireshark
I went through the settings of all my port groups and verified: all were set to Link status only. What? So I turned to Twitter Tech Support with an inquiry and got a quick reply:
http://kb.vmware.com/selfservice/microsites/search.do?language=en_US&cmd=displayKC&externalId=1024435
Unfortunately, setting the Net.MaxBeaconsAtOnce to 0 as suggested in the KB article didn't help: still seeing the beacons. But that suggestion helped me fine-tune some of my search criteria, and a memory was triggered: there's some new network health check capabilities in vSphere 5.1...
Virtual switch health check options in vSphere 5.1
By default, both of these health checks are disabled, but I remember seeing them and enabling them when I first set up 5.1. I wasn't sure which item was the source of the beacon frames, but it's simple and fast to check both options when the frames show up in the packet capture every 30 seconds!
Enabling VLAN and MTU will enable beaconing
Turns out that it's the VLAN and MTU that was putting those beacons out there. I was only watching the traffic for a specific VLAN (which is tagged for my pNICs), so the Teaming and failover option may also put beacons on the untagged network. But the mystery of beacon frames was solved!

Friday, October 26, 2012

Upgrading vSphere 5.1.0 to 5.1.0a

VMware released the 'a' update to their vSphere 5.1 binaries (both vCenter & Hypervisor) on 25-Oct-2012. I downloaded the ISOs for both ESXi (VMware-VMvisor-Installer-201210001-838463.x86_64.iso), vCenter (VMware-VIMSetup-all-5.1.0-880471.iso)  as well as the offline update (ESXi510-201210001.zip) because VMware vSphere Update Manager (VUM) doesn't perceive these as patches.

Update: Since first posting this, I've been informed that VUM is able to patch the ESXi hosts, whether you're running 5.1.0 or 5.1.0a versions of vCenter. I infer one of two things from this: I went after the updates too soon (before VMware had published the update for VUM to use), or my VUM install isn't getting the update info correctly. This change only affects the way you (can) go about updating the host; the vCenter server upgrade doesn't change.

Note: The offline update package for 5.1.0a is not for use with VUM; you'll have to either install from the ISO or use command-line methods to perform an upgrade of ESXi. The latter will be covered in this post.

Reminder: If you run vCenter in a VM, not on a physical host, use out-of-band console access that bypasses the vCenter Server! As soon as that vCenter service stops—which it must—your connectivity to the VM goes away. You can use the VIC if you connect directly to the ESXi host that's running the vCenter VM; that's the way I do mine. Windows Remote Console should only be used with the "/admin" switch, and even then, your mileage may vary. Any other remote access technique that mimics the physical console access is fine. Just don't use the VIC or Web Client remote access via the vCenter services that you're trying to upgrade. "Duh" might be your first response to this, but the first time you forget and connect out of habit, you'll hopefully remember this post and smile.

As with all upgrades, vCenter is first on the list, and in the new model introduced with 5.1, that starts with the SSO Service. That was recognized as an upgrade, and proceeded and succeeded without any additional user entry beyond the obligatory EULA acceptance.

Just to be sure, after SSO finished updating, I tried logging in using the "old style" client (VIC) from the shortcut on the vCenter desktop: no problem. Then I tried it with the Web Client: failure. On a hunch, I restarted the Web Client Service, but with no luck: "Provided credentials are not valid."

Oopsie.

One more test: I'd used the "Use Windows session authentication" option in the Web Client. This time, I tried using the same domain credentials, but manually enter them instead of using pass-through: Pass.

That may be a bug; it may be a problem with unmatched versions of SSO and Web Client. Moving on with the rest of the upgrade...

The next step is to upgrade the Inventory Service service; like SSO, it can upgrade without specific user input. However, when the service is replaced with the newer version, vCenter Server (and other services dependent on vCenter Service) is stopped and not restarted. Manually restarting the services will allow you back at your system again, just in case you get interrupted while working and need to get back on before updating the vCenter Server service to the new version...

Like the previous services, vCenter Server recognizes that it's an upgrade and click, click, click to complete. Naturally, the services are stopped in order to replace them, but the installer does restart them when it's done. Upgrading the VIC is another click,click,click operation, as is the Web Client.

It did not, however, fix the pass-through authentication issue in the Web Client.
I spent a while in conversation with Chris Wahl and Doug Baer on Twitter, trying to get it straightened out. Both are VCDX and super sharp, and they gave me lots of solid advice for improving bits of my vCenter setup, but this one wasn't budging. At this point, I've given up on it: there's a solid workaround, so it's not a dealbreaker. Watch this space, however: if/when I figure it out, I'll pass along my findings.
VUM isn't updated in this release, so that bit doesn't need to be upgraded or reinstalled. However, the offline package isn't going to work with it (as mentioned above), so the upgrade is done using one of the alternate methods. My preferred choice is to use the busybox shell via SSH.

To use this method, I first used the VIC to upload the offline update to a datastore visible to all my hosts. Next, I put the first host into Maintenance Mode. Because I took advantage of the sweet "ssh AutoConnect" plugin, the console of the host is a right-click away. Once at the console, the following command is executed:

esxcli software vib update -d /vmfs/volumes/[DATASTORE]/[PATCH_FILE].zip

After a short wait, the prompt was back informing me that the update was complete, and a reboot was required to implement. You can use your favorite method of restarting the host, and once it returns to connectivity with vCenter, you have to manually exit Maintenance Mode. Repeat on each host until you're fully updated.

This update didn't replace Tools with a new version; the tools installed as part of the GA version are recognized as current, so I didn't get to see if the promise of no-reboot Tools updates would come to fruition.

Monday, October 22, 2012

vCenter 5.1 Install Notes

This post is a "live document" covering any "gotchas" that I discover as I install vCenter Server for vSphere 5.1 in various environments.

Install Defaults

SSO HTTPS Port: 7444
SSO Lookup Service URL: https://:/lookupservice/sdk
IS HTTPS Port: 10443
IS service mgmt port: 10109
IS linked mode comm port: 10111
IS Memory (small): 3072MB
IS Memory (med): 6144MB
IS Memory (large): 12288MB
VC HTTPS Port: 443
VC HTTP Port: 80
VC Heartbeat: 902
WebSvc HTTP Port: 8080
WebSvc HTTPS Port: 8443
WebSvc ChangeSvc Notification: 60099
LDAP Port: 389
SSL Port: 636
VC Memory (small): 1024MB
VC Memory (med): 2048MB
VC Memory (large): 3072MB
WebClient HTTP Port: 9090
WebClient HTTPS Port: 9443

Process Flow


Service Ports

Chances are very good that you'll be challenged by the Windows Firewall. Make sure that it's either disabled, or the appropriate ports are opened.

SSO Administrator Credentials

The default user (admin@System-Domain) is not changeable at installation, and you'd better keep the password you set well-documented. This is required when installing other dependent services.

JDBC requires fixed ports

The SSO service uses the JDBC library for connectivity to Microsoft SQL. JDBC is ignorant of named instances, dynamic ports and the use of the SQL Browser or SSRP. Before trying to install SSO, you must go into the SQL Server Configuration Manager and configure a static port. If there's only one SQL instance on the host, you can use the default (1433), otherwise, pick something out of the air.
"Dynamic Ports" is blank; "TCP Port" is set to the static port you desire.
If you want to avoid restarting the instance that's already running, you can set the currently-used port as the static port. The server will go on using that port (which it chose dynamically) until it restarts; after that, it'll use the same port as a static port.

SSO requires SQL Authentication

A good sign that SQL Auth is not enabled for the server.
Although the installer makes it look like you can install the services and use Windows Authentication, the service actually uses SQL Auth. This is also a side-effect of using JDBC libraries instead of native Windows ODBC or ADO libraries.
You can install with Windows Auth, but the service can't use it for DB logon.
If your database engine is not configured for SQL Auth, you'll need to talk to your DBAs—and possibly, your security officer(s)—to make it available. Changing the authentication from Windows to "Windows & SQL" may require restarting the instance; your DBAs will let you know when the job is completed.

Changes in 5.1.0a
Looks like VMware took some information to heart on broken installs and modified the SSO install dialog for database connectivity:
JDBC Connection for 5.1.0a SSO Installation
It is no longer possible to install using Windows Authentication. You will need to have created the user & DBA accounts as SQL Auth; the quick/easy way to get it right is to use the CreateUser script in the same folder as the CreateTablespace script.

SSO Service is Java

Like other services in the vCenter suite, SSO is a Java executable. You will want to review the heap size settings to be sure that it's reserving enough space to be useful, but not so much that it's wasteful. The default is 1024MB and can be adjusted by editing the "wrapper.java.additional.9" value in SSOServer\conf\wrapper.conf
Original memory: 1024MB; Running memory: 384MB

Inventory Service Service is Java

Like other services in the vCenter suite, Inventory Service (IS) is a Java executable. Although the installer gives you three choices for the heap size settings, you might want to tweak that value a little to be sure that it's reserving enough space to be useful, but not so much that it's wasteful. The value can be adjusted by editing the "wrapper.java.maxmemory" value in Inventory Service\conf\wrapper.conf
Small memory model: 3072MB; Running memory: 384MB

vCenter Database

Create the 64-bit Server DSN for the vCenter Server database connection before you start the installation. In order to do that, you'll have to create a blank database, too, or you can't set the DSN to connect to the right database by default.

Another gotcha: Using the built-in DOMAIN\Administrator account could backfire on you. Recommended practice, naturally, is to use a service account; however, you've got to run the installer from the account you want for the services to run under if you also want to use Windows Auth. That requires either logging in as that user, or running the installer with the "runas" utility.

vCenter Server Service is Java

Like other services in the vCenter suite, vCenter Server is a Java executable. Although the installer gives you three choices for the heap size settings, you might want to tweak that value a little to be sure that it's reserving enough space to be useful, but not so much that it's wasteful. The value can be adjusted by editing the "wrapper.java.maxmemory" value in tomcat\conf\wrapper.conf
Small memory model: 1024MB; Running memory: 384MB

Friday, October 19, 2012

vSphere Data Protection is still too immature


With the release of vSphere 5.1, I was excited to migrate from the sometimes-flaky "VMware Data Recovery" (VDR) product over to the Avamar-based "vSphere Data Protection" (VDP) appliance.

Unfortunately I found the product to be limited and hard to work with, even when compared to VDR.

While VDP replaces VDR in the vSphere lineup, it's no upgrade: VDR is not supported for v5.1 (but will work in many circumstances) and will not be supported for that environment; VDP will not be back-rev'd to older versions of vSphere. However, there is currently no way to "upgrade" or migrate from VDR to VDP; when you migrate to v5.1, you have to essentially "start fresh" with VDP if you desire to use the supported VMware solution. Any organization with backup retention requirements may find this a trouble spot—but then, you should probably be looking at a purpose-built product, anyway.

Installing VDP is both easy and difficult, and is performed in two stages. In the first stage—which is very easy—VDP is installed as an appliance from an OVF. The main decision you must make comes in the form of selecting the appropriate size of appliance to install: 512GB, 1TB or 2TB. This is where reading the manual comes in handy: you'd better pick the correct size, because you can neither expand the repository on an existing appliance, nor can you migrate the data from one appliance to another. This is one place where VDR had better capability: expanding a repository was pretty easy, and you could migrate a repository from one appliance to another. Additionally, the size is representative of the repository for the backups, not the space that is actually consumed by the entire appliance: the manual indicates that the actual space consumed by the appliance will be ~1.5x the stated size of the repository.

Why not just pick the biggest, you ask? Because the appliance will consume all that space, even if you install it on NFS or select thin disks for block storage. It'll start small, but the initialization process for the appliance (which happens as part of the second stage of the installation) will result in every block being touched and the disk being de-thinned. Worse, if you select "eager-zeroed thick" for the disk, the initialization will STILL go through and touch all blocks/clusters, so don't waste your time with it.

After the appliance is loaded and powered-on, you figure out where the admin portal is published, which is then opened in a web browser. The security-minded will cringe at the requirements for the appliance password (set during the second install phase):

  • Exactly 9 characters (no more, no less)
  • At least one uppercase letter
  • At least one lowercase letter
  • At least one number
  • No special characters
Personally, I have no problem with a minimum of 9 characters, but requiring exactly 9 chars, and not permitting "special characters" really makes me wonder what they're doing.

Other settings are configured (see Duncan Epping's "Back to Basics for VDP" for more details) and depending on your storage performance, it may be an either long or short wait while the system finalizes things and you're able to back up VMs. In my case, I had to redo the install a couple of times, with no rhyme or reason why the install mode wouldn't take the settings the first time.

Once the user interface is available in the Web Client, it's fairly straightforward for a previous VDR user to create VDP jobs that mirror the old system. VDR, however, had far more information about the "goings on" as it interacted with your vSphere environment; you could quickly see which VMs were being backed up at a given time (if at all), and if you had a failure for any reason, one could fairly quickly diagnose the reason for the failure (commonly a snapshot issue) and address the problem.

VDP, on the other hand, gives essentially zero information about machines being protected. Worse, the daily report that VDP can issue will also include information about machines that are not being protected, and there's no way to suppress the information. In my lab, I had 13 VMs to protect, and each day I learned that 2 of them would fail. I struggled to figure out how to determine the VMs with issues, and once I did that, it was nearly impossible to determine what caused the backup to fail. With some patience and Knowledge Base searches, I was able to get an idea of where logfiles might exist, but even once I found them, isolating the logs for the particular VMs of interest was difficult. Of the two failing VMs, one was the vCenter host, which frequently failed to backup in any environment when in-guest VSS snapshots were selected; I never solved that problem because I could never find a cause for the other VM (an Windows SSH host) failed as long as the system was powered on.

Ultimately, I gave up on it, and will be looking at other products like Veeam and Symantec V-Ray. While Avamar may be a phenomenal backup system, this VDP derivative of it is far too immature and unpredictable for me to rely on for my important data: I've uninstalled the appliance and removed the registration from vCenter.

Tuesday, September 11, 2012

Upgrading from vSphere 5.0 to 5.1

I upgraded my home lab from VMware vSphere 5.0 U1 to vSphere 5.1 today, using the GA bits that became available late yesterday, 10-September-2012.

vCenter Server

As with all vSphere upgrades, the first task was to upgrade the vCenter Server instance. This is also the first place that you'll see changes from the installs that were familiar from v4, forward.
Install Screen for VMware vCenter Server
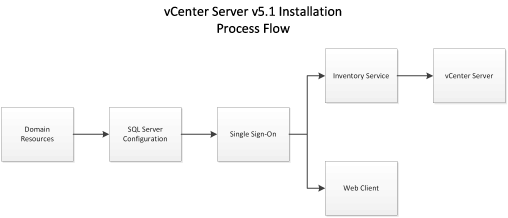
The first thing you notice is that two other options are prerequisites to installing vCenter Server: vCenter Single Sign On (SSO) and Inventory Service.

VMware does you the favor of offering an option to "orchestrate" the install of the two items prior to installing vCenterServer, but in doing so, it also keeps you from accessing all of the installation options (like HA-enabled SSO) available in the prerequisite individual installs.

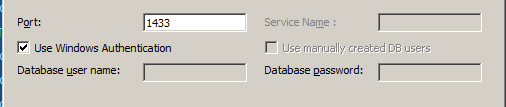
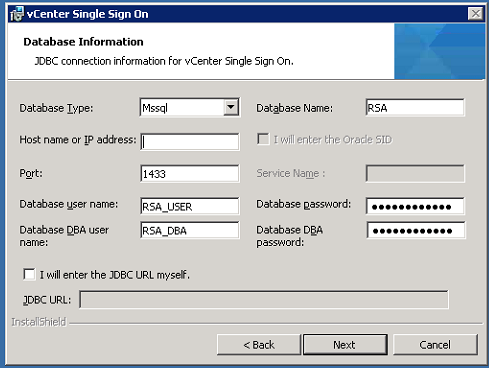
The next hiccup that I encountered was the requirement for the SSO database. Yes, it does support Microsoft SQL, and yes, it can install an instance of Express for you. But if you'd like to use the database instance that's supporting the current vCenter database, you'll have two additional steps to perform, outside of the VMware installer:
1) Run the database creation script (after editing it to use the correct data and logfile locations for the instance)
2) Reset the instance to use a static port.

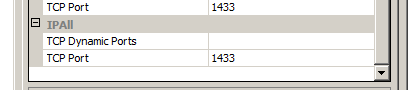
It is documented as a prerequisite for installing the SSO service that the SQL server requires a static port. But why? Because it relies on JDBC to connect to the database, and JDBC doesn't understand Named Instances, dynamic ports or the Browser Service and SQL Server Resolution Protocol.
Note the lack of options for named instances.
If you did like many folks and used the default install of SQL Express as your database engine, you have the annoyance of needing to stop what you're doing and switch your instance (VIM_SQLEXP, if using the default) to an unused, static port. In order for that setting to take effect, you must restart the SQL Server instance. Which also means your vCenter services will need to be restarted.

Again: this is a documented requirement in the installation guide, yet another reason to read through it before jumping in...

Once you have SSO installed, the Inventory Service is recognized as a upgrade to the existing service, as is the vCenter Server itself. Nothing really new or unique in adding these services, with the exception of providing the master password you set during the SSO installation.

Then the ginormous change: you've probably been installing the Web Client out of habit, but now you really need to do so if you'd like to take advantage of any new vSphere 5.1 features that are exposed to the user/administrator (like shared-nothing vMotion).

But don't stop there! Make sure you install the vCenter Client as well. I don't know which plug-ins for the Client are supposed to be compatible with Web Client, but the ones I use the most—Update Manager and VMware Data Recovery—are still local client only.

That's right: Update Manager 5.1—which is also one of the best ways to install ESXi upgrades for small environments that aren't using AutoDeploy or other advanced provisioning features—can only be managed and operated from the "fat" client.

Finally, one positive note for this upgrade: I didn't have to change out any of my 5.0 license keys for either vCenter Server. As soon as vCenter was running, I jumped into the license admin page and saw that my existing license was consumed for the upgraded server, and no new "5.1" nodes in eval mode were present.

ESXi

Once vCenter is upgraded and running smoothly, the next step is to upgrade your hosts. Again, for small environments (which is essentially 100% of those I come across), Update Manager is the way to go. The 5.1 ISO from VMware is all you need to create an upgrade baseline, and serially remediating hosts is the safest way to roll out your upgrades.

Like the vCenter Server upgrade, those 5.0 license keys are immediately usable in the new host, but with an important distinction: as near as I can tell, those old keys are still "aware" of their "vTax" limitations. It doesn't show in the fat client, but the web client clearly indicates a "Second Usage" and "Second Capacity" with "GB vRAM" as the units.
vRAM limits still visible in old license key: 6 x 96 = 576. 
I can only assume that converting old vSphere 5 to vCloud Suite keys will replace that "Second Capacity" value with "Unlimited" or "N/A"; if you've got a big environment or host Monster VMs, you'll want to get those new keys as soon as possible to eliminate the capacity cap.
The upgrade itself was pretty painless for me. I run my home lab on a pair of Dell PE2950 III hosts, and there weren't any odd/weird/special VIBs or drivers with which to contend.
Update: vCloud Suite keys did NOT eliminate the "Second Capacity" columns; vRAM is still being counted, and the old v5.0 entitlement measures are being displayed.

Virtual Machines

The last thing you get to upgrade is your VMs. As with any upgrade to vSphere (even some updates), VMware Tools becomes outdated, so you'll work in some downtime to upgrade to the latest version. Rumors to contrary, upgrading Tools will require a reboot in Windows guests, at least to get the old version of Tools out of the way.

vSphere 5.1 also comes with a new VM Hardware spec (v9) which you can optionally upgrade to as well. Like previous vHardware upgrades, the subject VM will need to be powered off. Luckily, VMware has added a small bit of automation to this process, allowing you to schedule the upgrade the next time the guest is power-cycled or cleanly shut down.

Monday, September 10, 2012

Eliminate SPOF in your DNS

On Monday, September 10, 2012, millions of sites were affected by an attack upon outage in GoDaddy's DNS infrastructure. It's not clear that every GoDaddy-hosted DNS domain was affected, but those customers that were affected included those using other services (even in-house) for their email, web and other non-DNS services.

In a nutshell, when you mess with DNS, you mess with the glue that holds the Internet together. And relying on one provider—even one with ginormous infrastructure for hosting DNS like GoDaddy—creates an important Single Point Of Failure.

There is, however, a technical solution that can help keep your organization from becoming collateral damage in an attack like this.

DNS

Working under the assumption that the reader has a cursory understanding of DNS, you already understand about primary and secondary zones.

What you may not realize is that the authority for DNS records is contained within the DNS zone information itself, and that you can readily spoof or publish any authority you'd like as a primary.

With that, you can quickly set up a distributed DNS platform that won't topple if one DNS provider gets crushed by a DDoS.

Stealth DNS

Start by moving your primary DNS zone(s) in house. That gives you complete, direct control over your DNS records. You can use anything that complies with RFC-1035, but I like to use ISC BIND, warts and all. The disadvantage of this, however, is that your primary will always the first point of attack for DNS; if that can be disabled or compromised, it's a bigger deal than if a secondary is compromised.

You get around this limitation by protecting the primary with secondaries: advertise the secondary nameservers in places like your domain records, and allow no hosts but the secondaries to communicate with the primary.

The final trick is to change your zone records so that the primary doesn't even get listed in the SOA; pick a secondary, knowing you can readily change the SOA to a different one at need. This results in stealthing your primary DNS zone database.

Multiple Secondary Providers

The final step is to utilize secondaries from multiple providers. If your ISP provides free secondary service, utilize it. Use xname.org, buddyns.com, or any of the dozen other free secondary services. Use a paid secondary service from godaddy.com or soliddns.net.

The key is to spread the load around. If one of your providers falls over from a DDoS attack, it's not likely that the other(s) will also be getting attacked at the same time.

Update: If the domain registrar is the one being hosed—and for some reason you've been affected by it—there's nothing you can do but wait out the storm. The domain registrar publishes the connection between your domain name and those carefully configured name servers, and theoretically, that information is already being distributed among the various root servers for the TLD of which your domain is a child. The root servers have been shown to be quite resilient to DDoS attacks, so as long as your registrar has done its job correctly, you shouldn't have a problem. If it hasn't, you're screwed.

Update 2: GoDaddy has announced that it was not an attack, but a problem in their DNS infrastructure. Either way, if your single provider becomes unavailable (for any reason), you're still in trouble.

Friday, August 24, 2012

Remove security warning from Internet-sourced files


Ever been setting up or managing a system and run into a prompt like this:

It’s probably because you grabbed the original executable from an Internet site.

Using a modern browser to grab the file will typically result in a special NTFS stream added to the originally-downloaded file (eg, bginfo.zip) that gets promulgated to the executable you’re trying to run.

This can be a good thing when you're trying out software, but how do you fix it when you know you can trust the file? This sort of thing can be come quite annoying if it's tied to a Startup item like BGInfo.

The best solution is to “unblock” the file you download; that keeps the stream from being added to the extracted file(s). But what if you’ve already extracted them?

Same solution, but you apply it to the executable instead of the download. Right-click on the file to unblock, then select properties. You should see something a bit like this:
Note the [Unblock] button at the bottom. If you click that and save the properties, the NTFS stream metadata is removed from the file, and you won’t get the popup message whenever the app is run.

When I'm retrieving trusted files from my own web servers, I’ve simply gotten into the habit of unblocking files as soon as I download them; if the ZIP or installer file doesn’t have that metadata, the extracted files won’t inherit them.

Also: there’s no way to mass-unblock files; if you select a group of files and choose properties, you don’t get the option to edit the security. If you're downloading a zip file full of executables (like the SysInternals Suite), you definitely want to unblock the ZIP file before extracting it, or you'll have to unblock each executable individually.

Thursday, August 9, 2012

Do-it-yourself SQL Agent replacement for vCenter

The fast/easy way to support VMware vCenter on Windows is to let the installer load SQL Express. By default, that's the SQL 2005 version of Express, and it has some limitations to it, like maximum database size (4GB), maximum RAM used (1GB) and maximum sockets utilized (1, but it'll use as many cores--real and hyperthreaded--as the socket provides). If you have a small datacenter being managed (5 hosts or less, 50 guests or less), those limits are probably not going to cause you pain.

The limit that usually causes the biggest problem is the database size limit; even that can be overcome by pre-installing the SQL 2008 or 2012 version of Express: the size limit is extended to 10GB.

But the one consistent limitation across all the versions of Express is the loss of the SQL Agent (MSDE is the predecessor to Express, and while it has Agent, it also is based on SQL 2000 and has a 1GB size limit; neither are acceptable for even the smallest vCenter deployments).

SQL Agent is the service that runs with the paid versions of SQL Server that provides, among other things, automation of scheduled jobs for the database engine.

By default, VMware simply ignores job scheduling when running on top of Express; the code is baked right into the SQL scripts for job creation. Supposedly, the vpxd will take care of those things, but in practice, I've discovered that it doesn't do the it with the same effectiveness as the SQL Agent jobs.

There is an alternative, however: use the Windows Task Scheduler.

As long as you have the proper command-line SQL client that can "talk" to your Express instance installed on your vCenter host, you can automate the jobs for yourself.

Take a look in c:\Program Files\VMware\Infrastructure\VirtualCenter Server for all the files named job_*_mssql.sql. Each of those represents a different scheduled task for the Agent-based SQL databases, and those scripts provide sufficient information to reproduce a scheduled task in Windows.

Here's what to look for:
set @JobNAME= : this is what you should name your task
@command = N'EXECUTE... ' : this is the query you're going to automate
@active_start_time= : this is the start time for the job, in HMMSS or HHMMSS format.
@freq_subday_type= : which type of repeat interval. 4 == minutes; 8 == hours
@freq_subday_interval= : indicates the repeat interval

For ease of reference, here's a handy-dandy table for the 5.0.0 version of vCenter:
Job Name Command Start Time Repeat Interval
Event Task Cleanup DBNAME EXEC cleanup_events_tasks_proc 1:30 AM Every 6 hours
Past Day stats rollup DBNAME EXEC stats_rollup1_proc 1:00 AM Every 30 minutes
Past Week stats rollup DBNAME EXEC stats_rollup2_proc 1:20 AM Every 2 hours
Past Month stats rollup DBNAME EXEC stats_rollup3_proc 1:00 AM Every 24 hours
Topn past day DBNAME EXEC rule_topn1_proc 1:15 AM Every 10 minutes
Topn past week DBNAME EXEC rule_topn2_proc 1:45 AM Every 30 minutes
Topn past month DBNAME EXEC rule_topn3_proc 1:35 AM Every 2 hours
Topn past year DBNAME EXEC rule_topn4_proc 1:55 AM Every 24 hours
Process Performance Data DBNAME EXEC process_performance_data_proc 1:00 AM Every 30 minutes
Property Bulletin Daily Update DBNAME
DELETE FROM VPX_PROPERTY_BULLETIN
WHERE EXISTS(
   SELECT 1 FROM VPX_PROPERTY_BULLETIN TMP 
   WHERE TMP.OBJECT_MOID=VPX_PROPERTY_BULLETIN.OBJECT_MOID
      AND TMP.OPERATION_TYPE=1
      AND TMP.GEN_NUMBER < (
         SELECT MAX(GEN_NUMBER) - 300000
         FROM VPX_PROPERTY_BULLETIN
      )
);
1:40 AM Every 24 hours

Depending on the version of SQL you have installed, you'll be using OSQL, ISQL or SQLCMD as your command-line client. All three, however, have the same arguments for the way we'll use it, so while I'm going to be providing the instructions using SQLCMD, you can substitute your choice with minimal effort.

The trick is to assemble your arguments for SQLCMD in the task definition, then schedule the task in the same intervals & timing as the Agent version.

In addition to the command, you'll need the following case-sensitive arguments:
-E or -U username -P password (I prefer to use -E, which passes in the Windows account token for the user the task runs under; keeps from making a SQL password from being visible)
-S server\instance
-d database
-Q "command text"

So the finished command line for the first entry (for me) in the table becomes:
SQLCMD.EXE -E -S localhost\VIM_SQLEXP -d VIM_VCDB -Q "EXEC cleanup_events_tasks_proc"

Once you have the command assembled in the "Run:" field for the task, you can then step through the scheduling tab and match the time & recurrence as noted above.

Finally, you can skip the heavy lifting all together (except for that last, long task, which exceeds the limits of the schtasks command) and use the following CMD script to send the whole thing into your system, substituting some of the variables with your specific needs:
@echo off
set CLI=C:\Program Files\Microsoft SQL Server\100\Tools\Binn\SQLCMD.EXE
set SVR=localhost\VIM_SQLEXP
set DB=VIM_VCDB
set USR=[domain\]username

schtasks /create /tn "Event Task Cleanup %DB%" /sc HOURLY /mo 6 /st 01:30 /ru "%USR%" /tr "\"%CLI%\" -E -S %SVR% -d %DB% -Q \"EXEC cleanup_events_tasks_proc\" "
schtasks /create /tn "Past Day stats rollup %DB%" /sc MINUTE /mo 30 /st 01:00 /ru "%USR%" /tr "\"%CLI%\" -E -S %SVR% -d %DB% -Q \"EXEC stats_rollup1_proc\" "
schtasks /create /tn "Past Week stats rollup %DB%" /sc HOURLY /mo 2 /st 01:20 /ru "%USR%" /tr "\"%CLI%\" -E -S %SVR% -d %DB% -Q \"EXEC stats_rollup2_proc\" "
schtasks /create /tn "Past Month stats rollup %DB%" /sc DAILY /st 01:00 /ru "%USR%" /tr "\"%CLI%\" -E -S %SVR% -d %DB% -Q \"EXEC stats_rollup3_proc\" "
schtasks /create /tn "Topn past day %DB%" /sc MINUTE /mo 10 /st 01:15 /ru "%USR%" /tr "\"%CLI%\" -E -S %SVR% -d %DB% -Q \"EXEC rule_topn1_proc\" "
schtasks /create /tn "Topn past week %DB%" /sc MINUTE /mo 30 /st 01:45 /ru "%USR%" /tr "\"%CLI%\" -E -S %SVR% -d %DB% -Q \"EXEC rule_topn2_proc\" "
schtasks /create /tn "Topn past month %DB%" /sc HOURLY /mo 2 /st 01:35 /ru "%USR%" /tr "\"%CLI%\" -E -S %SVR% -d %DB% -Q \"EXEC rule_topn3_proc\" "
schtasks /create /tn "Topn past year %DB%" /sc DAILY /st 01:55 /ru "%USR%" /tr "\"%CLI%\" -E -S %SVR% -d %DB% -Q \"EXEC rule_topn4_proc\" "
schtasks /create /tn "Process Performance Data  %DB%" /sc MINUTE /mo 30 /st 01:00 /ru "%USR%" /tr "\"%CLI%\" -E -S %SVR% -d %DB% -Q \"EXEC process_performance_data_proc\" "

Tuesday, June 12, 2012

Using VMware Workstation for learning Hyper-V

I'm working towards my MCITP, and have the MS 70-643 [Configuring Windows Server 2008 Applications Infrastructure] test scheduled for the end of the month. I've got the self-paced study guide, and ran into an immediate problem when I read the introduction: Hyper-V is needed to complete the guide, and using VMware (Workstation or ESX Free) won't help because Hyper-V itself is a topic covered on the exam.

So the first thing I did was hunt around for a machine that would run Hyper-V, and the closest I came to finding one (that wasn't already in production for some other purpose) was my laptop (HP Elitebook 8460p): it had the full Core i5 CPU and chipset, along with 8GB RAM. Instead of messing with dual-boot, I pulled the system drive and installed an older HD I had lying around, and got to work on installing the OS.

While Windows Server 2008 R2 will run on the laptop, the network hardware wasn't on the base image, nor were a slew of other devices. No surprise, either, that there were no Server versions of the drivers from HP.

So I looked into using a spare server at the office; unfortunately, that was a bust, too: the spare servers wouldn't run Hyper-V because of hardware limitations.

A little help from Google, however, showed me that it's not just possible, but easy to go Inception and run Hyper-V as a guest on top of VMware Workstation 8.
Inception: Server 2008 R2 on a Hyper-V VM running on a Workstation VM
There is one gotcha, however: in addition to selecting the "Virtualize Intel VT-x/EPT" option for the Workstation guest vCPU config, you need to add a line to the guest's VMX file: hypervisor.cpuid.v0 = "FALSE"
Pass-thru hardware virtualization
Once you have that added to the guest config (which must be done when the VM is powered-down), Hyper-V will support its own nested guests.

One other thing you'll want to do: because Hyper-V uses the [CTRL]+[ALT] in all its mouse-release options, updating the VMware default hotkey sequence to include an additional (or different) sequence is necessary if you ever think you'll need the Hyper-V sequence.

If you leave the sequence alone in Workstation, then there's no way to send [CTRL]+[ALT]+[LEFT] down into the Hyper-V guest: Workstation captures the sequence before it can be sent.

UPDATE: There must be a bug in Workstation, both 5.02 and 5.04. In both environments, I've trashed my host system partition when booting one of the Hyper-V-hosted VMs. The first time it happened, I figured it was a fluke with the host's drive; luckily, I had a backup, although it was over 60 days old and I had to get some help from the company Domain Admins to get it back on the domain. The second time, I had a backup from that morning to restore, and the third time, I simply gave up on the whole thing after restoring from that morning's backup.

Monday, April 2, 2012

Making SkipRearm work for you

So, one of the nice parts about virtualizing a Windows 2003 or XP system (other than the small resource footprint, compared to newer OS versions) was the quick, tidy way of cloning and generalizing them: clone it, run NewSID to give it a new SID and NetBIOS name. Done.

We can't do that anymore with Windows Server 2008 R2 and Windows 7 (nor Server 2008 and Vista): between licensing scheme changes and NewSID going the way of the dodo, there are only two ways to virtualize them: install from 'scratch', or clone/sysprep.

Microsoft has made huge strides in their install platform since it was introduced, and doing "from scratch" installs aren't that bad anymore; but if you've got a system that's set up just so, it's probably a lot more work to rebuild from scratch than to clone & generalize.

But that's what can cause problems: the default behavior of sysprep is to reset the product code and licensing activation state for the cloned machine. In and of itself, that's no great issue, but Microsoft built a hard limit into the number of times a system can be "rearmed" for licensing; if you reach that limit, there's no do-overs. You can't get sysprep to succeed.

There's a way to address this, too: Microsoft also recognized that there might be times when you need to leave the machine's licensing state alone, yet still generalize it. You can find articles around the 'net for the "SkipRearm" component of a sysprep answer file, and it does work. Mostly. If you do it correctly.

That's the point of this post: for every way that exists to do it correctly, there are probably 150 ways to do it incorrectly. I know: I spent several hours over the weekend trying to get it working.

I succeeded, but it wasn't quick. So what follows is the documentation for the method that worked for me...

To make shorter work of this, you'll need several things:

  1. Microsoft WAIK (Windows Automated Install Kit). It's an ISO that includes the installer for SIM (System Image Manager). The key item is SIM.
  2. Install image (WIM) from the OS you're trying to work with. It can be the base install.wim that comes on the distribution media, or an updated WIM that you used to create your "template" system.
  3. A VM with a fully-licensed OS. You'll want to run this VM on a hypervisor that will allow you to take snapshots (Type I or Type II, doesn't make a difference--it's the snapshot facility that we're after to make faster work of this).
  4. Text editor (Notepad is fine, but I like the highlighting in SciTE, the Scintilla Text Editor)
Assemble your toys, and take a snapshot of your VM so that you can roll it back to the state that exists prior to "messing" with it.
  1. Launch SIM and open your install image:
  2. Create or open an answer file:
  3. Expand the Components folder, right-click the Microsoft-Windows-Security-SPP component that is appropriate for your OS type, and select Add setting to Pass 3 generalize. Note: if you instead select the -SLC component, it will have a SkipRearm setting, but the program notes indicate that the setting has been deprecated. In practice, it means "this won't work on newer OSes."

    Additionally, if you're doing this preparation for a 32-bit OS (the screenshots are for Server 2008 R2, by definition a 64-bit OS), you will need to make sure you've selected the x86_ component, not the amd64_ as I've done in the examples. You will note that the Server 2008 R2 WIM doesn't include that option in the components list, but it is available in the 32-bit Windows 7 WIM.
  4. In the settings window, change the value for SkipRearm to 1
  5. Close the Windows image. This will remove any specific association to that image from your answer file.
  6. Save your answer file. Exit SIM. Open your answer file in a text editor.
  7. Note the details in the XML file entries. Those attributes of the component name are the piece that seem to be missing from all the other postings I've seen for this function. If you don't have them all—including that publicKeyToken attribute—your answer file will not work.
  8. If you're not going to play with SIM and try to add additional functionality to your answer file, copy the contents to a file on your VM.
  9. Sysprep can be found in c:\windows\system32\sysprep, which is not in the environment path, so you'll need to open a command shell and go to that directory to invoke it. Invoke it with the following command:
    sysprep /unattend:{answer file you created} /oobe /generalize /reboot
    Assuming your answer file was formatted and read correctly, sysprep will take care of generalizing the VM and rebooting. It will take a couple of reboot passes before it's ready for you to work on it, and the default "out of box experience" dialogs will request your attention; when that's complete, you should see that your VM:
    1. is still licensed
    2. has a new SID
    3. has the same number of "Remaining rearm count" as the source VM
  10. When you're through testing, revert your VM to the snapshot, delete the snapshot, then save the answer file to the base image.
Once you have an answer file saved to a base VM, it's trivial to clone, sysprep and be on your way with a minimum of effort.