Thursday, February 6, 2014

SSL Reverse Proxy using Citrix NetScaler VPX Express

Part 5 in a series

This part is the final post of the series; it builds on the previous posts by adding an SSL-based content switch on top of our previously-created simple HTTP content switch.

The NetScaler does a fine job of handling SSL traffic in a manner similar to the way it handles the unencrypted HTTP traffic. The key differentiator—other than making sure to distinguish the traffic as being SSL-bound—is the inclusion of certificate handling.

Of course, the "outside" or Content Switching virtual server must have an SSL certificate; the client trying to reach your host(s) is expecting an SSL connection, so the listener responding to the particular host request must respond with a conforming certificate or he/she will have to deal with certificate errors.

The "inside" server that's the target of Content Switching probably wants to communicate with its clients using SSL, too (In some special cases—known as "SSL Offload"—the inside server allows non-encrypted connections from specific hosts that are pre-configured to handle the overhead of SSL encryption; NetScaler can do this, too). In order for the NetScaler to perform as a proxy, it must have sets of SSL certificates for both the inside and the outside connections. Once you have those, you can quickly set up an SSL-based content switching configuration that mirrors the HTTP setup.

And the best part? Only the Content Switching virtual server needs to have an SSL certificate that is signed by a trusted root! (Caveat: it must be either a wildcard or multiple-SAN certificate. Remember: the DNS name must match either the CN [common name] or one of the DNS SAN [subject alternate name] entries of the host certificate) The "inside" servers that you're putting "behind" the NetScalers can have self-signed certificates or certificates signed by an in-house CA.


A little about Certificate files

The NetScaler has a ton of flexibility for working with many certificate formats—PEM and DER encoding, PKCS#12 bundles, etc.—but I find that it's easiest and most flexible when using individual, single-certificate (or key) PEM-type, Base64-encoded text files. It's easiest if you just have them ready-to-go; if you don't, you can learn about using OpenSSL, or you can simply use an online converter like SSL Shopper's Certificate Tools. Personally, I use a local copy of OpenSSL.

For the purpose of this tutorial, I'm going to assume you have all the certificates you need, already in PEM format.

SSL handling in the NetScaler

The SSL feature must be enabled to do any sort of SSL load balancing or proxy configuration; it is enabled in the same place that Load Balancing and Content Switching is enabled, off the System->Settings menu:

Preparing Certificates

Once that's enabled, the yellow warning symbol for the Traffic Management function disappears. The first step to managing certificates is to get certificate files uploaded to the NetScaler. Select the SSL option itself:

then "Manage Certificates / Keys /CSRs" in the Tools section of the right-hand column.
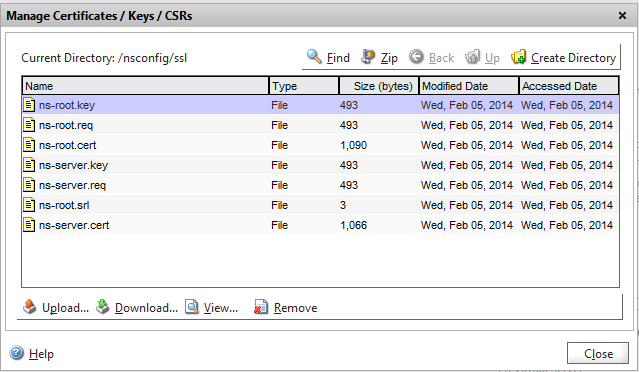
The dialog resembles a file management window because it essentially is: it's a tool that lets you upload certificate files to the NetScaler's certificate store. Click [Upload...] to load the certificate files on the NetScaler. You'll need both the certificate and its private key, plus any CA certificates—including intermediates—that were used in a signing chain.

Once you have your certificates loaded, close the file dialog and expand the SSL menu tree and select Certificates

Click [Install...]. This process both creates a configuration object that the NetScaler can use to bind certificates to interfaces, and it gives you the opportunity to link certificates together if they form a signing chain. Although you can also use this interface to perform the upload function, I find it works more consistently—especially when handling filenames—to upload in one step, then install.

The server certificate itself needs to be installed using both the certificate and its key file; signing CAs can be loaded with just the certificate file.

Once all the certificates in the chain are loaded, select the server certificate and click the [Action] dropdown, then the "Link..." option. 

If you've got a recognized file and the CA that signed the file is already installed, it will be pre-selected in the Link Certificate dialog. Click [OK].
Repeat with any other certificates in the chain, back to the CA root.


Creating the Content Switching Configuration

With minor exceptions, we'll follow the same process for creating a standard HTTP content-switching config. Specific differences will be highlighted using italic typeface.
  1. If they don't exist already, create your server entries. Because I'm building on the work previously documented, my servers are already present.
  2. Create SSL-based services for the servers; configure https as a monitor:
  3. Create SSL-based Load Balancing Virtual Servers
    1. Set the protocol to SSL
    2. Disable "Directly Addressable"
    3. Enable the SSL-based service
    4. Switch to the SSL Tab
    5. Highlight the server certificate and click [Add >] to bind the certificate to the server
  4. Create the new Content Switching policies. We can't use the previous ones—even if they're functionally identical—because we're going to use them on a different CS Virtual Server.
  5. Create (or modify) an SSL-based Content Switching Virtual Server
    1. Set the protocol to SSL
    2. Set the IP address for the virtual server. It can be the same address as the HTTP virtual server.
    3. Insert policies and set targets to SSL-based targets
    4. Switch to the SSL Tab
    5. Highlight the server certificate and click [Add >] to bind the certificate to the server
    6. Highlight the next CA cert in the signing chain; click the drop-down arrow on the [Add >] button and select [as CA >] to add the signing cert.
    7. Repeat step 5 for all remaining certificates in the signing chain.
    8. Click [Create] when complete.
As soon as the configuration is "settled" in the innards of the NetScaler, the "State" should indicate that it is "Up" and you can again test using your HOSTS file. Note: you may still get a certificate error if your URL doesn't match the name in the certificate bound to the Content Switching virtual server (eg, a short name will not properly resolve against a domain wildcard certificate).

Parts in this series:

HTTP Reverse Proxy using Citrix NetScaler VPX Express

Part 4 in a series

So far: the first three parts of this series dealt with the introduction of a problem (multiple servers behind a NAT firewall that use the same port) and solution (Citrix NetScaler VPX Express); laying the groundwork for configuring the solution; an overview of what we'll be configuring.

Because it is possible to set up content switching with a single host (the degenerate case), this is the method we'll begin with. While it doesn't really do much for us, simply repeating the steps for a second (and subsequent) will result in a working solution. Other guides lay down the steps with two hosts already in mind, and teasing apart the pieces to apply it to your situation might be more difficult.

Groundwork

Some planning must be done prior to doing this setup. The first is a set of IP addresses that you'll need to have handy. This post will use the following addresses; substitute them with your own:
HostIP
CS Virtual Server192.168.106.37
Target Server A192.168.106.38
Target Server B192.168.106.39

Enable Features

The bare-bones install of the NetScaler has a number of features enabled, but the ones we need for content switching are disabled. Open the System configuration tree and select Settings

Select "Configure basic features" and make sure the following features are enabled (checked):
  • Load Balancing
  • Content Switching
If you selected "Traffic Management" in the left menu before and after enabling the feature, this is what you'd see:
Default, features disabled
LB and CS enabled
Begin the setup by expanding "Load Balancing" under "Traffic Management" and select "Servers":

In the center section, click [Add...] and create the server. The "Server Name" is an identifier used in the NetScaler; it does NOT have to be the FQDN or short name for the server.


Then switch to the Services option

and create a protocol-specific entry for the server, including a monitor
(I like to use http because it doesn't require any customization; a custom http-ecv monitor can be created to check for the explicit function of the target server, but that's beyond the scope of this series).

I also recommend using a naming convention that includes the type of object you're creating ('svc' for the service) and the protocol it's tied to ('http'); that will make it more obvious where a given object comes from when you see them bound in other places.

Switch to the Virtual Servers menu


and click [Add...] to build the virtual server.

Make sure you uncheck the "Directly Addressable" option; this eliminates the need to give the virtual server its own address (we want to give an address to the Content Switching virtual server) and select the service we just created.

Switch to the Content Switching menu and select "Policies"


Click [Add...] to create a policy to trigger sending the traffic based on the hostname used in the HTTP header.

Select the Virtual Servers option under Content Switching

and click [Add..] to create a new virtual server.
This server gets the IP address to which we'll be forwarding traffic.

Click "Insert Policy" to insert a new policy

Select the new policy from the drop-down, then pull down the list of targets, selecting the new load balancing server. You will get a warning about the "Goto Expression"

Select [Yes], then [Create] to make the server.

At this point, your setup should function for the first server you configured!

Now: go back to the step for creating the outside server and repeat except for creating a new Content Switching server.


Now: Open the existing server

and add another policy, using the new server's policy and LB virtual server entry:


You can test this internally by either updating your DNS server entries or adding a line to your machine's HOSTS file:
192.168.106.37 serverA serverB

Point your browser at http://serverA after you make the change, and voila!, you get to the target. Switch to http://serverB, and you get that target instead.

Once you've verified the functionality from the inside, update the forwarding on your NAT firewall and test using an outside address (eg, use a cell phone that's not on your home WiFi).

Parts in this series:

Wednesday, February 5, 2014

Citrix NetScaler Content Switching Overview

Part 3 in a series

In the first part of the series, I discussed the problem facing a user with a single outward-facing public IP address, when he/she wants to host multiple services behind a NAT router that use the same port. My proposed solution is the Citrix NetScaler VPX Express, for which I documented the installation and initial configuration in the second part.

Content Switching, NetScaler-style

Before diving into the configuration steps, I thought it would be helpful to diagram the interconnections and data flow when a content switching setup is completed; I sure could have used it when I started down the path of figuring this out for myself...

Terms

Load Balancing Server
A host external to the NetScaler, specified by name and IP address
Load Balancing Service
A specification of the sort of traffic (protocol & port) that a Server is expecting, and that the NetScaler is switching. One or more "monitor" rules should be attached to the service so that the NetScaler can determine whether the target server is actually available.
Load Balancing Virtual Server
A specification of an "internal" endpoint used by the NetScaler to route traffic. In the case of SSL traffic, a copy of the target server's private key and certificate chain will enable SSL offload.
Content Switching Policy
A definition or rule that is used to identify or select traffic in order to correctly forward requests.
Content Switching Virtual Server
An IP+Port+Protocol specification that the NetScaler uses to listen for incoming traffic. This address is where your NAT router will forward the traffic to be switched. The CSVS has its own SSL certificate pair, and can thus decrypt and review all incoming requests against policies and take action.

Traffic flow


  1. An external request is received by the NetScaler on the IP and Port configured as a Content Switching virtual server.
  2. The NetScaler inspects the traffic and if it matches a policy rule, forwards the traffic to the target configured for the rule.
  3. The target Load Balancing server accepts the traffic, passing it along to the server+service specified.
  4. The internal server receives a request as if it were being originated from the NetScaler's Subnet IP.
  5. If the first policy rule didn't match, subsequent policy rules are evaluated, sending traffic to targets at the first match. If no policy rules match, a default target may be configured; otherwise, traffic is discarded.

Takeaway

Content Switching elements are configured in the reverse order of traffic flow:
  1. Servers
  2. Services
  3. Load Balancing Virtual Servers
  4. Policies
  5. Content Switching Virtual Server(s)
Other items:
  1. When using multiple Content Switching Virtual Servers, each Policy—by name—can only be configured for one CSVS at a time. As long as they have different names, however, they can have the same matching criteria (eg: HTTP.REQ.HOSTNAME.EQ("fqdn")).
  2. One-to-many relationships can exist between a target server and CS Policies; you don't have to go crazy building complex boolean logic into the expressions, just add additional Policies pointing at the same target.
  3. A variant of SSL Offload (SSL_BRIDGE) is not possible when using Content Switching. SSL_BRIDGE cannot inspect the headers used by the client in order to know where to send the traffic.

Parts in this series: