Monday, October 22, 2012

vCenter 5.1 Install Notes

This post is a "live document" covering any "gotchas" that I discover as I install vCenter Server for vSphere 5.1 in various environments.

Install Defaults

SSO HTTPS Port: 7444
SSO Lookup Service URL: https://:/lookupservice/sdk
IS HTTPS Port: 10443
IS service mgmt port: 10109
IS linked mode comm port: 10111
IS Memory (small): 3072MB
IS Memory (med): 6144MB
IS Memory (large): 12288MB
VC HTTPS Port: 443
VC HTTP Port: 80
VC Heartbeat: 902
WebSvc HTTP Port: 8080
WebSvc HTTPS Port: 8443
WebSvc ChangeSvc Notification: 60099
LDAP Port: 389
SSL Port: 636
VC Memory (small): 1024MB
VC Memory (med): 2048MB
VC Memory (large): 3072MB
WebClient HTTP Port: 9090
WebClient HTTPS Port: 9443

Process Flow
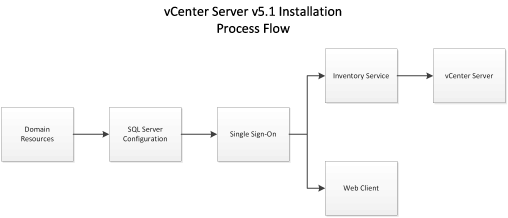

Service Ports

Chances are very good that you'll be challenged by the Windows Firewall. Make sure that it's either disabled, or the appropriate ports are opened.

SSO Administrator Credentials

The default user (admin@System-Domain) is not changeable at installation, and you'd better keep the password you set well-documented. This is required when installing other dependent services.

JDBC requires fixed ports

The SSO service uses the JDBC library for connectivity to Microsoft SQL. JDBC is ignorant of named instances, dynamic ports and the use of the SQL Browser or SSRP. Before trying to install SSO, you must go into the SQL Server Configuration Manager and configure a static port. If there's only one SQL instance on the host, you can use the default (1433), otherwise, pick something out of the air.
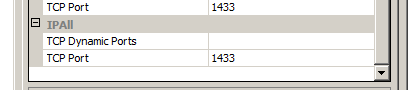
"Dynamic Ports" is blank; "TCP Port" is set to the static port you desire.
If you want to avoid restarting the instance that's already running, you can set the currently-used port as the static port. The server will go on using that port (which it chose dynamically) until it restarts; after that, it'll use the same port as a static port.

SSO requires SQL Authentication

A good sign that SQL Auth is not enabled for the server.
Although the installer makes it look like you can install the services and use Windows Authentication, the service actually uses SQL Auth. This is also a side-effect of using JDBC libraries instead of native Windows ODBC or ADO libraries.
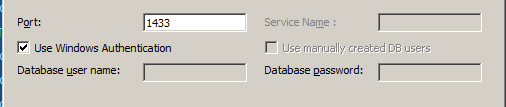
You can install with Windows Auth, but the service can't use it for DB logon.
If your database engine is not configured for SQL Auth, you'll need to talk to your DBAs—and possibly, your security officer(s)—to make it available. Changing the authentication from Windows to "Windows & SQL" may require restarting the instance; your DBAs will let you know when the job is completed.

Changes in 5.1.0a
Looks like VMware took some information to heart on broken installs and modified the SSO install dialog for database connectivity:
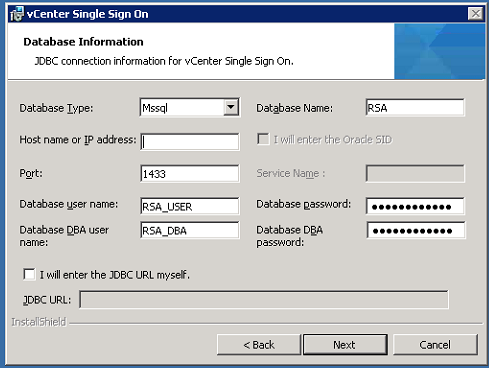
JDBC Connection for 5.1.0a SSO Installation
It is no longer possible to install using Windows Authentication. You will need to have created the user & DBA accounts as SQL Auth; the quick/easy way to get it right is to use the CreateUser script in the same folder as the CreateTablespace script.

SSO Service is Java

Like other services in the vCenter suite, SSO is a Java executable. You will want to review the heap size settings to be sure that it's reserving enough space to be useful, but not so much that it's wasteful. The default is 1024MB and can be adjusted by editing the "wrapper.java.additional.9" value in SSOServer\conf\wrapper.conf
Original memory: 1024MB; Running memory: 384MB

Inventory Service Service is Java

Like other services in the vCenter suite, Inventory Service (IS) is a Java executable. Although the installer gives you three choices for the heap size settings, you might want to tweak that value a little to be sure that it's reserving enough space to be useful, but not so much that it's wasteful. The value can be adjusted by editing the "wrapper.java.maxmemory" value in Inventory Service\conf\wrapper.conf

Small memory model: 3072MB; Running memory: 384MB

vCenter Database

Create the 64-bit Server DSN for the vCenter Server database connection before you start the installation. In order to do that, you'll have to create a blank database, too, or you can't set the DSN to connect to the right database by default.

Another gotcha: Using the built-in DOMAIN\Administrator account could backfire on you. Recommended practice, naturally, is to use a service account; however, you've got to run the installer from the account you want for the services to run under if you also want to use Windows Auth. That requires either logging in as that user, or running the installer with the "runas" utility.

vCenter Server Service is Java

Like other services in the vCenter suite, vCenter Server is a Java executable. Although the installer gives you three choices for the heap size settings, you might want to tweak that value a little to be sure that it's reserving enough space to be useful, but not so much that it's wasteful. The value can be adjusted by editing the "wrapper.java.maxmemory" value in tomcat\conf\wrapper.conf
Small memory model: 1024MB; Running memory: 384MB

Friday, October 19, 2012

vSphere Data Protection is still too immature


With the release of vSphere 5.1, I was excited to migrate from the sometimes-flaky "VMware Data Recovery" (VDR) product over to the Avamar-based "vSphere Data Protection" (VDP) appliance.

Unfortunately I found the product to be limited and hard to work with, even when compared to VDR.

While VDP replaces VDR in the vSphere lineup, it's no upgrade: VDR is not supported for v5.1 (but will work in many circumstances) and will not be supported for that environment; VDP will not be back-rev'd to older versions of vSphere. However, there is currently no way to "upgrade" or migrate from VDR to VDP; when you migrate to v5.1, you have to essentially "start fresh" with VDP if you desire to use the supported VMware solution. Any organization with backup retention requirements may find this a trouble spot—but then, you should probably be looking at a purpose-built product, anyway.

Installing VDP is both easy and difficult, and is performed in two stages. In the first stage—which is very easy—VDP is installed as an appliance from an OVF. The main decision you must make comes in the form of selecting the appropriate size of appliance to install: 512GB, 1TB or 2TB. This is where reading the manual comes in handy: you'd better pick the correct size, because you can neither expand the repository on an existing appliance, nor can you migrate the data from one appliance to another. This is one place where VDR had better capability: expanding a repository was pretty easy, and you could migrate a repository from one appliance to another. Additionally, the size is representative of the repository for the backups, not the space that is actually consumed by the entire appliance: the manual indicates that the actual space consumed by the appliance will be ~1.5x the stated size of the repository.

Why not just pick the biggest, you ask? Because the appliance will consume all that space, even if you install it on NFS or select thin disks for block storage. It'll start small, but the initialization process for the appliance (which happens as part of the second stage of the installation) will result in every block being touched and the disk being de-thinned. Worse, if you select "eager-zeroed thick" for the disk, the initialization will STILL go through and touch all blocks/clusters, so don't waste your time with it.

After the appliance is loaded and powered-on, you figure out where the admin portal is published, which is then opened in a web browser. The security-minded will cringe at the requirements for the appliance password (set during the second install phase):

  • Exactly 9 characters (no more, no less)
  • At least one uppercase letter
  • At least one lowercase letter
  • At least one number
  • No special characters
Personally, I have no problem with a minimum of 9 characters, but requiring exactly 9 chars, and not permitting "special characters" really makes me wonder what they're doing.

Other settings are configured (see Duncan Epping's "Back to Basics for VDP" for more details) and depending on your storage performance, it may be an either long or short wait while the system finalizes things and you're able to back up VMs. In my case, I had to redo the install a couple of times, with no rhyme or reason why the install mode wouldn't take the settings the first time.

Once the user interface is available in the Web Client, it's fairly straightforward for a previous VDR user to create VDP jobs that mirror the old system. VDR, however, had far more information about the "goings on" as it interacted with your vSphere environment; you could quickly see which VMs were being backed up at a given time (if at all), and if you had a failure for any reason, one could fairly quickly diagnose the reason for the failure (commonly a snapshot issue) and address the problem.

VDP, on the other hand, gives essentially zero information about machines being protected. Worse, the daily report that VDP can issue will also include information about machines that are not being protected, and there's no way to suppress the information. In my lab, I had 13 VMs to protect, and each day I learned that 2 of them would fail. I struggled to figure out how to determine the VMs with issues, and once I did that, it was nearly impossible to determine what caused the backup to fail. With some patience and Knowledge Base searches, I was able to get an idea of where logfiles might exist, but even once I found them, isolating the logs for the particular VMs of interest was difficult. Of the two failing VMs, one was the vCenter host, which frequently failed to backup in any environment when in-guest VSS snapshots were selected; I never solved that problem because I could never find a cause for the other VM (an Windows SSH host) failed as long as the system was powered on.

Ultimately, I gave up on it, and will be looking at other products like Veeam and Symantec V-Ray. While Avamar may be a phenomenal backup system, this VDP derivative of it is far too immature and unpredictable for me to rely on for my important data: I've uninstalled the appliance and removed the registration from vCenter.

Tuesday, September 11, 2012

Upgrading from vSphere 5.0 to 5.1

I upgraded my home lab from VMware vSphere 5.0 U1 to vSphere 5.1 today, using the GA bits that became available late yesterday, 10-September-2012.

vCenter Server

As with all vSphere upgrades, the first task was to upgrade the vCenter Server instance. This is also the first place that you'll see changes from the installs that were familiar from v4, forward.
Install Screen for VMware vCenter Server
The first thing you notice is that two other options are prerequisites to installing vCenter Server: vCenter Single Sign On (SSO) and Inventory Service.

VMware does you the favor of offering an option to "orchestrate" the install of the two items prior to installing vCenterServer, but in doing so, it also keeps you from accessing all of the installation options (like HA-enabled SSO) available in the prerequisite individual installs.

The next hiccup that I encountered was the requirement for the SSO database. Yes, it does support Microsoft SQL, and yes, it can install an instance of Express for you. But if you'd like to use the database instance that's supporting the current vCenter database, you'll have two additional steps to perform, outside of the VMware installer:
1) Run the database creation script (after editing it to use the correct data and logfile locations for the instance)
2) Reset the instance to use a static port.

It is documented as a prerequisite for installing the SSO service that the SQL server requires a static port. But why? Because it relies on JDBC to connect to the database, and JDBC doesn't understand Named Instances, dynamic ports or the Browser Service and SQL Server Resolution Protocol.
Note the lack of options for named instances.
If you did like many folks and used the default install of SQL Express as your database engine, you have the annoyance of needing to stop what you're doing and switch your instance (VIM_SQLEXP, if using the default) to an unused, static port. In order for that setting to take effect, you must restart the SQL Server instance. Which also means your vCenter services will need to be restarted.

Again: this is a documented requirement in the installation guide, yet another reason to read through it before jumping in...

Once you have SSO installed, the Inventory Service is recognized as a upgrade to the existing service, as is the vCenter Server itself. Nothing really new or unique in adding these services, with the exception of providing the master password you set during the SSO installation.

Then the ginormous change: you've probably been installing the Web Client out of habit, but now you really need to do so if you'd like to take advantage of any new vSphere 5.1 features that are exposed to the user/administrator (like shared-nothing vMotion).

But don't stop there! Make sure you install the vCenter Client as well. I don't know which plug-ins for the Client are supposed to be compatible with Web Client, but the ones I use the most—Update Manager and VMware Data Recovery—are still local client only.

That's right: Update Manager 5.1—which is also one of the best ways to install ESXi upgrades for small environments that aren't using AutoDeploy or other advanced provisioning features—can only be managed and operated from the "fat" client.

Finally, one positive note for this upgrade: I didn't have to change out any of my 5.0 license keys for either vCenter Server. As soon as vCenter was running, I jumped into the license admin page and saw that my existing license was consumed for the upgraded server, and no new "5.1" nodes in eval mode were present.

ESXi

Once vCenter is upgraded and running smoothly, the next step is to upgrade your hosts. Again, for small environments (which is essentially 100% of those I come across), Update Manager is the way to go. The 5.1 ISO from VMware is all you need to create an upgrade baseline, and serially remediating hosts is the safest way to roll out your upgrades.

Like the vCenter Server upgrade, those 5.0 license keys are immediately usable in the new host, but with an important distinction: as near as I can tell, those old keys are still "aware" of their "vTax" limitations. It doesn't show in the fat client, but the web client clearly indicates a "Second Usage" and "Second Capacity" with "GB vRAM" as the units.
vRAM limits still visible in old license key: 6 x 96 = 576. 
I can only assume that converting old vSphere 5 to vCloud Suite keys will replace that "Second Capacity" value with "Unlimited" or "N/A"; if you've got a big environment or host Monster VMs, you'll want to get those new keys as soon as possible to eliminate the capacity cap.
The upgrade itself was pretty painless for me. I run my home lab on a pair of Dell PE2950 III hosts, and there weren't any odd/weird/special VIBs or drivers with which to contend.
Update: vCloud Suite keys did NOT eliminate the "Second Capacity" columns; vRAM is still being counted, and the old v5.0 entitlement measures are being displayed.

Virtual Machines

The last thing you get to upgrade is your VMs. As with any upgrade to vSphere (even some updates), VMware Tools becomes outdated, so you'll work in some downtime to upgrade to the latest version. Rumors to contrary, upgrading Tools will require a reboot in Windows guests, at least to get the old version of Tools out of the way.

vSphere 5.1 also comes with a new VM Hardware spec (v9) which you can optionally upgrade to as well. Like previous vHardware upgrades, the subject VM will need to be powered off. Luckily, VMware has added a small bit of automation to this process, allowing you to schedule the upgrade the next time the guest is power-cycled or cleanly shut down.

Monday, September 10, 2012

Eliminate SPOF in your DNS

On Monday, September 10, 2012, millions of sites were affected by an attack upon outage in GoDaddy's DNS infrastructure. It's not clear that every GoDaddy-hosted DNS domain was affected, but those customers that were affected included those using other services (even in-house) for their email, web and other non-DNS services.

In a nutshell, when you mess with DNS, you mess with the glue that holds the Internet together. And relying on one provider—even one with ginormous infrastructure for hosting DNS like GoDaddy—creates an important Single Point Of Failure.

There is, however, a technical solution that can help keep your organization from becoming collateral damage in an attack like this.

DNS

Working under the assumption that the reader has a cursory understanding of DNS, you already understand about primary and secondary zones.

What you may not realize is that the authority for DNS records is contained within the DNS zone information itself, and that you can readily spoof or publish any authority you'd like as a primary.

With that, you can quickly set up a distributed DNS platform that won't topple if one DNS provider gets crushed by a DDoS.

Stealth DNS

Start by moving your primary DNS zone(s) in house. That gives you complete, direct control over your DNS records. You can use anything that complies with RFC-1035, but I like to use ISC BIND, warts and all. The disadvantage of this, however, is that your primary will always the first point of attack for DNS; if that can be disabled or compromised, it's a bigger deal than if a secondary is compromised.

You get around this limitation by protecting the primary with secondaries: advertise the secondary nameservers in places like your domain records, and allow no hosts but the secondaries to communicate with the primary.

The final trick is to change your zone records so that the primary doesn't even get listed in the SOA; pick a secondary, knowing you can readily change the SOA to a different one at need. This results in stealthing your primary DNS zone database.

Multiple Secondary Providers

The final step is to utilize secondaries from multiple providers. If your ISP provides free secondary service, utilize it. Use xname.org, buddyns.com, or any of the dozen other free secondary services. Use a paid secondary service from godaddy.com or soliddns.net.

The key is to spread the load around. If one of your providers falls over from a DDoS attack, it's not likely that the other(s) will also be getting attacked at the same time.

Update: If the domain registrar is the one being hosed—and for some reason you've been affected by it—there's nothing you can do but wait out the storm. The domain registrar publishes the connection between your domain name and those carefully configured name servers, and theoretically, that information is already being distributed among the various root servers for the TLD of which your domain is a child. The root servers have been shown to be quite resilient to DDoS attacks, so as long as your registrar has done its job correctly, you shouldn't have a problem. If it hasn't, you're screwed.

Update 2: GoDaddy has announced that it was not an attack, but a problem in their DNS infrastructure. Either way, if your single provider becomes unavailable (for any reason), you're still in trouble.

Friday, August 24, 2012

Remove security warning from Internet-sourced files


Ever been setting up or managing a system and run into a prompt like this:

It’s probably because you grabbed the original executable from an Internet site.

Using a modern browser to grab the file will typically result in a special NTFS stream added to the originally-downloaded file (eg, bginfo.zip) that gets promulgated to the executable you’re trying to run.

This can be a good thing when you're trying out software, but how do you fix it when you know you can trust the file? This sort of thing can be come quite annoying if it's tied to a Startup item like BGInfo.

The best solution is to “unblock” the file you download; that keeps the stream from being added to the extracted file(s). But what if you’ve already extracted them?

Same solution, but you apply it to the executable instead of the download. Right-click on the file to unblock, then select properties. You should see something a bit like this:
Note the [Unblock] button at the bottom. If you click that and save the properties, the NTFS stream metadata is removed from the file, and you won’t get the popup message whenever the app is run.

When I'm retrieving trusted files from my own web servers, I’ve simply gotten into the habit of unblocking files as soon as I download them; if the ZIP or installer file doesn’t have that metadata, the extracted files won’t inherit them.

Also: there’s no way to mass-unblock files; if you select a group of files and choose properties, you don’t get the option to edit the security. If you're downloading a zip file full of executables (like the SysInternals Suite), you definitely want to unblock the ZIP file before extracting it, or you'll have to unblock each executable individually.

Thursday, August 9, 2012

Do-it-yourself SQL Agent replacement for vCenter

The fast/easy way to support VMware vCenter on Windows is to let the installer load SQL Express. By default, that's the SQL 2005 version of Express, and it has some limitations to it, like maximum database size (4GB), maximum RAM used (1GB) and maximum sockets utilized (1, but it'll use as many cores--real and hyperthreaded--as the socket provides). If you have a small datacenter being managed (5 hosts or less, 50 guests or less), those limits are probably not going to cause you pain.

The limit that usually causes the biggest problem is the database size limit; even that can be overcome by pre-installing the SQL 2008 or 2012 version of Express: the size limit is extended to 10GB.

But the one consistent limitation across all the versions of Express is the loss of the SQL Agent (MSDE is the predecessor to Express, and while it has Agent, it also is based on SQL 2000 and has a 1GB size limit; neither are acceptable for even the smallest vCenter deployments).

SQL Agent is the service that runs with the paid versions of SQL Server that provides, among other things, automation of scheduled jobs for the database engine.

By default, VMware simply ignores job scheduling when running on top of Express; the code is baked right into the SQL scripts for job creation. Supposedly, the vpxd will take care of those things, but in practice, I've discovered that it doesn't do the it with the same effectiveness as the SQL Agent jobs.

There is an alternative, however: use the Windows Task Scheduler.

As long as you have the proper command-line SQL client that can "talk" to your Express instance installed on your vCenter host, you can automate the jobs for yourself.

Take a look in c:\Program Files\VMware\Infrastructure\VirtualCenter Server for all the files named job_*_mssql.sql. Each of those represents a different scheduled task for the Agent-based SQL databases, and those scripts provide sufficient information to reproduce a scheduled task in Windows.

Here's what to look for:
set @JobNAME= : this is what you should name your task
@command = N'EXECUTE... ' : this is the query you're going to automate
@active_start_time= : this is the start time for the job, in HMMSS or HHMMSS format.
@freq_subday_type= : which type of repeat interval. 4 == minutes; 8 == hours
@freq_subday_interval= : indicates the repeat interval

For ease of reference, here's a handy-dandy table for the 5.0.0 version of vCenter:
Job Name Command Start Time Repeat Interval
Event Task Cleanup DBNAME EXEC cleanup_events_tasks_proc 1:30 AM Every 6 hours
Past Day stats rollup DBNAME EXEC stats_rollup1_proc 1:00 AM Every 30 minutes
Past Week stats rollup DBNAME EXEC stats_rollup2_proc 1:20 AM Every 2 hours
Past Month stats rollup DBNAME EXEC stats_rollup3_proc 1:00 AM Every 24 hours
Topn past day DBNAME EXEC rule_topn1_proc 1:15 AM Every 10 minutes
Topn past week DBNAME EXEC rule_topn2_proc 1:45 AM Every 30 minutes
Topn past month DBNAME EXEC rule_topn3_proc 1:35 AM Every 2 hours
Topn past year DBNAME EXEC rule_topn4_proc 1:55 AM Every 24 hours
Process Performance Data DBNAME EXEC process_performance_data_proc 1:00 AM Every 30 minutes
Property Bulletin Daily Update DBNAME
DELETE FROM VPX_PROPERTY_BULLETIN
WHERE EXISTS(
   SELECT 1 FROM VPX_PROPERTY_BULLETIN TMP 
   WHERE TMP.OBJECT_MOID=VPX_PROPERTY_BULLETIN.OBJECT_MOID
      AND TMP.OPERATION_TYPE=1
      AND TMP.GEN_NUMBER < (
         SELECT MAX(GEN_NUMBER) - 300000
         FROM VPX_PROPERTY_BULLETIN
      )
);
1:40 AM Every 24 hours

Depending on the version of SQL you have installed, you'll be using OSQL, ISQL or SQLCMD as your command-line client. All three, however, have the same arguments for the way we'll use it, so while I'm going to be providing the instructions using SQLCMD, you can substitute your choice with minimal effort.

The trick is to assemble your arguments for SQLCMD in the task definition, then schedule the task in the same intervals & timing as the Agent version.

In addition to the command, you'll need the following case-sensitive arguments:
-E or -U username -P password (I prefer to use -E, which passes in the Windows account token for the user the task runs under; keeps from making a SQL password from being visible)
-S server\instance
-d database
-Q "command text"

So the finished command line for the first entry (for me) in the table becomes:
SQLCMD.EXE -E -S localhost\VIM_SQLEXP -d VIM_VCDB -Q "EXEC cleanup_events_tasks_proc"

Once you have the command assembled in the "Run:" field for the task, you can then step through the scheduling tab and match the time & recurrence as noted above.

Finally, you can skip the heavy lifting all together (except for that last, long task, which exceeds the limits of the schtasks command) and use the following CMD script to send the whole thing into your system, substituting some of the variables with your specific needs:
@echo off
set CLI=C:\Program Files\Microsoft SQL Server\100\Tools\Binn\SQLCMD.EXE
set SVR=localhost\VIM_SQLEXP
set DB=VIM_VCDB
set USR=[domain\]username

schtasks /create /tn "Event Task Cleanup %DB%" /sc HOURLY /mo 6 /st 01:30 /ru "%USR%" /tr "\"%CLI%\" -E -S %SVR% -d %DB% -Q \"EXEC cleanup_events_tasks_proc\" "
schtasks /create /tn "Past Day stats rollup %DB%" /sc MINUTE /mo 30 /st 01:00 /ru "%USR%" /tr "\"%CLI%\" -E -S %SVR% -d %DB% -Q \"EXEC stats_rollup1_proc\" "
schtasks /create /tn "Past Week stats rollup %DB%" /sc HOURLY /mo 2 /st 01:20 /ru "%USR%" /tr "\"%CLI%\" -E -S %SVR% -d %DB% -Q \"EXEC stats_rollup2_proc\" "
schtasks /create /tn "Past Month stats rollup %DB%" /sc DAILY /st 01:00 /ru "%USR%" /tr "\"%CLI%\" -E -S %SVR% -d %DB% -Q \"EXEC stats_rollup3_proc\" "
schtasks /create /tn "Topn past day %DB%" /sc MINUTE /mo 10 /st 01:15 /ru "%USR%" /tr "\"%CLI%\" -E -S %SVR% -d %DB% -Q \"EXEC rule_topn1_proc\" "
schtasks /create /tn "Topn past week %DB%" /sc MINUTE /mo 30 /st 01:45 /ru "%USR%" /tr "\"%CLI%\" -E -S %SVR% -d %DB% -Q \"EXEC rule_topn2_proc\" "
schtasks /create /tn "Topn past month %DB%" /sc HOURLY /mo 2 /st 01:35 /ru "%USR%" /tr "\"%CLI%\" -E -S %SVR% -d %DB% -Q \"EXEC rule_topn3_proc\" "
schtasks /create /tn "Topn past year %DB%" /sc DAILY /st 01:55 /ru "%USR%" /tr "\"%CLI%\" -E -S %SVR% -d %DB% -Q \"EXEC rule_topn4_proc\" "
schtasks /create /tn "Process Performance Data  %DB%" /sc MINUTE /mo 30 /st 01:00 /ru "%USR%" /tr "\"%CLI%\" -E -S %SVR% -d %DB% -Q \"EXEC process_performance_data_proc\" "

Tuesday, June 12, 2012

Using VMware Workstation for learning Hyper-V

I'm working towards my MCITP, and have the MS 70-643 [Configuring Windows Server 2008 Applications Infrastructure] test scheduled for the end of the month. I've got the self-paced study guide, and ran into an immediate problem when I read the introduction: Hyper-V is needed to complete the guide, and using VMware (Workstation or ESX Free) won't help because Hyper-V itself is a topic covered on the exam.

So the first thing I did was hunt around for a machine that would run Hyper-V, and the closest I came to finding one (that wasn't already in production for some other purpose) was my laptop (HP Elitebook 8460p): it had the full Core i5 CPU and chipset, along with 8GB RAM. Instead of messing with dual-boot, I pulled the system drive and installed an older HD I had lying around, and got to work on installing the OS.

While Windows Server 2008 R2 will run on the laptop, the network hardware wasn't on the base image, nor were a slew of other devices. No surprise, either, that there were no Server versions of the drivers from HP.

So I looked into using a spare server at the office; unfortunately, that was a bust, too: the spare servers wouldn't run Hyper-V because of hardware limitations.

A little help from Google, however, showed me that it's not just possible, but easy to go Inception and run Hyper-V as a guest on top of VMware Workstation 8.
Inception: Server 2008 R2 on a Hyper-V VM running on a Workstation VM
There is one gotcha, however: in addition to selecting the "Virtualize Intel VT-x/EPT" option for the Workstation guest vCPU config, you need to add a line to the guest's VMX file: hypervisor.cpuid.v0 = "FALSE"
Pass-thru hardware virtualization
Once you have that added to the guest config (which must be done when the VM is powered-down), Hyper-V will support its own nested guests.

One other thing you'll want to do: because Hyper-V uses the [CTRL]+[ALT] in all its mouse-release options, updating the VMware default hotkey sequence to include an additional (or different) sequence is necessary if you ever think you'll need the Hyper-V sequence.

If you leave the sequence alone in Workstation, then there's no way to send [CTRL]+[ALT]+[LEFT] down into the Hyper-V guest: Workstation captures the sequence before it can be sent.

UPDATE: There must be a bug in Workstation, both 5.02 and 5.04. In both environments, I've trashed my host system partition when booting one of the Hyper-V-hosted VMs. The first time it happened, I figured it was a fluke with the host's drive; luckily, I had a backup, although it was over 60 days old and I had to get some help from the company Domain Admins to get it back on the domain. The second time, I had a backup from that morning to restore, and the third time, I simply gave up on the whole thing after restoring from that morning's backup.

Monday, April 2, 2012

Making SkipRearm work for you

So, one of the nice parts about virtualizing a Windows 2003 or XP system (other than the small resource footprint, compared to newer OS versions) was the quick, tidy way of cloning and generalizing them: clone it, run NewSID to give it a new SID and NetBIOS name. Done.

We can't do that anymore with Windows Server 2008 R2 and Windows 7 (nor Server 2008 and Vista): between licensing scheme changes and NewSID going the way of the dodo, there are only two ways to virtualize them: install from 'scratch', or clone/sysprep.

Microsoft has made huge strides in their install platform since it was introduced, and doing "from scratch" installs aren't that bad anymore; but if you've got a system that's set up just so, it's probably a lot more work to rebuild from scratch than to clone & generalize.

But that's what can cause problems: the default behavior of sysprep is to reset the product code and licensing activation state for the cloned machine. In and of itself, that's no great issue, but Microsoft built a hard limit into the number of times a system can be "rearmed" for licensing; if you reach that limit, there's no do-overs. You can't get sysprep to succeed.

There's a way to address this, too: Microsoft also recognized that there might be times when you need to leave the machine's licensing state alone, yet still generalize it. You can find articles around the 'net for the "SkipRearm" component of a sysprep answer file, and it does work. Mostly. If you do it correctly.

That's the point of this post: for every way that exists to do it correctly, there are probably 150 ways to do it incorrectly. I know: I spent several hours over the weekend trying to get it working.

I succeeded, but it wasn't quick. So what follows is the documentation for the method that worked for me...

To make shorter work of this, you'll need several things:

  1. Microsoft WAIK (Windows Automated Install Kit). It's an ISO that includes the installer for SIM (System Image Manager). The key item is SIM.
  2. Install image (WIM) from the OS you're trying to work with. It can be the base install.wim that comes on the distribution media, or an updated WIM that you used to create your "template" system.
  3. A VM with a fully-licensed OS. You'll want to run this VM on a hypervisor that will allow you to take snapshots (Type I or Type II, doesn't make a difference--it's the snapshot facility that we're after to make faster work of this).
  4. Text editor (Notepad is fine, but I like the highlighting in SciTE, the Scintilla Text Editor)
Assemble your toys, and take a snapshot of your VM so that you can roll it back to the state that exists prior to "messing" with it.
  1. Launch SIM and open your install image:
  2. Create or open an answer file:
  3. Expand the Components folder, right-click the Microsoft-Windows-Security-SPP component that is appropriate for your OS type, and select Add setting to Pass 3 generalize. Note: if you instead select the -SLC component, it will have a SkipRearm setting, but the program notes indicate that the setting has been deprecated. In practice, it means "this won't work on newer OSes."

    Additionally, if you're doing this preparation for a 32-bit OS (the screenshots are for Server 2008 R2, by definition a 64-bit OS), you will need to make sure you've selected the x86_ component, not the amd64_ as I've done in the examples. You will note that the Server 2008 R2 WIM doesn't include that option in the components list, but it is available in the 32-bit Windows 7 WIM.
  4. In the settings window, change the value for SkipRearm to 1
  5. Close the Windows image. This will remove any specific association to that image from your answer file.
  6. Save your answer file. Exit SIM. Open your answer file in a text editor.
  7. Note the details in the XML file entries. Those attributes of the component name are the piece that seem to be missing from all the other postings I've seen for this function. If you don't have them all—including that publicKeyToken attribute—your answer file will not work.
  8. If you're not going to play with SIM and try to add additional functionality to your answer file, copy the contents to a file on your VM.
  9. Sysprep can be found in c:\windows\system32\sysprep, which is not in the environment path, so you'll need to open a command shell and go to that directory to invoke it. Invoke it with the following command:
    sysprep /unattend:{answer file you created} /oobe /generalize /reboot
    Assuming your answer file was formatted and read correctly, sysprep will take care of generalizing the VM and rebooting. It will take a couple of reboot passes before it's ready for you to work on it, and the default "out of box experience" dialogs will request your attention; when that's complete, you should see that your VM:
    1. is still licensed
    2. has a new SID
    3. has the same number of "Remaining rearm count" as the source VM
  10. When you're through testing, revert your VM to the snapshot, delete the snapshot, then save the answer file to the base image.
Once you have an answer file saved to a base VM, it's trivial to clone, sysprep and be on your way with a minimum of effort.

Sunday, March 18, 2012

Resize your Vista/Win7/Win08 desktop icons

If you're a clean desktop type, you've figured out by now that you can resize (in smallish increments) the icons that Microsoft puts on the user desktop (notably, the Recycle Bin, which is the only icon on a fresh desktop—unless the administrator has installed something else as well).
Hold down the CTRL key and scroll the mouse.
So if the default icon size looks a bit like this:
You can scroll and make them tiny (my preference):
And you can also increase their size in case you prefer to go that direction:
Unfortunately, there are times when you can't scroll, or scrolling doesn't get interpreted correctly. Working inside a virtual machine is one of those times; working by remote can be another. Luckily, the Windows API allows a programmer to "simulate" a scroll-wheel in code, bypassing the need for a physical scroll wheel.
The Jamie Morrison over at the ether published a small console program that can do just that: programmatic simulation of scroll-wheel events. See their Knowledgebase article for more information.

Update: In the event that the links above ever go dead, here's the version that was available on 12-June-2012

Monday, February 27, 2012

Windows print driver insanity

Windows print drivers are the bane of many admins and users. These bits of software live in the murky area between the OS kernel and user space, and decisions (and non-decisions) made by their developers can quickly turn a well-running system into complete garbage.

It's my opinion that much of the bad press that Windows gets (compared to Linux or OS X) is the result of poorly coded drivers (and I definitely include video driver in this indictment).

The real head-shaker I'm working on, however, isn't the bad behavior of the driver as much as the peripheral settings and installer that come with the driver.

I ran across a situation where the Lexmark "universal driver" was dropping some entries in the Registry that didn't cause issues in single-user environments, but wrought havoc on multiuser (eg, terminal server) environments.

Specifically, the driver saved a binary value that essentially contained an XML file. On the surface, that would be innocuous, but when the size of the blob is on the order of 500KB—and the same blob is duplicated in several values and keys throughout both the System and User hives—it becomes an issue.

Even when Windows has supposedly fixed the Registry memory restriction and allocation problems, starting in Windows 2003.

Not sure if you have a potential to be bitten by this little gem? Well, if you aren't using Lexmark printers, you should be fine. But if you are, open Regedit and do an exact search for the following value name: GDL


I had a terminal server user with over 50 of these entries in her user profile; when she was logged in, no other users could log on (not enough resources for the registry of the new login). We removed the values, and voila, users could login.

Insanity!

(Of course, I now want away to search for Registry entries by size: anything bigger than 100K needs to be flagged so I can complain to the vendor—even if it's Microsoft—about bloating my Registry.)

Thursday, February 16, 2012

DR Recovery of a Hyper-V guest using Virtual Server 2005

Here's the scenario: You've convinced your managers to try out virtualization, and you've decided to buy a single server along with some shared storage, leveraging your current server as a second host for your environment. You've made the choice to try Microsoft Hyper-V (after all, it's included with Windows 2008 R2), and you get everything going on the new host. But when it comes to putting Hyper-V on the current server, it turns out that the CPUs, chipset and BIOS are incompatible. After some research, you learn that it will support Virtual Server 2005 (VS2005).

Microsoft is using the same virtual hard drive format (VHD) that they inherited from Connectix, so on the surface, one would hope that it would be possible to use a guest's VHD in either environment: simply create a new VM with the VHD as the primary disk and boot. You won't be able to use any of the really powerful features of virtualization like Live Migration, but at least you'll have an opportunity for short DR RTO/RPO if you could readily move the guest between hosts—even if it's a manual process.

Unfortunately, the two Microsoft hypervisors have very different VM (ie, virtual hardware) specifications (and limitations), and essentially share only the VHD format in common: attempting to boot a Hyper-V guest in VS2005 will fail miserably, and may do so without any indication of why it's failing: you get stuck at a black screen, and that's it. No BSOD, nothing.

Fortunately, there exists many references to porting Hyper-V guests into other environments that are just a Google search away. All those resources tell you that it's possible to run the guest in Virtual PC (the desktop hypervisor, not the server hypervisor) if you remove the integration tools. Some of them also add the step of performing a hal.dll swap. Of course, one thing is absolute: the version of the OS that you're trying to migrate must be a 32-bit OS: while Virtual Server 2005 itself may run fine on a 64-bit OS, it cannot support any 64-bit guest.

Fine. Caveat emptor. We didn't virtualize a 64-bit guest with Hyper-V, so this just might work...

Here's the first problem with the porting technique: if you could get the guest running on a recovery host in order to remove the integration tools, why would you fool around with doing anything else? It's running. Stop fooling with it and move on to get your production hypervisor working again!

Luckily, the real trick isn't related to removing the integration tools, it's getting the right HAL.DLL on the guest. So here's how that is done.
  1. Prepare your Hyper-V guest
    1. On your VS2005 host, create a VM running the same OS as the Hyper-V guest that you wish to recover. This is only temporary, as you're after one special file from the guest.
    2. Get a copy of its hal.dll (%systemdrive%\WINDOWS\SYSTEM32\hal.dll)
    3. Put a renamed copy of the VS2005 HAL (eg, hal.dll.vs05)  on the production Hyper-V system drive, in the same folder as the original HAL.
  2. Test your disaster
    1. Copy the Hyper-V guest VHD to your recovery host. If you do it while your guest is running, it will reliably reproduce the "improper shutdown" that will occur if your Hyper-V host dies unexpectedly.
    2. Mount the VHD as a local disk on your VS2005 host machine; if you're running the latest version, this capability is part of the package.
    3. Rename the original hal.dll to something else (eg, hal.dll.hyperv) and rename your VS2005 HAL to hal.dll. By renaming—instead of replacing—you should be able to reverse the process when you have a production Hyper-V host available again.
    4. Dismount the VHD
    5. Create a new VS2005 guest, using the copied, modified VHD as the primary disk. Do not connect the network to the guest, or you'll have all sorts of problems, the least of which being errors about duplicate names on the network.
    6. Boot the guest. If you get all the way to the logon prompt, you've succeeded.
  3. Test recovery
    1. Shut down your test VS2005 VM.
    2. Mount the VHD as a local disk.
    3. Reverse the hal.dll renaming operation completed in 2c.
    4. Dismount the VHD
    5. Move the VHD back to your Hyper-V host
    6. Create a new Hyper-V guest using the VHD from the VS2005 system. Again do not connect the network to the guest, or problems will ensue.
    7. Boot the guest. Again, if you get a logon prompt, you're golden.
What to do if this doesn't work: go back to management and get a second, new server. Your company's livelihood shouldn't rely on a "bailing wire & duck tape" solution like this. You've already got the shared storage; that's the most expensive part of a highly-available virtualization environment.

What to do if this does work: see above. Don't rely on this solution. This is, at best, a complete kludge, a pig in a prom dress. I'm not even sure that you'd get support from Microsoft if you had an issue, even if it was totally unrelated to the environment.

And in my (biased) opinion, use VMware instead of Hyper-V. While both products have Type-II hypervisor options if that's a requirement (you need a full Windows OS on the "bare metal" host), the VMware guest is a much more mature, portable virtual hardware platform (it really can be as easy as copying a file when you're ready to move to the latest versions of VMware); Microsoft (and all the competition, for that matter) are still working to reach the sophistication & reliability of what VMware introduced years ago.

Friday, January 27, 2012

concluding a chapter

Today marks my final day as Senior Technologist at CarterEnergy, and closes the chapter on my career with the company I've been with since July 11, 2001. Some highlights in my 10½ years with Carter:
  • went from being the sole technical guy at the company to the co-leader of a 5-person IT team
  • provided IT leadership in selecting, implementing and maintaining various business systems
  • performed numerous system and desktop upgrades
    • Windows NTà2000+ADà2003à2008
    • Windows 95à98àXPàWindows 7
  • troubleshot thousands of helpdesk requests
  • built system interfaces to integrate disparate systems, both external/internal and internal/internal
  • created automated systems to offload tasks from people to systems
  • wrote software that was later incorporated into a commercial software suite
  • implemented a virtual infrastructure for server consolidation
  • architected and implemented a DR site
CarterEnergy has been a great place to work. The leadership of the company "gets" how technology can be used effectively to bring efficiencies in business operations: it's not just a "cost center" or other drain on resources. So why leave?

It's one of those final bullet points: virtual infrastructure.

Ever since VMware vMotion was demonstrated to me, I've been enthralled with virtualization and VMware's take on the technology. I've been a member of the local VMware User Group (VMUG) since 2005, and have served on the leadership team of the group since early 2007. I've been to VMworld  four times, and had the honor of helping staff the Self-paced Labs in 2009. I've received recognition for the work in the user group by being named vExpert every year since the award's inception. I even run a two-node VMware cluster in the basement of my home.

CarterEnergy uses virtualization to great effect. But it has always been a tool, never an end in and of itself. Whenever I had the opportunity to work in our environment, it was usually for the purpose of solving a distantly related problem: get it done, get out and go on with the next item on the punch list for solving the business problem.

So when an opportunity to join a Systems team for a VMware Partner with a vibrant virtualization practice came my way, I took it. On February 1, I start a new chapter in my career by joining Vital Support Systems as a System Engineer III. In the new role, I'll be able to make virtualization technologies my bread-and-butter activities as I serve a new customer base.

Saturday, December 17, 2011

drobo's top-notch customer support

Although I'm a professional storage administrator, I really like the dead-simple maintenance that you get with the storage appliances from the folks at Drobo. It's true that they seem a bit pricey, and it's very true that their consumer-directed units are "performance-challenged," but when it comes to an easy way to create a huge, self-managing, readily growing storage pool for everything from home video and digital stills to a dumping-ground for backup images, it's really hard to beat.
I own four units:

  • 2 "first gen" 4-spindle, USB-2
  • 8-spindle DroboPro (USB-2, FireWire, iSCSI)
  • 5-spindle Drobo FS (CIFS)
The reason for this posting is because of a problem I had today with my Pro: although it's presenting a 16TB volume to the connected host via Ethernet/iSCSI, it's filled with a mix of 1TB and 1.5TB SATA-2 drives. The usable capacity is in the neighborhood of 8TB, and I had it roughly 70% full with backups and staging files when it decided to die.
I pulled the power, then restarted it, and it started a boot cycle.
Nuts.
After checking online and finding a troubleshooting post from Drobo, I went through the steps to address the problem. No joy.
I'd purchased the unit in November, 2009, so it was clearly out of warranty, but I took a chance and sent a help request to Drobo Support. It didn't take long before Chad was answering back through their support system, and by giving him good, descriptive information about the problem, he quickly responded with "please call me at..." to get some final information on my symptoms.
Unfortunately, they see this happen enough that they've actually coined a name for it: the Yellow Brick Road.
Luckily, the folks at Drobo recognized some time ago that this particular boot-loop cannot be solved by the customer, and even when the device is out of warranty, they'll RMA the thing and get you back in business.
By any measure, that's awesome customer support.

Thursday, November 10, 2011

"Nailed Up" SSH connection for Cisco devices

To all my fellow Cisco switch & router admins: have you ever been frustrated by the built-in, non-modifiable timeout for SSH support on the devices?

Well, there's a work-around that doesn't require tapping on the keyboard at least every 9:59...

The exec-timeout control for vty lines has no effect on SSH sessions; officially, you can't disable the timeout. Leave an SSH connection idle for 10:00 and it'll terminate from the remote (device) side. The alternative is to remote into your device using telnet; with that protocol, you can greatly extend or even disable the timeout.

But we don't like to use telnet, right? All data is sent in the clear, both keystrokes and screen paints, which includes authentication and logon credentials.

So how do we get the best of both worlds: secure, private connectivity of SSH with the extended, configurable (or disabled) timeout of telnet?

Answer: use both.

Seriously. Use both.

If you use SSH to remotely access a device, you'll get stuck with the 10:00 timer. But if you immediately telnet (or rlogin) back into the same device, you'll "mask" the SSH timeout with the telnet timeout (if one exists).

From the outside, this appears totally safe: all traffic going to and from the device is effectively encrypted by SSH. The telnet/rlogin session is happening "inside" the device where no man-in-the-middle or sniffer can see the traffic.

How does this work? Essentially, the timeout only measures idle time at an EXEC prompt; when you're using telnet (or SSH or rlogin, for that matter), the originating session is no longer in EXEC, it's running an operation.

One obvious negative to this is that you must keep telnet enabled as a valid transport for your device. A second negative is the practice of disabling timeouts on your vty lines. The fix for the first issue is to create a loopback interface for the express purpose of being a telnet endpoint; you then apply ACLs so that it is the only interface on your device that is permitted to accept connections on tcp/23. Assuming you build your ACLs so that telnet connections are only accepted when originated from the device itself, you will have effectively boxed in the insecure protocol inside the device. There's no real solution to the poor timeout choice, except making it long enough for most work without disabling it.

Thursday, November 3, 2011

Hypocrisy, thy name is Microsoft

So back in July 2011, when VMware announced vSphere 5 to the world along with its controversial new licensing model, VMware's competition was quick to join the hue and cry from customers that felt VMware was taking away something that, until then, was free.

You can Google it yourself; just put "vTax" in your search bar and you can get lost in all the write-ups,  venom and FUD.

One of my favorites is a TechNet article from the Microsoft virtualization team that attempts a side-by-side cost analysis between vSphere 5 and Hyper-V, showing how the increasing RAM and core density of a single server causes rapidly-escalating prices for licensing. While the author presents reasonable math on the cost to migrate from low(er) density hosts to high(er) density hosts, I have yet to see real-world Hyper-V support the consolidation ratio of VMware. In my personal experience, I've been unable to start up three 2GB VMs on an 8GB Hyper-V system for a classroom environment, while I've run five 2GB VMs on an 8GB ESXi server. In both cases, the host was strained to the point that the running VMs (2 vs 5) were sluggish and slow to respond, but I use the example to suggest that at scale it could take 50% less VMware infrastructure compared to Hyper-V, making a 10-to-10 cluster comparison no more appropriate than comparing apples to oranges for Vitamin C nutrition. And while both products have a limited set of approved/supported platforms for hardware compatibility, the VMware set is much broader than Hyper-V, giving the purchaser more options for savings that can offset the raw costs of licensing.

And on top of all that, Microsoft marketing money also paid for a spoof of VMware with the "VMlimited" microsite.

But today, Microsoft exposed its hypocrisy by unveiling a new licensing model when they announced the next version of SQL Server, SQL Server 2012.

In the same way that VMware is accused of "taking back" free features and benefits, Microsoft has done the same by eliminating the per-processor (socket) licensing option in favor of a per-core (physical thread of execution) model.

Like with VMware's old model, the old model for SQL Server allowed organizations to provision high(er)-density servers (in terms of both RAM and cores-per-socket) in place of low(er)-density servers without running into the need to acquire new licenses. The new model takes that away, and also puts the burden of reoccurring subscription expenses (Software Assurance, or "SA") into the mix in order to best-leverage the combination of SQL Server and virtualization.

Under the old model, an organization could pay $164,970 (USD, list) for six sockets of SQL Server Enterprise Edition; in a 6-socket VMware cluster, a DBA could then implement an unlimited number of SQL instances on up to 8 VMs per host. If the organization paid an additional $41,244/year for SA, the VMware cluster would be able to run unlimited instances on an unlimited number of VMs (subject to OS licensing limits—if any—and resource constraints of the virtual environment). Further, the old model had no limitations for the migration of SQL-hosting VMs from one server to another (i.e., vMotion). With modern, high-density servers that provide 512GB RAM and 24 cores of execution per 2-socket box, it's conceivable that dozens of multi-vCPU VMs could be hosted for costs in the neighborhood of $365,000 over a 5-year period.

Now compare that to the new model. At a (list) price of $6874 per core, that same six-socket, 12-core-per-socket cluster would cost $494,928 plus an additional 25% annually for SA, making the 5-year cost for the same hardware environment in excess of $1.1 million.

That's a 300% increase in costs for the new licensing model.

Hmmm.... Shall we now call per-core licensing the SQL Tax?

Thursday, October 20, 2011

auto-elevate in win7

I've had to deal with a poorly-written application for quite a few years: it misbehaves by requiring Administrative rights when running. I've spent many hours pouring over the capture from (SysInternals) procmon without success: the application just won't reveal what trigger is needed to let it run in a low-security context.

Many sysadmins might question how this app ever got accepted into our environment with such a huge security flaw. The answer is simple: corporate policy didn't include running all desktops in limited-user mode. We still had a large selection of systems running on Windows 98 (for which "basic user" was not an option), and allowed users to run on Windows 2000 and Windows XP as local admins. We never caught the limitation during initial acceptance testing.

We were finally standardized on Windows XP when the policy change came that allowed us to switch end users from administrative to limited-user, but because the application was in limited distribution through our user base, it wasn't in the original test cases for switching to limited users. After the handful of users started submitting the same issue, we spent a while troubleshooting the app before we realized the common thread: it misbehaved only when running in the context of a limited user. While looking for a solution, we left the handful that required the app to continue to run their sessions in administrative mode. Remaining an administrative user was not an acceptable solution.

Luckily, Windows XP provides the "runas" utility, which permitted us to create a dedicated domain user that could have local admin rights as well as network access (a requirement of the application). With some limited, additional configuration, the special user account credentials could be used in an obfuscated batch file, and the primary user account could remain "limited". It worked beautifully.

Enter Windows 7.

Actually, the problem started with Windows Vista and the introduction of UAC (user account control), but because we never accepted Vista into the corporate environment, it wasn't an issue until Windows 7.
Being security conscious, we never considered disabling UAC for systems; however, that nicety became a burden on our use of our misbehaving application and the XP-type workaround: We could still use the alternate user, but UAC remained a barrier to the application, even when logged on as a local administrator.
So we experimented with ways to get an elevated session:
  • We tried 3rd-party tools, but they didn't work unless you were already in an administrative session
  • We tried "XP Mode", which was fine as long as we didn't try to access network resources; the standard user in the virtual environment is a local administrator for the system—something that should bother everyone using it.
After much trial-and-error, we discovered that a "nested" execution would work:
  1. we use "runas" to create the execution environment for an administrative user
  2. inside the session "bubble" that runas creates, we use the 3rd-party tool "NirCMD" to launch the pesky application in an elevated session.
The shortcut looks a bit like this:

runas /user:domain\special /savecred "c:\windows\system32\nircmd.exe elevate c:\progra~2\pesky\pesky.exe"
You can get nircmd.exe at nirsoft.net; they have a number of nice, free utilities that can make your life easier.

The solution isn't perfect—a basic UAC prompt is still displayed—but it requires no user to remember alternate credentials. There are also setup requirements for preparing the administrative user's local profile (for network printers) and saving the administrative user credentials (prompted at first run), but until we can retire the application, we now have a working solution.

UPDATE: Changed link for NirSoft; the original post was incorrect.

Wednesday, September 28, 2011

iPhone Battery Drain, revisited

It happened again. I earlier blogged about the situation where my iPhone started eating the battery so fast that it was actually hot to the touch. Again, the issue was near-continuous network access to my home Exchange server (over ActiveSync), but this time I was able to resolve the issue by disabling calendar sync (which deleted all the calendar entries for that connection) instead of deleting the whole profile.
As soon as the calendar stopped being sync'd, the high network utilization went away; re-enabling the sync brought back the calendar items without causing the utilization problem.

Friday, September 16, 2011

iomega ix2-200 NAS non-cloud to cloud upgrade

UPDATE: DO NOT attempt to adapt this process to update an ix4 to the cloud-OS version!
If you do so, the upgrade will apparently attempt to update the BIOS of the ix4, and there appears to be a sufficient difference between the two products (cloud, non-cloud) that you will end up "bricking" your ix4. This happened to me (yes, I know I was taking a big chance) and someone else I know. Having a complete set of pristine, factory-reset drives will not give you the ability to revert to the non-cloud OS if you have a problem with the upgrade.
For the record, the system I started with had a sticker on the flash chip indicating that it was running the "V1.0.7" code.
The only known fix is a "low-level format" back at iomega support.

Standing on the shoulders of others...

So you've got a "non-cloud" version of the iomega ix2-200, and you're miffed that iomega doesn't officially support an upgrade path to convert it to the newer "cloud" editions. Maybe you want some of those cloud features, or maybe you have a Mac with Lion, which apparently isn't supported on the non-cloud models.
The upgrade can be accomplished; however it is destructive. You will not be able to perform an in-place upgrade with this technique, although you will be able to "get back" to having the original equipment—if that's what you desire.

What follows is a recipe that worked for me; your mileage may vary.

Required Hardware:
  • iomega ix2-200 (duh!)
  • Blank, FAT32-formatted USB thumbdrive with a drive activity light, 2GB or larger.
  • pin, toothpick or other small, stiff wire that can be used to press and hold the reset button on the ix2 for ~90 seconds.
Optional Hardware:
  • New hard drives. This is a prime opportunity to upgrade a 1TB or 2TB (raw) model to a 4TB or 6TB unit; it also gives you a fallback position in the event you brick the thing while working with the new drives. If you go this route, however, do not try to improve performance by switching to 7200RPM drives: The heat output of those drives is too high for the tiny fan in the chassis to handle. Stick with "green", variable RPM drives, and you should be okay.
  • USB-to-SATA adapter. This eliminates the need to crack the case of a desktop machine (for access to the SATA ports) to clear a drive that will be re-used for the conversion.
Required Software:
  • Linux distribution with openssh, tar, md5sum, gunzip and the ability to mount files to a loopback device. Believe it or not, your ix2 itself will fit the bill if you don't otherwise have a linux distro handy; all you need is SSH access, and you're golden. This recipe assumes the use of the ix2.
  • Latest/greatest upgrade of the ix2-200 "cloud edition" firmware from iomega. As of this writing, the most-current version was 3.1.14.995. The firmware comes in an encrypted tarball, but your linux distro will make short work of that little problem.
Preparation:
  1. Prepare the ix2 for conversion: Copy all your data to another storage medium. If you brick your ix2, you don't want to be left hanging in the cold.
  2. Create the conversion tarball.
    1. Create a new share on the ix2. Copy the firmware image from iomega to the share.
    2. Save the following code as a shell script in the same place:
      ifw=./ix2-200-3.1.14.995.tgz
      ofw=${ifw%.tgz}-decrypted.tar.gz
      ix2=${ifw%.tgz}-files
      
      mkdir -p $ix2/images
      mkdir -p $ix2/update
      mkdir -p $ix2/apps
      
      openssl enc -d -aes-128-cbc -in $ifw -k "EMCNTGSOHO" -out $ofw
      tar xzvf $ofw -C $ix2/update/
      
      imgs=$(find $ix2/update/)
      for img in ${imgs} ; do
        if [ -f $img.md5 ] ; then
          mv $img $ix2/images/
          mv $img.md5 $ix2/images/
        fi
      done
      
      mount -o loop,ro $ix2/images/apps $ix2/apps
      cp -p $ix2/apps/usr/local/cfg/config.gz $ix2/images/
      umount $ix2/apps
      gunzip $ix2/images/config.gz
      
      img=$ix2/images/config
      md5=$(md5sum $img)
      md5=${md5% *}
      md5=${md5% }
      echo "$md5" > $img.md5
      
      cd $ix2/images/
      tar czvf ../ix2-boot.tgz *
      
      You will need to edit the first line of the script to match the filename of the firmware tarball you placed in the folder with the script.
    3. Log on to the ix2 using SSH. (the first part of this post will walk you through gaining SSH access to your ix2)
    4. Verify you have an available loopback device to use as a mountpoint: losetup -f
      • if losetup indicates that there are no free loop devices, you need to create the next one in sequence.
      • Determine the next-needed loop device with: losetup -a
        The output will probably look a bit like this:
        root@ix2:/# losetup -a
        /dev/loop0: [0900]:15970 (/sysroot/boot/images/apps)
        /dev/loop1: [0900]:47905 (sysroot/boot/images/config)
        /dev/loop2: [0900]:15972 (/sysroot/boot/images/oem)
        
      • As indicated above, the first 3 loops are in use (loop0 through loop2), so the next one needed is loop3.
      • Use the following command to make loop3 (the 4th loop device):
        mknod -m 0600 /dev/loop3 b 7 3
    5. Change to the directory of the share you created:
      cd /mnt/soho_storage/samba/shares/sharename
    6. Make the script executable:
      chmod 700 scriptname
    7. Execute the script:
      ./scriptname
      The script will take a while to run: the original tarball must be unpacked, several files get copied, a new tarball is built. It's time-consuming, especially on low-powered hardware like the ix2. But nothing you're doing is affecting the existing system; you're simply using a handy linux environment to get some work done.
    8. The final result will be a new file in the *-files folder called ix2-boot.tgz. Back on your main workstation, copy this new tarball to your USB drive in the following directory tree:
      \emctools\ix2-200d_images\
    9. Exit the SSH shell
  3. The drives that will be targeted for the conversion must be clean/clear drives; preferably, they will be new drives that have never been used, with no existing partition table. If you're going to re-use the existing ix2 drives, or re-use drives that you've had in another system, you first need to wipe them out: delete any existing partitions. The conversion won't work if you have data on the drives. This is where your mettle as a gadget geek gets tested: do you throw caution to the wind and wipe the ix2 drives, or do you get new drives and "play it safe?"
  4. Place the new/wiped drives into the ix2.
  5. Plug in the USB drive to any of the three ports.
  6. Press and continue to hold the reset button on the back of the unit while plugging in the power supply. The ix2 will automatically boot when power is applied, and if you don't keep the reset button depressed for the entire boot sequence, you will not activate the installation. Watch your USB activity light; although it will come on when the unit activates the drive, you need to keep the reset button depressed until regular activity (i.e., blinking) is observed. In my experience, this takes approximately 90 seconds from the moment you plug in the power supply.
  7. Wait. The update will occur, and you'll see plenty of activity for the drive indicator on both the USB drive and the ix2. After less than 10 minutes, however, the ix2 will automatically power off.
  8. Remove the USB drive. Reconnect the network. Power up the ix2.
If you successfully updated the image, the indicator lamps on the front of the unit will blink furiously for a few minutes. Once the main power indicator (bottom lamp) is solid, you should be able to reach the management console via browser (Hopefully, you have some way to tell what the IP address is; your router or other DHCP server should have a way to indicate the address—I use a DHCP reservation, so I always get the same address, regardless of configuration state for the unit).

If you don't get that far—the bottom lamp blinks, the drive lamp blinked a couple of times, but otherwise, no activity—don't despair: I've seen other postings that indicate success when performing the procedure twice; I never needed it (I've repeated the update three times so far). Worst-case: you pull the drives and replace your original ix2 drives. Nothing is stored locally on the device, so a clean drive swap is possible.

The second alert lamp will blink until data protection is complete (either because you switched to a "none" option or it finished setting up the mirror); you can expect the drive activity lamp to be lit solid during the data protection phase.

By default, the firmware wants the ix2 to be using mirrored protection. You can alter that through the setup, and with the cloud version, you have the option of using "linear" or "raid0" if you want to get optimal performance at the expense of data protection.

Once you have the device configured the way you prefer, recreate your shares and iscsi volumes and put your data back on the unit: you're now Cloud-Ready!

The science and tech fields have historically worked by advancing based on prior works; we don't reinvent the wheel, we take the various works of our predecessors and advance "the art" through mash-ups that fail more often than they succeed.


This is one of those mash-ups, and thanks go to the following...

Thursday, September 15, 2011

iomega px6-300d: first look

The iomega px6-300d is a storage appliance that can be provisioned with up to six SATA drives, both traditional rotating-disk and SSD. It is one of four NAS/SAN appliances in the "px" line from iomega, and is the largest-capacity "desktop" model.
Under the hood, it contains a dual-core Intel Atom processor (running at 1.8GHz) with 2GB RAM, sports a pair of Gigabit Ethernet ports, three USB ports (1 x USB 3.0, 2 x USB 2.0), and runs a customized version of Linux called "EMC LifeLine." The unit can be purchased with various pre-installed drive configurations (6, 12 & 18TB raw capacity); along with the px4 models, iomega has also (finally!) offered a "diskless" configuration.
Retail Box
I purchased a diskless unit ($750 from B&H) for use in my home lab, and independently acquired a matched set of six 2TB Hitachi 7200RPM SATA-III drives (HDS723020BLA642, $110 from NewEgg). This 12TB (raw) setup cost me less than $1500; in contrast, the list price for a pre-populated 12TB unit is $3,299.99.
The unit came in a nice retail box, and was well-padded and packed. In addition to the unit itself, the package contained the external power supply, power cord, CAT5e Ethernet cable, a "Quick Start Guide" and a "Solutions CD."
px6-300d front
px6-300d rear
The front of the unit provides drive access, power button, information display (and a pair of input buttons) and one USB port; the rear of the unit has a pair of 90mm fans, the power connection, reset button, Gigabit Ethernet ports and a pair of USB ports. The rear also sports (what appears to be) a surprising and undocumented x1 PCIe expansion slot.
The Quick Start Guide instructs the owner to install software from the Solutions CD, which will then assist in installing the array; having experience with the ix line, I simply created a DHCP reservation (the MAC address is documented with a sticker on the rear of the unit), connected it to Having purchased a diskless unit, I was curious to see how the system would behave when booted with no drives. True to form, this situation was handled gracefully.
front door open, showing drive trays
drive trays with 2.5", 3.5" drives

trays line up SATA connector
Up to six drives can be installed using supplied hot-swap trays, which support both 3.5" and 2.5" form-factor drives. In addition to the matched drives, I also had a 2.5" SSD available for testing, but the supplied screws didn't fit the drive properly; it was a bit of a struggle to find screws that would not only work with the drive, but also work with the sled: the smaller drives must be attached to the sled from the bottom, so care must be given to make sure the screws do not protrude too far from the bottom of the sled.
The unit I received was pre-installed with an out-of-date firmware (3.1.10; 3.1.14 most current as of this posting), which booted correctly even without any drives installed in the unit. This is a distinct departure from the "ix" line of NAS boxes, which require at least one functioning drive to store the firmware (which also explains why the older lines didn't support a diskless purchase option). The management interface will not allow you to do anything until at least one drive is installed, however, so that was the first order of business.

After installing the first drive, the management interface permitted me to add the unit to my Windows domain, and I also went through the exercise of downloading and updating the firmware. This is a very easy process, so novice users shouldn't be afraid of it.
The unit supports a wide variety of RAID levels, and the user can combine arbitrary combinations of drives into "storage pools" so that the unit can provide different levels of performance based on your needs, so I will be testing the various permutations with increasing spindle counts.
Drive
Count
Storage Pool Protection Options
1None
2None, RAID0, RAID1
3None, RAID0, RAID5
4None, RAID0, RAID1/0, RAID5
5None, RAID0, RAID5
6None, RAID0, RAID1/0, RAID5, RAID6
Once you create a storage pool, you can create one or more NAS volume (for CIFS, NFS or other share-types) or iSCSI volumes in it. When creating a file-sharing volume, the unit can recognize space utilization on a file-by-file basis, and will display free/used space as one would expect. A volume used for iSCSI will appear to be 100% allocated as soon as it is created, even if no initiator has ever connected and accessed the LUN. Additionally, multiple shares can be created for a single file-sharing volume, but there's a one-to-one mapping between an iSCSI volume and a target. Security for either file shares or iSCSI is optional; the unit defaults to read/write permissions for everyone.
There are a number of nice features that I'll investigate further, but the first order of business is performance testing. With luck, I'll learn that the device can scale with each added spindle; it will also be interesting to see how much of a performance hit the device will take when using RAID6 instead of RAID5 in the 6-spindle configuration.